RTE प्रतिपूर्ति दावा कैसे जमा करें सरकार के पास Inkwelly से
यह गाइड उन स्कूल अकाउंटेंट और प्रिंसिपल के लिए है जो RTE Act 2009 की धारा 12(1)(c) के अंतर्गत राज्य शिक्षा कार्यालय में प्रतिपूर्ति दावा प्रस्तुत कर रहे हैं। अंत में Inkwelly का दावा Pending से Submitted में बदल जाएगा, हर छात्र item verified होगा, और सरकार से मिला reference number दावे के साथ रिकॉर्ड हो जाएगा।
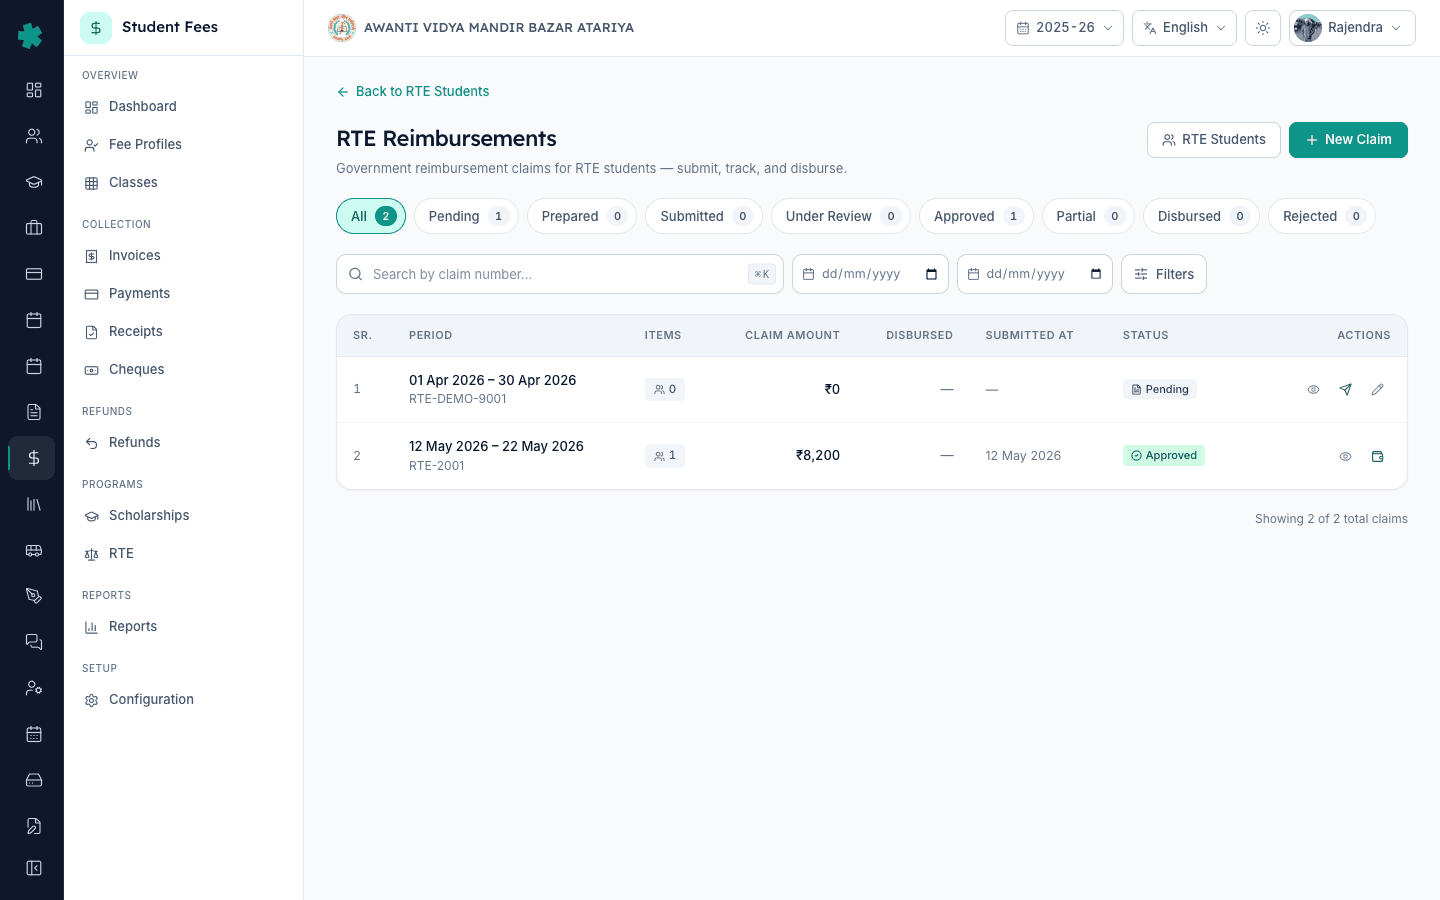
Inkwelly में RTE दावा जमा करने के लिए: Student Fee → RTE → Claims खोलें, तैयार दावा खोलें, हर छात्र item को attendance, ली गई फीस और RTE certificate से मिलाकर verify करें, फिर ऊपर दाईं ओर Submit Claim दबाएँ। Government file या portal का reference Submission Reference में paste करें और confirm करें। दावा Pending से Submitted हो जाएगा, item आगे edit नहीं हो पाएँगे, और Inkwelly आज की तारीख को submitted date के रूप में दर्ज कर देगा।
RTE Act 2009 हर मान्यता प्राप्त निजी अनुदान-रहित स्कूल को धारा 12(1)(c) के तहत आर्थिक रूप से कमज़ोर और वंचित वर्ग के बच्चों के लिए आरक्षित 25 प्रतिशत सीटों पर राज्य से प्रति-बच्चा प्रतिपूर्ति का अधिकार देता है। राज्य हर साल प्रति-बच्चा दर अधिसूचित करता है — 2024-25 सत्र के लिए यह राज्य और कक्षा के अनुसार ₹450 से ₹2,200 प्रति बच्चा प्रति माह के बीच रही — और स्कूल जिला शिक्षा कार्यालय में तिमाही या वार्षिक दावा दाखिल करते हैं। Inkwelly हर बच्चे की प्रतिपूर्ति-योग्य अवधि को एक claim row में bundle करता है ताकि स्कूल हर line verify करके एक consolidated file जमा कर सके।
1. तैयार दावा खोलें
बाएँ साइडबार से Inkwelly → Student Fee खोलें, फिर PROGRAMS के अंतर्गत RTE → Claims पर क्लिक करें। Claims पेज स्कूल के हर तैयार दावे को claim number, अवधि, छात्रों की संख्या, कुल राशि और मौजूदा status — Pending, Prepared, Submitted, Under Review, Approved, Partially Disbursed, Disbursed या Rejected — के साथ दिखाता है। Pending या Prepared status वाले दावे की row पर क्लिक करके detail पेज खोलें। ऊपर header में claim number, period और status pill के साथ Submit Claim, Edit और Delete बटन दिखेंगे।
2. हर छात्र की राशि Items टैब पर जाँचें
Items टैब पहले से चयनित होता है। हर row में student name, admission number, class chip, claim period, per-student claim amount और Verified column में Pending या Verified pill दिखती है। हर row को स्कूल के फीस ledger से मिलाएँ — claim amount Tuition और बाकी reimbursable head का योग होना चाहिए, उस period में परिवार से ली गई किसी भी फीस को घटाकर। Table के नीचे कुल claim और items की संख्या प्रिंट होती है, जिसे ऊपर summary card से मिलाएँ। प्रति-छात्र राशि के स्रोत को समझने के लिए [#ref:cmpcg48ql033dv535lsn21rn2] देखें।
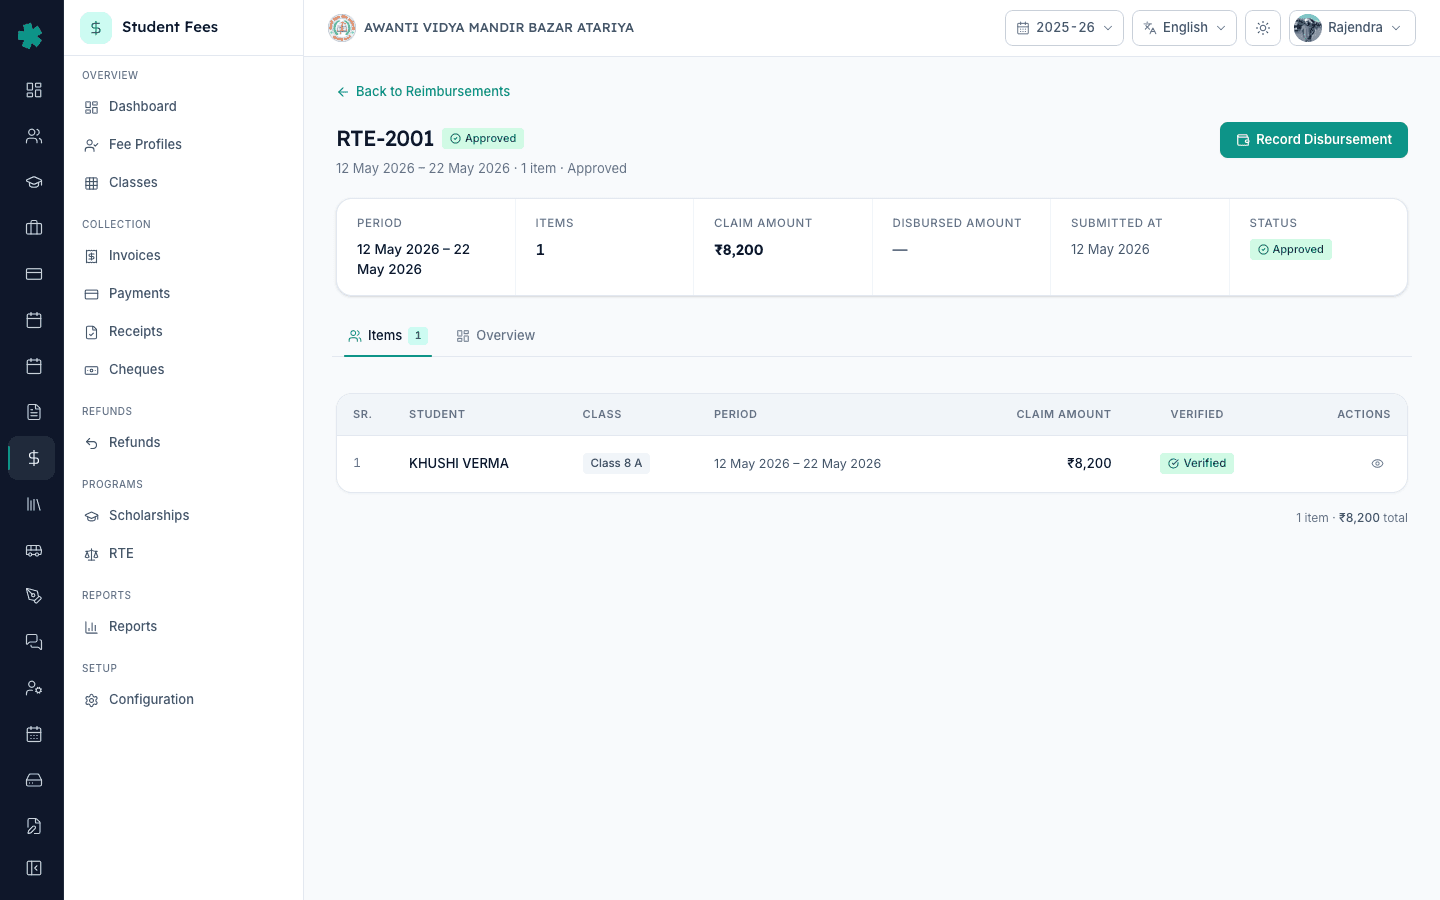
3. हर बच्चे के लिए supporting papers इकट्ठा करें
वापस Inkwelly में verify करने से पहले हर छात्र की file में तीन papers लगाएँ: claim period का attendance register (राज्य 75 प्रतिशत उपस्थिति अनिवार्य रखता है), ली गई फीस का ledger entry जो दिखाए कि बच्चे से RTE के अंतर्गत कोई फीस नहीं ली गई, और admission के समय BSA या block office से मिला RTE eligibility certificate। ये तीन papers जिला शिक्षा कार्यालय audit के समय माँगता है; Inkwelly इन्हें upload नहीं करता, स्कूल इन्हें भौतिक claim file में रखता है।
4. हर item को एक क्लिक से verify करें
Actions column में पहली unverified row पर हरे tick icon पर क्लिक करें। Inkwelly Verify Claim Item dialog खोलता है जिसमें ऊपर छात्र का summary card दिखता है — name, admission, class और claim amount। Verification Notes में एक छोटा note टाइप करें जैसे Attendance 88 percent, fees waived, RTE certificate UP-RTE-2024-0117 on file ताकि audit ledger में cross-check दर्ज हो जाए। Verify दबाएँ। Row की pill Pending से हरी Verified badge में बदल जाएगी। हर item के लिए दोहराएँ — एक भी item Pending रह जाने पर दावा submit नहीं हो सकता।
5. ऊपर दाईं ओर Submit Claim दबाएँ
जब हर item पर हरी Verified pill दिख जाए, claim header के ऊपर दाईं ओर Submit Claim दबाएँ। Inkwelly Submit Claim dialog खोलता है जिसमें Claim Period, Claim Number, Total Items, Claim Amount और एक text input — Submission Reference — दिखता है। Dialog चेतावनी भी देता है कि submit होने के बाद items आगे edit नहीं हो सकते और state office दावे की समीक्षा एवं स्वीकृति के बाद ही disbursement दर्ज हो पाएगा।
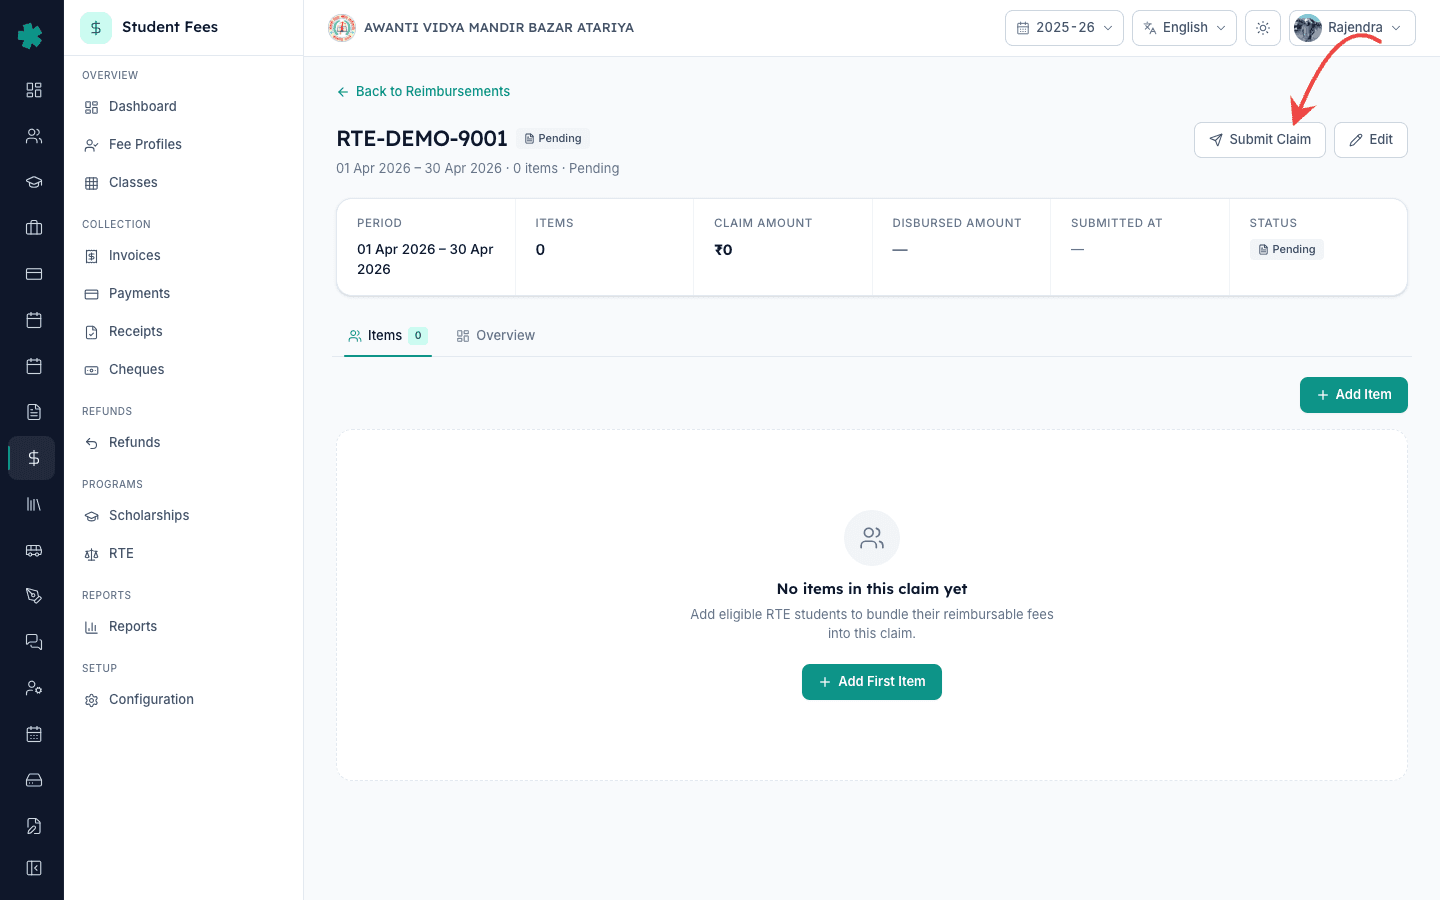
6. Government का tracking reference paste करें
प्रिंट किया हुआ claim summary और supporting papers state portal या जिला शिक्षा कार्यालय में जमा करें। Portal acknowledgment number लौटाता है — Uttar Pradesh UP-RTE-YYYY-NNNN format देता है, Madhya Pradesh और Maharashtra GOV/RTE/2024/1234 जैसा file number देते हैं। उस exact reference को Submission Reference field में paste करें — खाली छोड़ना मान्य है पर audit trail अगली तिमाही समीक्षा में कमज़ोर पड़ जाता है। Submit Claim दबाएँ। Inkwelly आज की तारीख को submitted date के रूप में दर्ज करता है और toast आता है Claim submitted to government।
7. Submitted status और timestamp confirm करें
Claim header की pill Pending या Prepared से नीली Submitted badge में बदल जाती है। Summary card पर अब Submitted At date दिखती है, Submission Reference Overview टैब के About section में आती है, और Items table का action column हर row पर सिर्फ़ देखने वाला eye icon दिखाने लगता है। Submit Claim बटन की जगह Edit बटन आ जाता है — state के पास Under Review रहते हुए header के छोटे सुधार अब भी संभव हैं। दावा अब जिला शिक्षा कार्यालय की प्रतिक्रिया का इंतज़ार कर रहा है, जिसे Inkwelly status Approved होने पर दिखाएगा और तब disbursement दर्ज किया जा सकेगा।
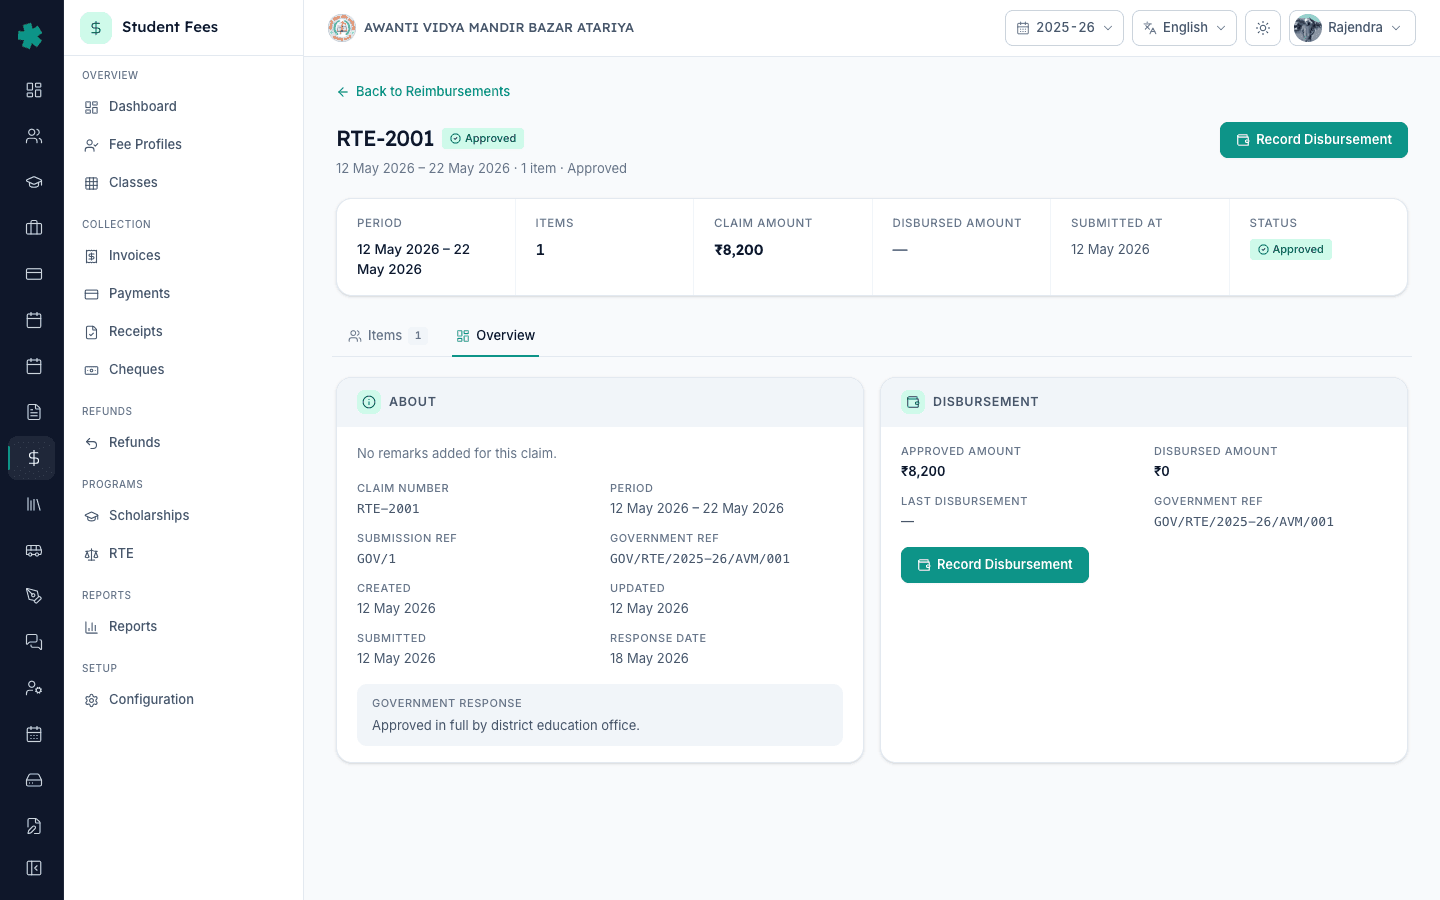
अगला कदम — जब जिला शिक्षा कार्यालय approved amount के साथ जवाब दे, [#ref:cmpcg66uh034av535xoltnvc6] का अनुसरण करके इस दावे के विरुद्ध भुगतान दर्ज करें और प्रति-छात्र disbursement tag करें। अगले period के लिए नया दावा तैयार करने वाले स्कूल [#ref:cmpcgstq903l9v535oflghuh6] पढ़ें — scholarship donor workflow अक्सर RTE top-up funding से जुड़ता है। प्रति-छात्र राशि बनाने वाले फीस प्लान की मूल सेटिंग के लिए [#ref:cmpcg3yww032zv535sb03l510] देखें।
Inkwelly Student Fees को काम करते हुए देखें
अक्सर पूछे गए सवाल
7 सवालSubmission ke baad RTE reimbursement aane me kitna samay lagta hai?
अधिकांश भारतीय राज्य RTE दावे तिमाही चक्र में process करते हैं, पर स्कूलों तक वास्तविक disbursement submission के छह से अठारह महीने बाद पहुँचता है। Uttar Pradesh और Madhya Pradesh में सबसे ज़्यादा देरी होती है; Maharashtra और Karnataka अपेक्षाकृत तेज़ हैं। स्कूलों को submitted claim को एक लम्बी अवधि के receivable की तरह मानना चाहिए और Student Fee dashboard के Claim Tracker से Submitted, Under Review, Approved और Disbursed तक उसकी प्रगति देखनी चाहिए।
क्या submitted होने के बाद RTE claim item edit किया जा सकता है?
नहीं। दावा Submitted होते ही Inkwelly हर item को lock कर देता है — Actions column में सिर्फ़ eye icon दिखता है और API भी आगे edit reject कर देती है। Header के Submission Reference और Government Reference field editable रहते हैं ताकि state office के दोबारा reference जारी करने पर उसे अपडेट किया जा सके। अगर राज्य दावा reject करता है, admin reset के बाद status वापस Pending पर आने पर items फिर editable हो जाते हैं।
Inkwelly me RTE claim kaise submit kare?
Student Fee menu kholiye, sidebar me RTE → Claims par jaiye, Pending ya Prepared claim ko click kijiye. Items tab par har student row ke green tick icon par click karke Verify Claim Item dialog se ek-ek karke verify kijiye. Sab items green Verified ho jaane ke baad top-right Submit Claim button dabaiye, government portal ka acknowledgment number Submission Reference field me paste kijiye aur Submit Claim dabaiye. Status Submitted ho jayega.
Verification mein kya documents chahiye?
Teen documents chahiye har RTE student ke liye: claim period ka attendance register (75 percent attendance mandatory hai), fees collected ledger ka entry yeh dikhane ke liye ki bachhe se koi fee nahi li gayi, aur BSA ya block office se mila RTE eligibility certificate. Inkwelly ye papers upload nahi karta — physical file me rakhe jaate hain. Verify Claim Item dialog me Verification Notes field me reference number aur attendance percent type kar dijiye taaki audit trail clear rahe.
अगर कुछ items अभी verified नहीं हुए हैं तो क्या होगा?
Submit Claim API UNVERIFIED_ITEMS error लौटाता है और दावा Submitted नहीं होता। Inkwelly का Submit Claim dialog एक लाल बैनर दिखाता है — `All items must be verified before submission`। Dialog बंद करके Items टैब scroll करें और हर उस row पर हरे tick icon पर क्लिक करें जिस पर अभी Pending pill है। हर item Verified होने के बाद Submit Claim दोबारा दबाएँ — dialog अब action स्वीकार कर लेगा।
कौन से राज्य Inkwelly का claim summary directly स्वीकार करते हैं?
Inkwelly हर छात्र की राशि, अवधि, admission number और class के साथ एक consolidated claim file बनाता है — वही fields जो हर राज्य का RTE portal माँगता है। Uttar Pradesh, Madhya Pradesh, Maharashtra, Karnataka, Rajasthan और Tamil Nadu इस printed summary को physical file के cover sheet के रूप में जिला शिक्षा कार्यालय में स्वीकार करते हैं। Portal में हर बच्चे की entry data-entry operator manual रूप से करता है; Inkwelly का summary master worksheet होता है जिससे वह transcribe करता है।
Kya ek hi claim me alag-alag class ke RTE students daal sakte hain?
Haan. Ek claim me KG se Class 8 tak ke saare RTE students ek saath bundle ho sakte hain — Inkwelly har row me class chip aur per-student amount alag dikhata hai. Lekin agar state per-child rate class-wise alag hai (jaise UP me Class 1-5 ka rate Class 6-8 se kam hai), to office aksar do alag claims banata hai taaki audit me clarity rahe.
आपको ये भी पसंद आ सकता है
2 लेखस्रोत व संदर्भ
- Right of Children to Free and Compulsory Education Act, 2009 — Section 12(1)(c) · देखा गया 19 May 2026
धारा 12(1)(c) निजी अनुदान-रहित स्कूलों में EWS और वंचित वर्ग के बच्चों के लिए 25 प्रतिशत आरक्षण और राज्य द्वारा प्रति-बच्चा प्रतिपूर्ति का प्रावधान करती है।
- Ministry of Education — RTE Act 2009 Model Rules (Reimbursement procedure) · देखा गया 19 May 2026
केंद्र सरकार द्वारा जारी model rules हर राज्य को प्रति-बच्चा reimbursement rate और तिमाही claim submission procedure जिला शिक्षा कार्यालय के माध्यम से चलाने को निर्देशित करते हैं।
- Ministry of Education — UDISE+ Data Capture Format (RTE Section) · देखा गया 19 May 2026
UDISE+ स्कूलों से हर साल RTE छात्र संख्या और reimbursement claim status report करवाता है, जो Inkwelly में मौजूद per-student claim record से मेल खाता है।
Inkwelly आपके स्कूल पर — खुद देखें
30 मिनट का डेमो। आपके मौजूदा ERP को आपके साथ खोलकर, कॉल पर ही आपका डेटा Inkwelly में लोड करते हैं। कॉल ख़त्म होते-होते एक तय तारीख़ का गो-लाइव प्लान आपके हाथ में।