A4 fee receipt template कैसे customise करें Inkwelly में
यह गाइड उन स्कूल अकाउंटेंट, फीस क्लर्क और ऑफिस administrator के लिए है जो हर दिन काउंटर पर अभिभावक को छपी हुई fee receipt देते हैं। अंत में आपके पास Inkwelly में एक A4 PDF receipt template तैयार होगा — स्कूल का नाम और logo, पूरा पता और संपर्क, ज़रूरी होने पर GSTIN और PAN, अधिकृत signature और verification QR के साथ — अगले counter collection के लिए तैयार।
Inkwelly में A4 fee receipt template customise करने के लिए: Student Fee → Configuration → Receipt Template खोलें, Branding section में Display Name और Logo सेट करें, Address & Contact भरें, Tax & Registration के अंतर्गत GSTIN और PAN जोड़ें, A4 / PDF Receipt पर जाकर signatory image upload करें, bank details और footer terms लिखें, Verification QR on करें और Save changes दबाएँ। यही एक template A4 PDF और thermal counter slip दोनों चलाता है।
Counter पर भुगतान के बाद parent जो एकमात्र कागज़ी प्रमाण घर ले जाते हैं वह fee receipt होती है, और प्रिंसिपल की मेज़ तक पहुँचने वाले अधिकांश विवाद ऐसी receipt से जुड़े होते हैं जिस पर स्कूल का पूरा registered नाम, पता या अधिकृत signature नहीं छपा था। Right of Children to Free and Compulsory Education Act, 2009 की Section 13 के अनुसार स्कूल को हर fee collection की receipt देनी होती है, और CBSE affiliation bye-laws affiliated स्कूलों से हर सत्र के लिए auditable financial records रखने की अपेक्षा करते हैं। Inkwelly का receipt template ऑफिस से छपने वाली हर receipt पर लागू होता है, इसलिए सत्र की शुरुआत में एक बार सही सेट करने से पूरे साल per-receipt गलतियाँ टल जाती हैं। यही template thermal counter slip भी चलाता है — जिसे sibling tutorial में अलग से बताया गया है — इसलिए यह एक बार का सेटअप है, हर printer के लिए अलग नहीं।
1. Configuration → Preferences के अंतर्गत Receipt Template खोलें
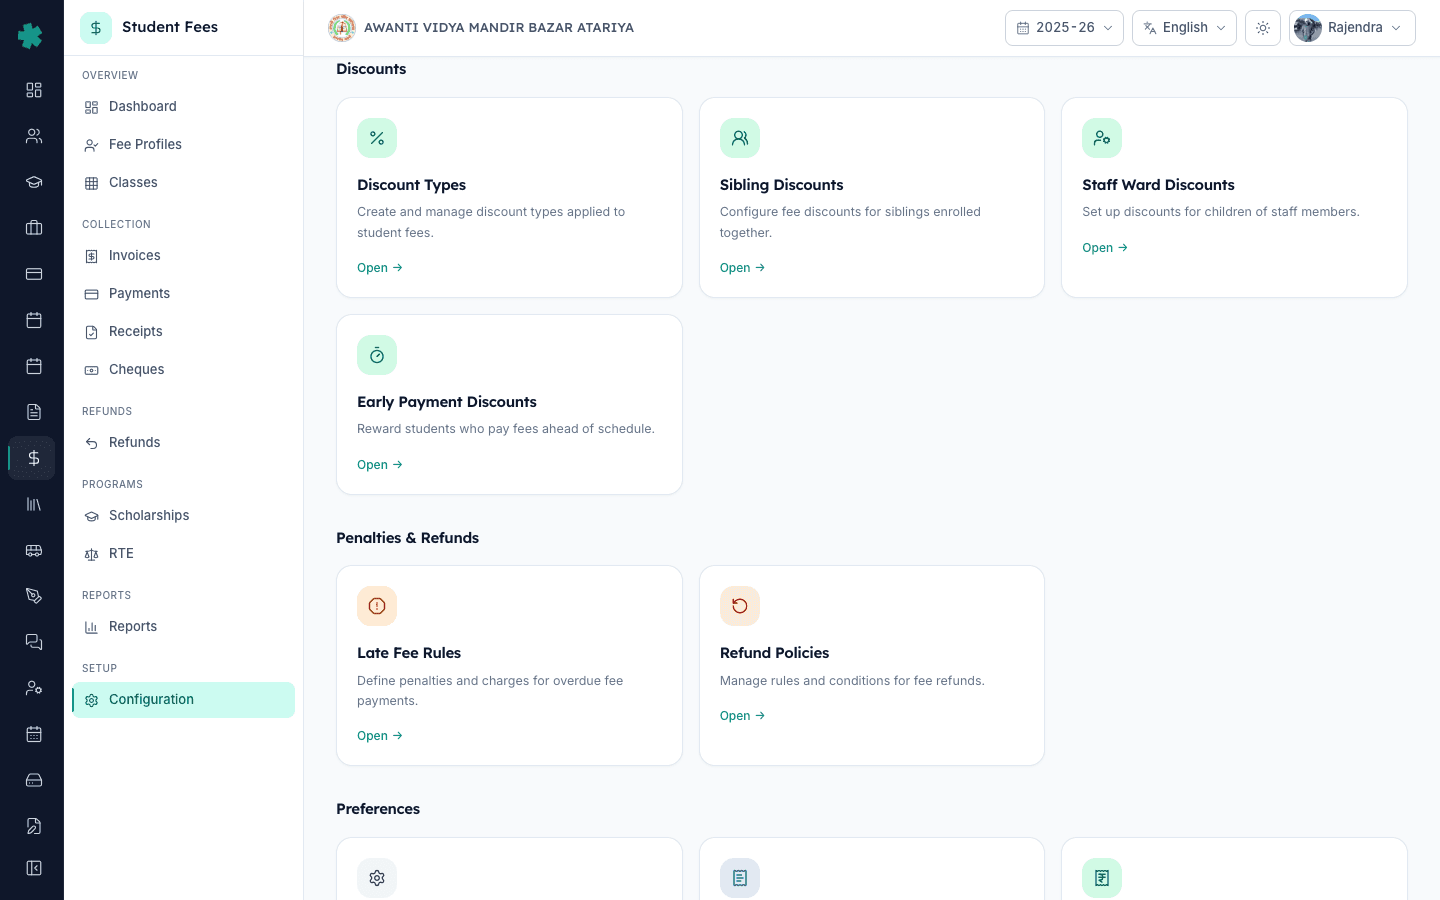
बाएँ साइडबार से Inkwelly → Student Fee खोलें, SETUP के अंतर्गत Configuration पर क्लिक करें, और नीचे Preferences section तक स्क्रॉल करें। Receipt Template टाइल Fee Settings और Invoice Template के पास होता है। Open क्लिक करें। Inkwelly आपको Receipt Template पेज पर ले जाता है, जहाँ बाएँ rail में पाँच sections हैं — Branding, Address & Contact, Tax & Registration, A4 / PDF Receipt और Thermal Printer। पहले चार A4 PDF receipt के लिए हैं; thermal setup एक अलग sibling tutorial में है।
2. Branding में display name और logo सेट करें
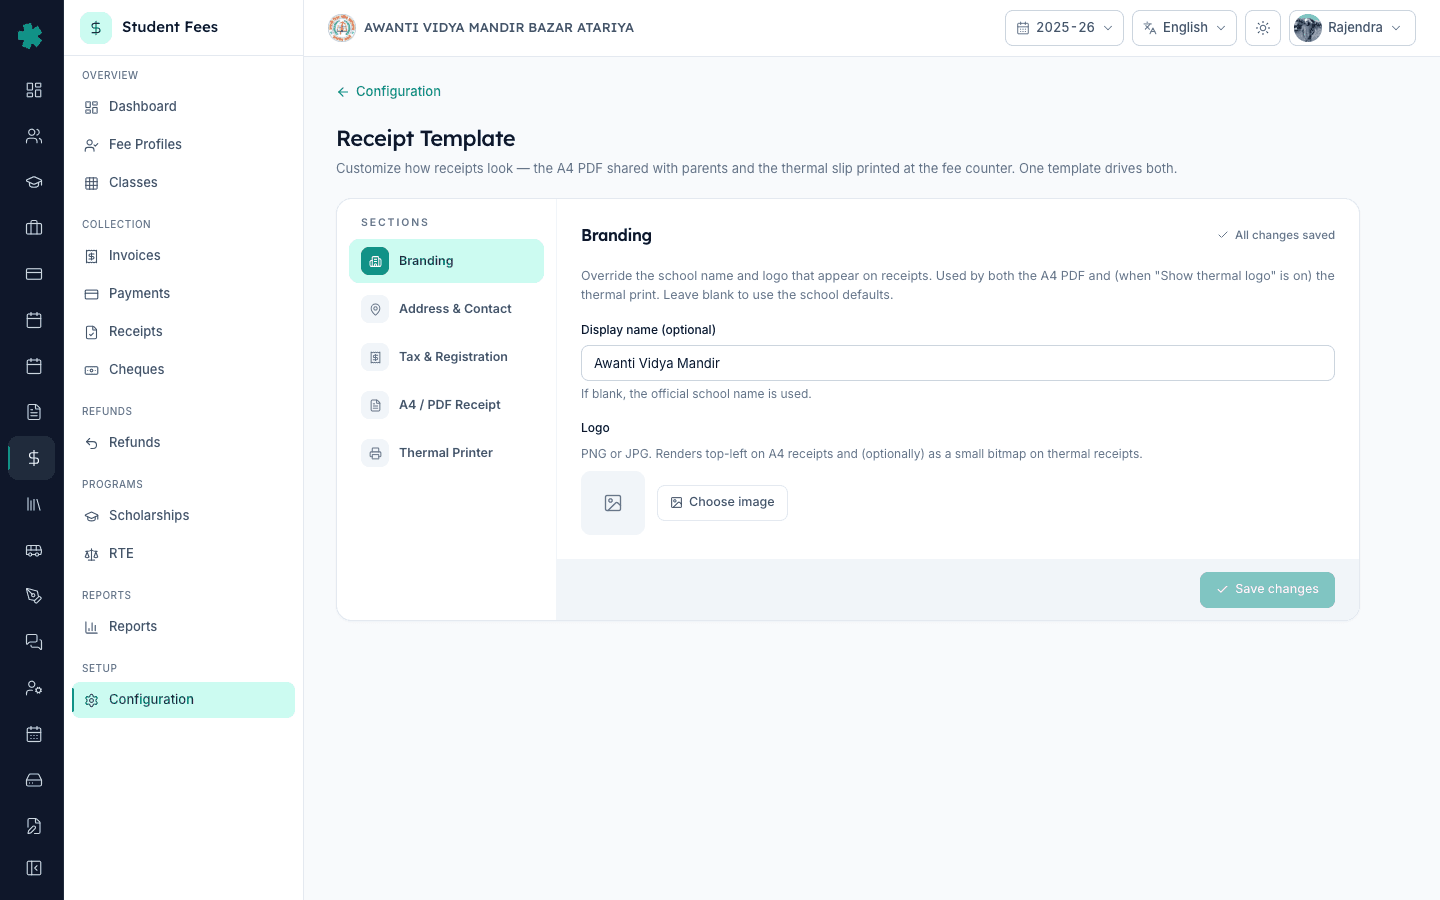
Branding section डिफ़ॉल्ट रूप से चयनित होता है। Display Name तभी भरें जब वह file पर मौजूद आधिकारिक नाम से अलग हो — ज़्यादातर स्कूल इसे खाली छोड़ते हैं ताकि receipts हमेशा registered नाम दिखाएँ। Logo के नीचे Choose image क्लिक करें और media library से PNG या JPG चुनें; A4 receipt में logo top-left पर छपता है और header band के अनुसार आकार स्वचालित हो जाता है। 500 KB से कम वाले logo सबसे तेज़ load होते हैं। यदि logo चौड़ा है, Inkwelly aspect ratio बनाए रखता है और कभी stretch नहीं करता। जैसे ही logo preview thumbnail में दिखता है, header में unsaved-changes pill on हो जाता है।
3. Address & Contact भरें
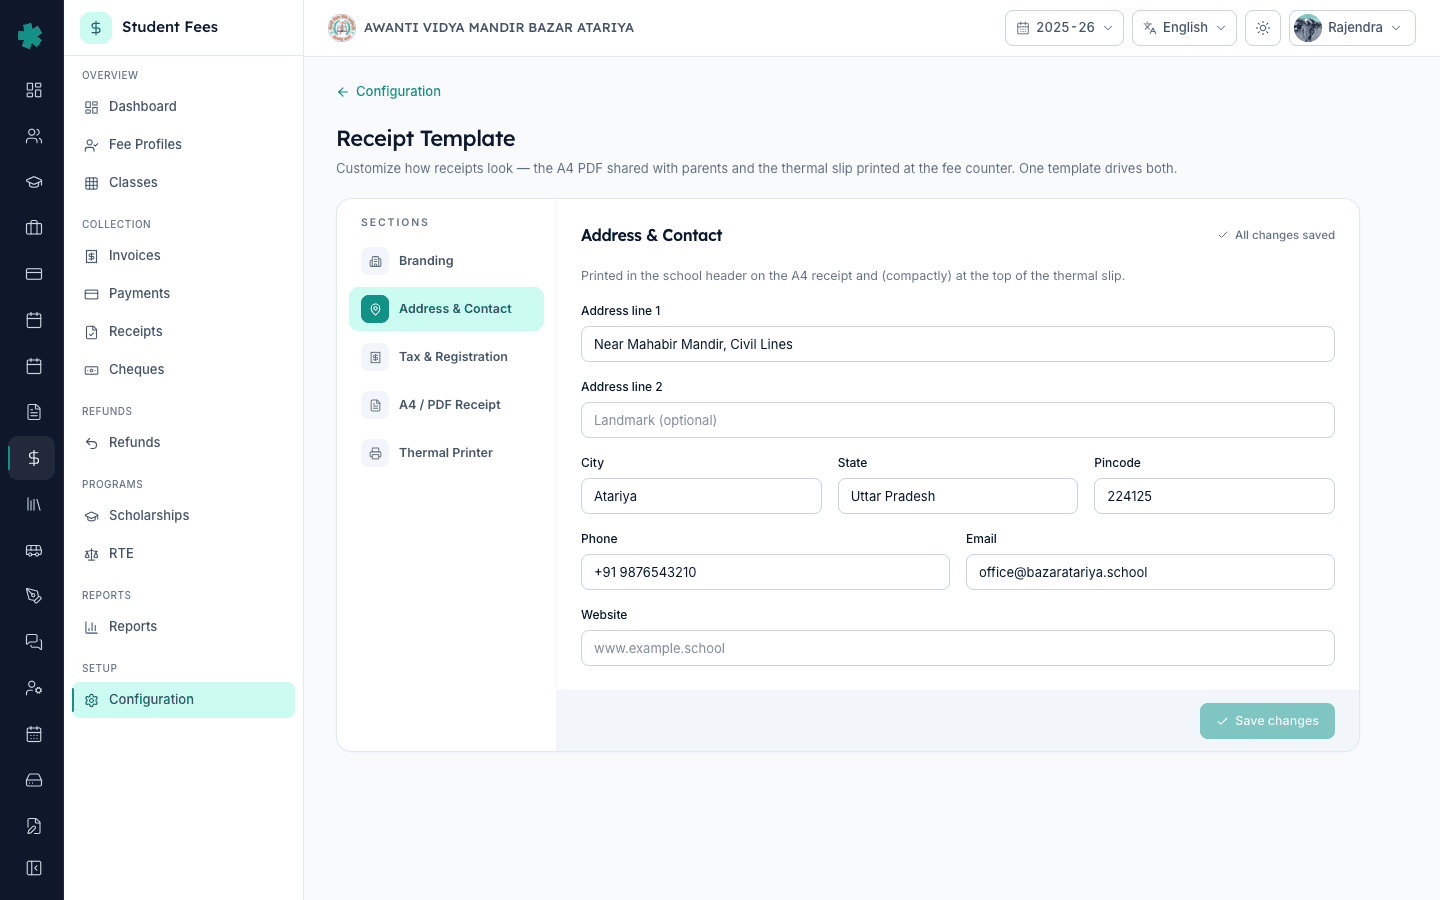
बाएँ rail में Address & Contact क्लिक करें। Address line 1 (सड़क, भवन, क्षेत्र) टाइप करें, landmark के लिए Address line 2, फिर तीन-column row में City, State और Pincode। अगले row में Phone और Email — स्कूल के आधिकारिक नंबर लिखें, किसी निजी मोबाइल का नहीं, क्योंकि विवाद होने पर parents यही प्रिंटेड नंबर मिलाते हैं। यदि स्कूल website रखता है तो Website भी भरें। Inkwelly इस block को receipt header में logo के बगल में छापता है, और pincode validation 20 character तक स्वीकार करता है ताकि किसी भी भारतीय राज्य के PIN+area code काम करें।
4. Tax & Registration में GSTIN और PAN जोड़ें
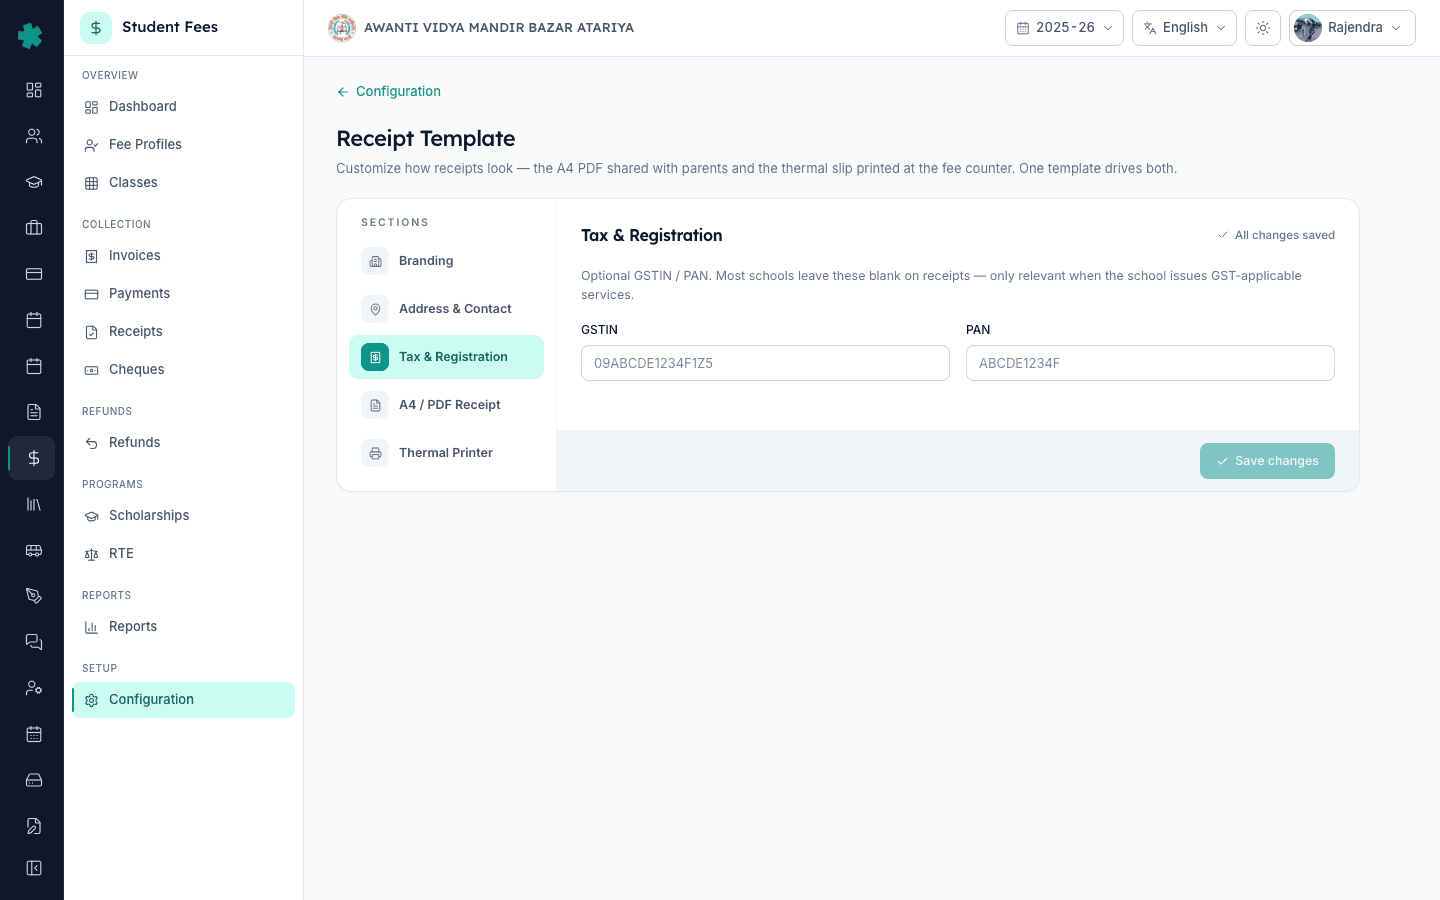
Tax & Registration क्लिक करें। GSTIN तभी भरें जब स्कूल parent जिस service के लिए भुगतान कर रहा है उसके लिए GST-registered है — uniforms, third-party transport, hostel — अन्यथा खाली छोड़ दें। ज़्यादातर CBSE day school tuition पर GST नहीं लेते। Inkwelly टाइप करते समय GSTIN अपने आप uppercase कर देता है, यानी 09abcde1234f1z5 बदलकर 09ABCDE1234F1Z5 हो जाता है। दूसरे field में स्कूल trust या society का PAN भरें — उन high-value receipts के लिए जहाँ parent के accountant को इसकी ज़रूरत हो। दोनों fields A4 PDF पर तभी दिखते हैं जब आप उन्हें भरें; खाली रहने पर printed receipt पर पूरा Tax block छिपा रहता है।
5. A4 / PDF Receipt पर जाकर body configure करें
बाएँ rail में A4 / PDF Receipt क्लिक करें। इस section में receipt body के पाँच blocks हैं — Signature, Bank details, Footer terms, PDF sections और Verification। यदि स्कूल bottom-right पर अधिकृत signature छपवाना चाहता है तो Show signature on करें; cashier या accountant के signature की transparent PNG upload करें, फिर Signatory name (जैसे Mr. Ramesh Kumar) और Signatory title (जैसे Cashier) टाइप करें। Show bank details off ही रखें जब तक प्रिंसिपल parent reference के लिए स्कूल account number छपवाना न चाहें। PDF sections block में Show payment breakdown, Show invoice summary और Show amount in words डिफ़ॉल्ट से on रखें — ये तीन details parent receipts पर सबसे पहले देखते हैं।
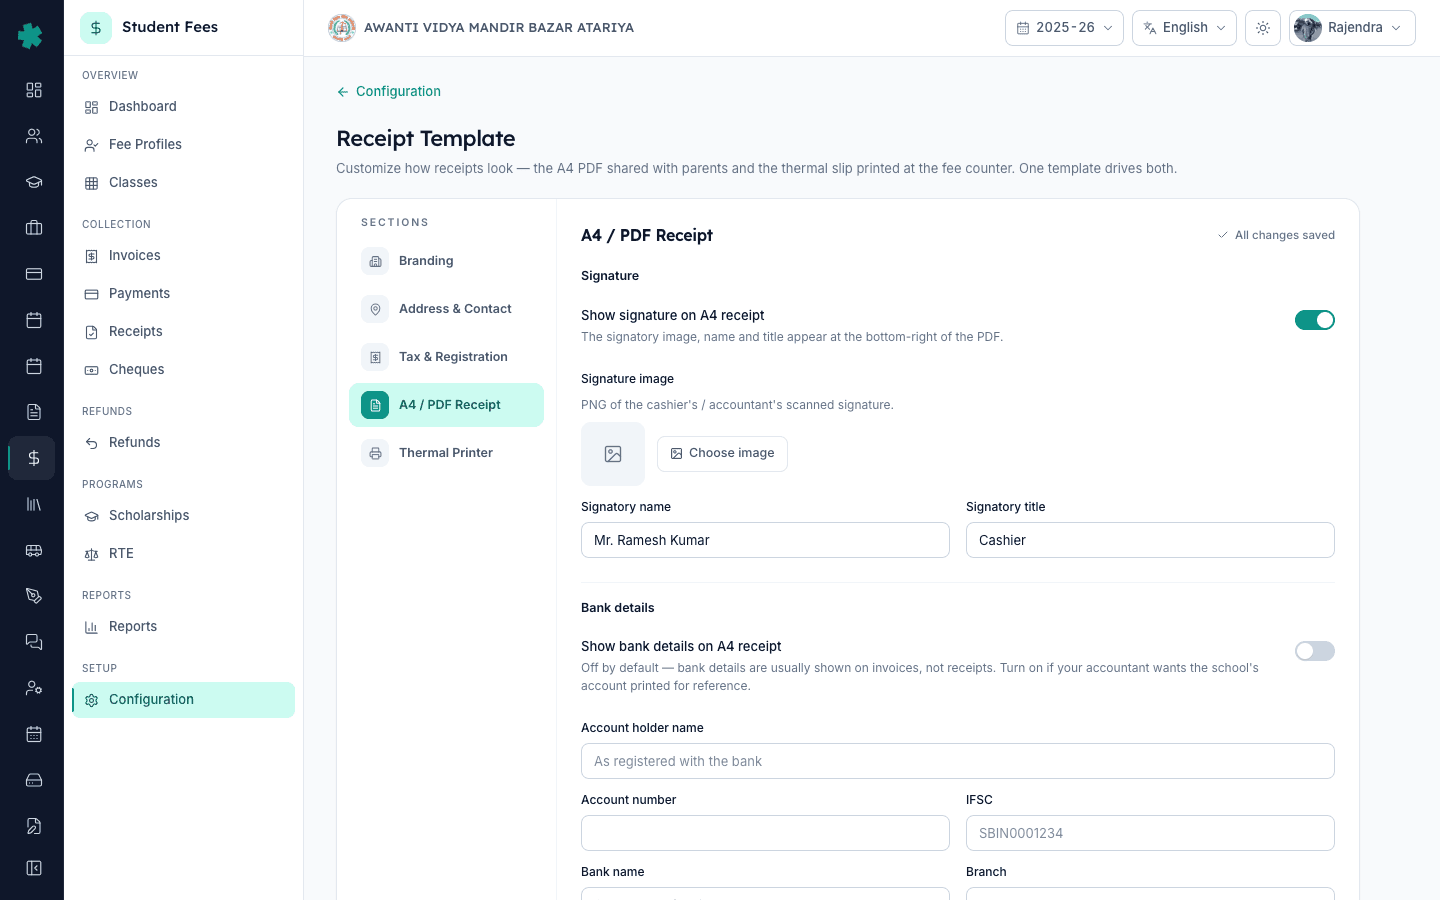
6. Footer terms लिखें और verification QR on करें
Footer terms तक स्क्रॉल करें और स्कूल के standard notes टाइप करें — उदाहरण: This is a computer-generated receipt, Cheques are subject to realisation, Original copy to be retained by parent। Line breaks जैसे टाइप किए वैसे ही रहते हैं, और field 2,000 character तक स्वीकार करता है। Verification block में Print verification QR on करें ताकि हर A4 receipt के header पर एक QR छपे जो /verify-receipt/[token] खोलता है। Parents और auditors किसी भी फोन कैमरे से QR scan करके पुष्टि कर सकते हैं कि receipt असली है और प्रिंट होने के बाद बदली नहीं गई — receipt पर सबसे उपयोगी anti-tampering सुविधा यही है।
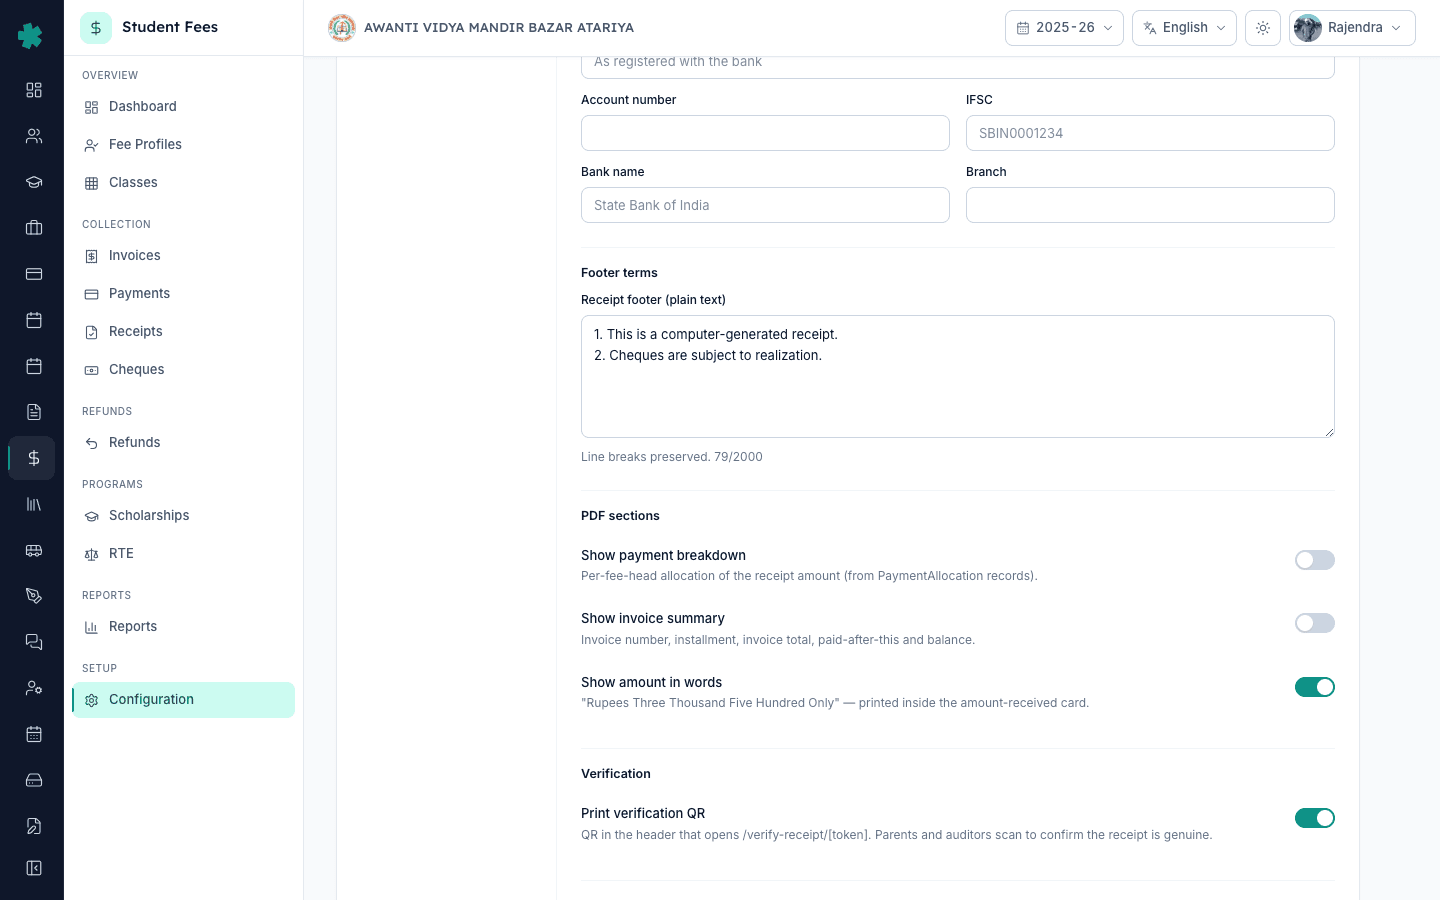
7. Label language चुनें और Save changes दबाएँ
A4 / PDF Receipt के अंत में Receipt label language block तक स्क्रॉल करें। English चुनें English-only receipt के लिए (ज़्यादातर CBSE और ICSE स्कूल), Hindi चुनें Devanagari-only receipt के लिए, या Hindi + English चुनें bilingual receipt के लिए जहाँ हर label Hindi में English के ऊपर छपता है। केवल static labels (Date, Mode, Amount Received) बदलते हैं — student के नाम और राशि हमेशा अपने मूल रूप में छपते हैं। नीचे-दाईं ओर Save changes दबाएँ। Inkwelly Receipt template saved toast दिखाता है और unsaved-changes pill बदलकर All changes saved हो जाता है। किसी हाल के payment से test receipt प्रिंट करके नया template सही दिख रहा है यह पुष्टि कर लें।
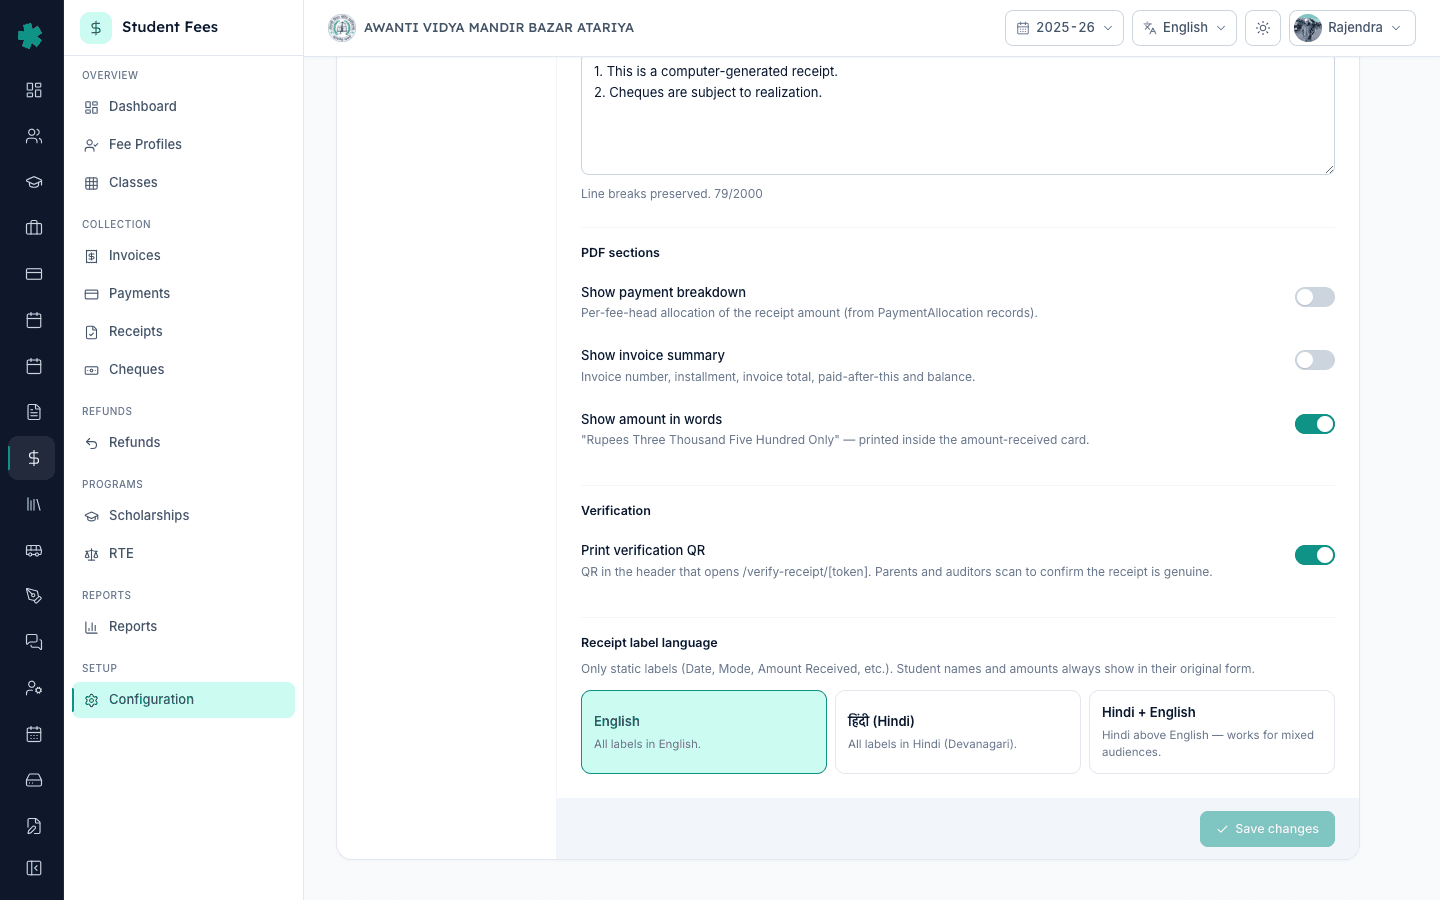
अगला कदम — इसी Receipt Template पेज से thermal counter slip सेट करें (How to set up thermal receipt printing in Inkwelly), फिर Razorpay जोड़ें ताकि parents online भुगतान भी कर सकें (How to connect Razorpay to accept online fee payments)। अगले collection cycle से पहले Penalties & Refunds टाइल भी पूरा कर लें — How to set up late fee rules और How to create a refund policy with time-based slabs पढ़ें, ताकि पूरा fee module पूरी तरह configured रहे।
Inkwelly Student Fees को अपने ऑफिस में काम करते हुए देखें
अक्सर पूछे गए सवाल
7 सवालक्या Inkwelly का एक receipt template A4 PDF और thermal counter slip दोनों को कवर करता है?
हाँ। Inkwelly का Receipt Template पेज A4 PDF receipt — जो parent घर ले जाते हैं — और fee counter पर छपने वाली thermal slip दोनों चलाता है। Branding, address, contact और verification settings दोनों surfaces पर लागू होती हैं। उसी पेज पर Thermal Printer टैब paper size, characters-per-line और ESC/POS-specific options जोड़ता है। A4 एक बार parent-facing PDF के लिए configure करें; thermal setup sibling tutorial में बताया गया है।
यदि स्कूल केवल tuition fee लेता है तो क्या receipt template पर GSTIN भरना चाहिए?
नहीं। ज़्यादातर CBSE, ICSE और राज्य बोर्ड के day school tuition पर GST नहीं लेते और receipt template पर GSTIN खाली छोड़ देते हैं — Inkwelly तब printed PDF पर पूरा Tax block छिपा देता है। GSTIN तभी भरें जब स्कूल third-party uniforms, transport, hostel या catering जैसी GST-applicable services के लिए registered है और parent के accountant को इसकी ज़रूरत पड़ सकती है।
A4 receipt के लिए स्कूल logo किस आकार और format में होना चाहिए?
500 KB से कम का साफ़ PNG या JPG सबसे अच्छा रहता है — file तेज़ upload होती है और साफ़ छपती है। Inkwelly logo को A4 receipt header में top-left पर एक तय band height पर रखता है और aspect ratio बनाए रखता है, इसलिए लंबा rectangular logo (नाम + crest) और square logo (केवल crest) दोनों बिना stretch हुए काम करते हैं। फोटो वाला logo टालें; एक flat vector-style logo सबसे साफ़ प्रिंट देता है।
Inkwelly me fee receipt par school logo aur address kaise add kare?
Student Fee menu kholiye, Configuration par click kijiye, Preferences section me Receipt Template tile Open kijiye. Branding tab pehle se selected hota hai — Choose image dabaiye aur PNG logo upload kijiye. Phir Address & Contact tab par jaiye, school ka address, city, state, pincode, phone, email aur website bhariye. Save changes dabaiye — agle receipt PDF par logo aur address dono print honge.
Receipt par signature aur QR kaise enable kare Inkwelly me?
Receipt Template page kholiye, A4 / PDF Receipt tab par click kijiye. Show signature toggle on kijiye, scanned PNG signature upload kijiye aur signatory ka naam aur title likhiye (jaise Mr. Ramesh Kumar, Cashier). Niche Verification block me Print verification QR on rakhiye — har receipt par ek QR print hoga jise parent ya auditor phone se scan karke /verify-receipt/[token] par receipt ki authenticity check kar sakte hain.
क्या A4 receipt पर label Hindi में छप सकते हैं उन parents के लिए जो English नहीं पढ़ते?
हाँ। A4 / PDF Receipt के अंत में Receipt label language block में तीन विकल्प हैं — English, Hindi (Devanagari) और Hindi + English। तीसरा विकल्प bilingual है: Date, Mode, Amount Received जैसे हर label Hindi में English के ऊपर छपते हैं, जो mixed Hindi-medium और English-medium parent group में सबसे अच्छा काम करता है। केवल static labels बदलते हैं — student के नाम और राशियाँ हमेशा अपने मूल रूप में छपती हैं।
क्या receipt template बदलने पर पहले से जारी receipt भी बदल जाएँगी?
हाँ, Inkwelly में हर receipt PDF प्रिंट के समय current template के विरुद्ध render होती है, इसलिए कोई पुरानी receipt फिर से प्रिंट करने पर नया logo, पता, signature और footer पकड़ लेती है। मूल receipt record — receipt number, date, student, राशि, mode — कभी नहीं बदलता। ज़्यादातर स्कूलों के लिए यही वांछित व्यवहार है क्योंकि audit के दौरान सुधारा गया पता या signature पुरानी receipts पर भी दिख जाता है, फिर से जारी किए बिना।
आपको ये भी पसंद आ सकता है
2 लेखस्रोत व संदर्भ
- Right of Children to Free and Compulsory Education Act, 2009 — Section 13 (No capitation fee) · देखा गया 19 May 2026
RTE Act हर fee collection की documented receipt देना अनिवार्य बनाता है, जिससे एक configured receipt template compliance की ज़रूरत बन जाता है।
- CBSE Affiliation Bye-Laws — Chapter VII, Financial Records · देखा गया 19 May 2026
CBSE bye-laws affiliated स्कूलों से हर fee collection पर registered नाम, पता और अधिकृत signature वाली receipts जारी करने और auditable financial records रखने की अपेक्षा करते हैं।
- Central Goods and Services Tax Act, 2017 — Section 31 (Tax Invoice) · देखा गया 19 May 2026
CGST Act की Section 31 के अनुसार registered entities को हर GST-applicable supply की receipt या invoice पर GSTIN दिखाना ज़रूरी है — जब स्कूल transport, hostel या अन्य GST-applicable services का शुल्क लेता है तब यह लागू होता है।
Inkwelly आपके स्कूल पर — खुद देखें
30 मिनट का डेमो। आपके मौजूदा ERP को आपके साथ खोलकर, कॉल पर ही आपका डेटा Inkwelly में लोड करते हैं। कॉल ख़त्म होते-होते एक तय तारीख़ का गो-लाइव प्लान आपके हाथ में।