किस्त के लिए Auto-generation कैसे चालू करें Inkwelly में
यह गाइड उन स्कूल ऑफिस और अकाउंटेंट के लिए है जो चाहते हैं कि फीस के invoice हर तिमाही Generate बटन दबाए बिना, due date से कुछ दिन पहले अपने आप parent dashboard में पहुँच जाएँ। अंत में आपकी एक किस्त पर auto-generation चालू होगा, अगली run की तारीख तय होगी, और Generate Invoices पेज पर Overall Coverage बेहतर दिखेगा।
Inkwelly में invoice auto-generation चालू करने के लिए: Student Fee → Invoices → Generate खोलें, फीस स्ट्रक्चर कार्ड में अपनी किस्त की row ढूँढें, Auto-gen बटन पर क्लिक करें, toggle ON करें, due date से कितने दिन पहले Inkwelly को run करना है वह संख्या भरें, और Save दबाएँ। Row पर Auto badge आ जाएगा। हर रात 02:00 IST पर Inkwelly pending invoice बना देता है, और ऑफिस कभी भी Run auto-sweep दबाकर इसे तुरंत भी चला सकता है।
Indian स्कूल Tally या Excel छोड़कर Inkwelly पर आने का सबसे बड़ा कारण auto-generation ही है। 1,200 छात्रों वाला स्कूल हर सत्र में लगभग 4,800 invoice जारी करता है — चार तिमाही किस्तों में। यह काम हाथ से करने पर ऑफिस के पूरे दो दिन हर तिमाही लगते हैं और parent का अनुभव असमान रहता है — किसी को invoice पहले दिन मिलता है तो किसी को बीसवें दिन। Auto-generation चालू होने पर Inkwelly हर invoice एक ही निर्धारित रात बनाता है, parent अगली सुबह अपने dashboard पर देख लेते हैं, और Generate Invoices पेज की Overall Coverage tile अपने आप 100% की ओर बढ़ती है। ऑफिस का काम invoice बनाने से हटकर invoice वसूलने पर केंद्रित हो जाता है — असली काम वही है।
1. Generate Invoices पेज खोलें
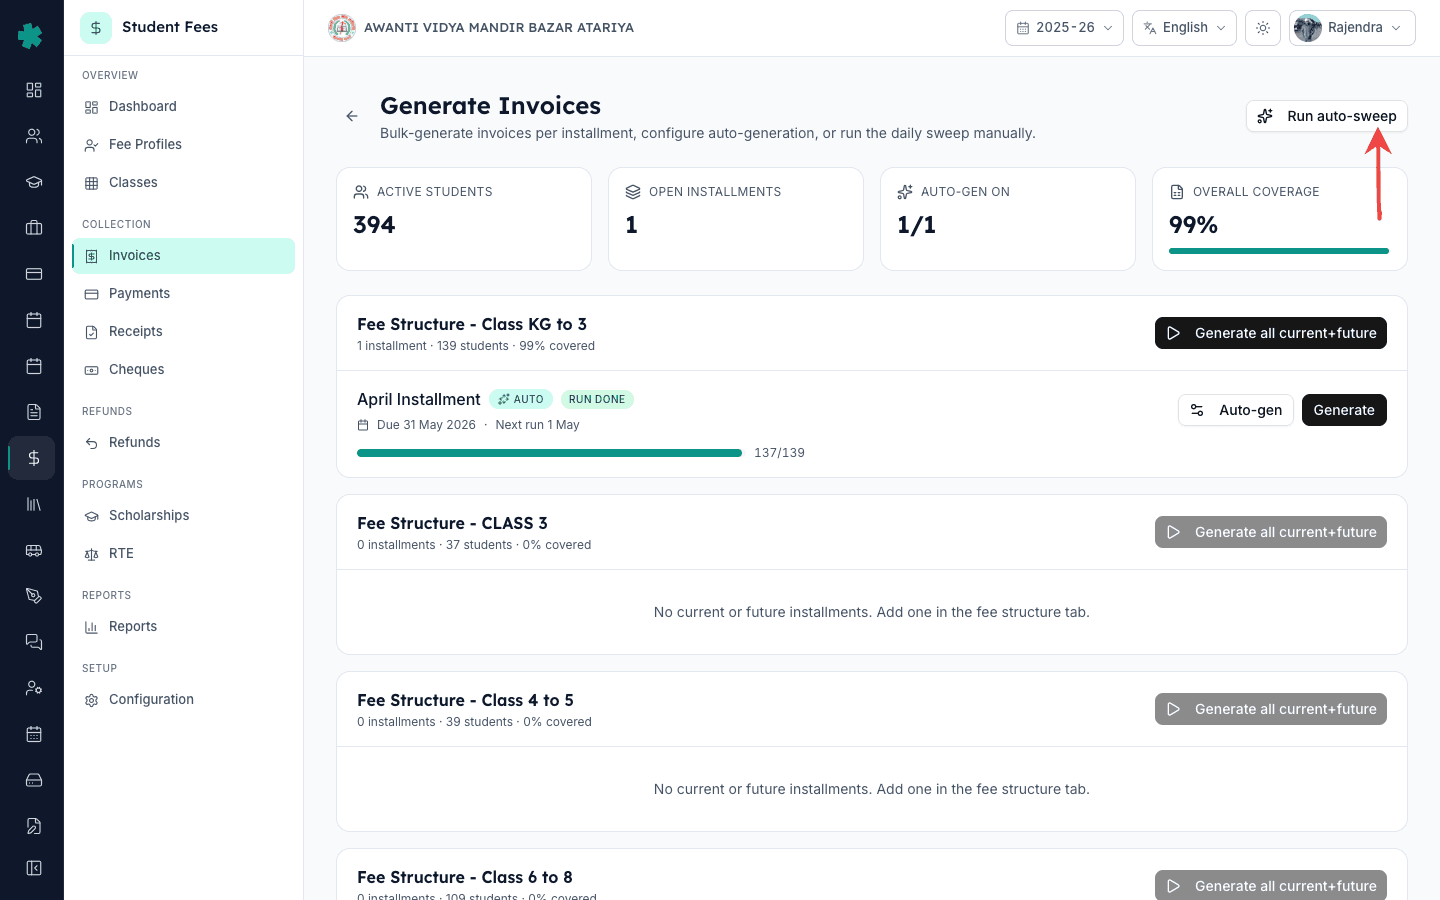
Inkwelly → Student Fee → Invoices खोलें। Invoices पेज पर सत्र के हर invoice की सूची और Total, Pending, Overdue, Paid के KPI tile दिखते हैं। ऊपर दाईं ओर Generate बटन पर क्लिक करें। यह Generate Invoices पेज पर ले जाता है — manual और automatic दोनों invoice निर्माण का केंद्र। Breadcrumb में Student Fee → Invoices → Generate दिखता है।

2. ऊपर के चार KPI tile पढ़ें
Generate Invoices पेज के सबसे ऊपर Inkwelly चार tile दिखाता है: Active Students (इस सत्र में कितनी fee profile bill होने योग्य हैं), Open Installments (सभी फीस स्ट्रक्चर मिलाकर कितनी current और future किस्तें हैं), Auto-gen On (जैसे 3/12 — कितनी किस्तों पर auto-generation पहले से चालू है), और Overall Coverage (कितने अपेक्षित invoice वास्तव में बने हैं, उसका भारित प्रतिशत)। Auto-gen On का अंश आपका scoreboard है — सत्र भर इसे 3/12 से बढ़ाकर 12/12 तक पहुँचाना लक्ष्य है।
3. फीस स्ट्रक्चर और किस्त की row ढूँढें
KPI tile के नीचे Inkwelly हर सक्रिय फीस स्ट्रक्चर को एक अलग कार्ड के रूप में दिखाता है — उदाहरण Fee Structure - Class KG to 3, Fee Structure - Class 4 to 5, Fee Structure - Class 11 PCM। हर कार्ड के अंदर उसकी किस्तें row के रूप में होती हैं। जिस किस्त को automate करना है उसे ढूँढें (जैसे April Installment, Q1 — April to June, या July Installment)। Row में किस्त का नाम, due date, coverage bar और दाईं ओर दो बटन दिखते हैं: Auto-gen और Generate।

4. किस्त row पर Auto-gen क्लिक करें
किस्त row के दाईं ओर मौजूद Auto-gen बटन पर क्लिक करें। दाईं ओर से एक side sheet खुलेगा जिसका शीर्षक होगा Auto-generate settings — subheader में किस्त का नाम और due date लिखा होगा। Sheet में दो भाग हैं: Auto-generate invoices नाम का switch और Days before due date नाम का संख्या field। यदि इस किस्त पर पहले auto-generation चल चुका है तो नीचे आख़िरी run का समय और status भी दिखाई देगा।
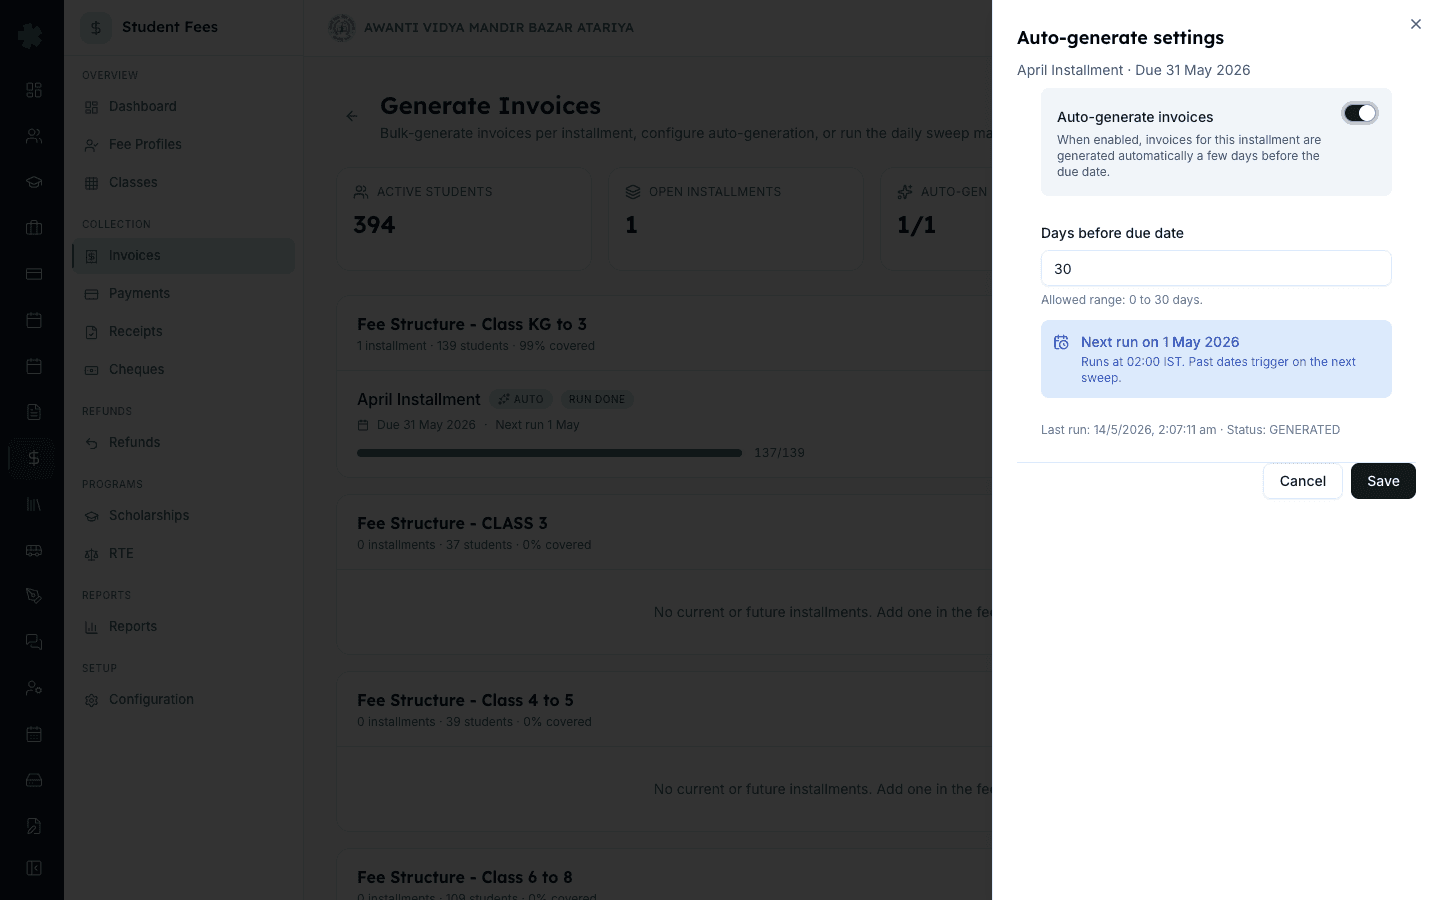
5. Toggle ON करें और दिनों की संख्या भरें
Auto-generate invoices switch को ON करें। नीचे एक नया अनुभाग खुलेगा जिसमें Days before due date माँगा जाएगा — अनुमत सीमा 0 से 30 दिन है। पाँच दिन भारतीय स्कूलों के लिए सुरक्षित default है: parent को due date से लगभग एक हफ़्ते पहले parent dashboard और WhatsApp summary में invoice दिख जाता है, लेकिन इतना जल्दी नहीं कि SMS भूल जाए। Inkwelly तुरंत Next run on तारीख गणना करके field के नीचे दिखा देता है — स्कूल कैलेंडर के विरुद्ध तारीख की पुष्टि कीजिए और Save दबाएँ। एक confirmation dialog खुलेगा जिसमें next run तारीख और 02:00 IST समय की पुष्टि होगी — Yes, enable पर क्लिक करें।
6. Row पर Auto badge आने की पुष्टि करें
Sheet बंद होगा और किस्त row refresh हो जाएगी। अब किस्त के नाम के साथ एक छोटा नीला Auto badge (sparkle आइकन सहित) और हल्के नीले रंग का Scheduled status pill दिखाई देगा। ऊपर का Auto-gen On tile एक बढ़ जाएगा। Next run on की रात जब Inkwelly invoice बना देगा, Scheduled pill हरे रंग के Run done में बदल जाएगा और coverage bar भर जाएगी। किसी कारण run विफल हुआ तो pill लाल Run failed में बदलेगा, जिसे sweep से retry किया जा सकता है।
7. आवश्यकता पड़ने पर Run auto-sweep दबाएँ
Generate Invoices पेज के ऊपर दाईं ओर Run auto-sweep बटन है। Inkwelly हर रात 02:00 IST पर यह sweep पूरे स्कूल पर अपने आप चलाता है, लेकिन यह बटन ऑफिस को इसे on-demand चलाने की सुविधा देता है — उपयोगी जब due date आज ही है और auto-gen 02:00 के बाद चालू किया, या पिछली run विफल हुई और कारण ठीक हो गया। Sweep idempotent है — एक ही दिन दो बार दबाने से कभी duplicate invoice नहीं बनती; केवल pending और failed किस्तें ही process होती हैं।
8. Overall Coverage से health देखें
Overall Coverage tile वह एक संख्या है जिस पर नज़र रखनी चाहिए। यह बने हुए invoice को अपेक्षित invoice (Active Students × Open Installments) के विरुद्ध भारित करके प्रतिशत दिखाता है। auto-generation सही चलाने वाला स्कूल हर किस्त की due date आने तक 100% की ओर पहुँचता रहता है। अगर एक ही स्ट्रक्चर पर Overall Coverage हफ़्तों कम बनी रहे, तो उस कार्ड को खोलकर देखिए — सबसे आम कारण होता है कि कम coverage वाली किस्त पर Auto-gen चालू ही नहीं है।
अगला कदम — उसी स्ट्रक्चर की बाकी किस्तों पर भी auto-generation चालू करें ताकि हर तिमाही अपने आप संभल जाए; वही प्रक्रिया दोहरानी है, अलग setup नहीं चाहिए। बीच सत्र में किसी स्ट्रक्चर को back-fill करने के लिए How to bulk-generate invoices for an installment साथ रखें। यदि स्ट्रक्चर पर अभी सभी किस्तें परिभाषित नहीं हैं तो पहले How to create a fee structure for the academic session पढ़ें, और Active Students अपेक्षा से कम दिख रहा हो तो How to create fee groups and assign them to classes देखें।
Inkwelly Student Fees को काम करते हुए देखें
अक्सर पूछे गए सवाल
6 सवालकिस्त row पर Auto-gen का क्या मतलब है?
Auto-gen वह नीला badge है जो किसी किस्त पर auto-generation चालू करने के बाद उसकी row पर आता है। यह ऑफिस को बताता है कि Inkwelly उस किस्त के सभी pending invoice निर्धारित तारीख पर अपने आप बनाएगा — किसी को Generate दबाने की ज़रूरत नहीं। Badge के साथ एक status pill भी रहता है: run से पहले Scheduled, सफल run के बाद Run done, और कुछ रोक देने पर Run failed।
Auto-gen kaise on kare Inkwelly me?
Student Fee menu kholiye, Invoices par jaiye, top-right ke Generate button par click kijiye. Fee structure card me apne installment ka row dhundhiye, row ke right side me Auto-gen button par click kijiye. Side sheet kholega — Auto-generate invoices toggle on kijiye, Days before due date me 5 type kijiye, Save dabaiye, confirmation dialog me Yes, enable kijiye. Row par blue Auto badge aa jayega.
Run auto-sweep kab use kare?
Run auto-sweep tab use kijiye jab due date aaj hi ho aur 02:00 IST ke baad apne Auto-gen on kiya ho — raat tak ruke bina abhi sweep chala dijiye. Doosri jagah, agar koi installment Run failed dikhaye aur cause fix ho gaya ho (jaise missing fee group ya inactive student), to button dabaye se sirf un installments ko retry kiya jayega. Sweep idempotent hai — duplicate invoice kabhi nahi banti.
Due date से कितने दिन पहले auto-generation चलना चाहिए?
पाँच दिन भारतीय स्कूलों के लिए सबसे आम सेटिंग है और Inkwelly का default भी यही है। इससे parent को due date से पूरे एक हफ़्ते पहले parent dashboard, WhatsApp summary और SMS reminder पर invoice दिख जाता है — late fee शुरू होने से पहले। जो स्कूल बच्चे के हाथ से कागज़ी फीस slip भेजते हैं वे प्रायः सात दिन चुनते हैं; hostel और transport-only plan वाले शून्य भी रखते हैं — due date वाले दिन ही invoice। Inkwelly में अनुमत सीमा 0 से 30 दिन है।
क्या auto-generation चालू करने से उन छात्रों के लिए duplicate invoice बनेगा जिनके पास पहले से है?
नहीं। Inkwelly का auto-generation engine हमेशा उन किस्तों को छोड़ देता है जिनके लिए उस छात्र का invoice पहले से बना है — चाहे वह manual हो, bulk-generate से बना हो या किसी पुराने auto-run से। Run auto-sweep बटन भी idempotent है। Run done का अर्थ केवल इतना है कि batch पूरा हुआ; यदि उस रात नया कुछ बनाने को नहीं था तो run शून्य नए invoice के साथ done दर्ज होती है — यही सही व्यवहार है।
Generate Invoices पेज का Overall Coverage वास्तव में क्या मापता है?
Overall Coverage पूरे स्कूल की सभी current और future किस्तों मिलाकर अपेक्षित invoice के विरुद्ध बने हुए invoice का भारित प्रतिशत है। हर (Active Students × Open Installments) का जोड़ denominator बनता है; वास्तव में मौजूद invoice numerator। auto-generation सही चलाने वाला स्कूल हर किस्त की तारीख आने तक 100% की ओर बढ़ता रहता है। अगर हफ़्तों यह आँकड़ा 80% से नीचे रहे तो किसी किस्त पर Auto-gen चालू नहीं है।
आपको ये भी पसंद आ सकता है
3 लेखस्रोत व संदर्भ
- CBSE Affiliation Bye-Laws — Chapter VII, Fee Structure and Advance Notice · देखा गया 19 May 2026
CBSE bye-laws require schools to publish the fee schedule in advance for every session, which is what auto-generation operationalises by placing each invoice in the parent dashboard days before the due date.
- Right of Children to Free and Compulsory Education Act, 2009 — Section 13 (Fee transparency) · देखा गया 19 May 2026
The RTE Act requires that no fee be collected outside the published structure, so a scheduled and predictable invoice cycle is the legal record the school must keep.
- Ministry of Education — UDISE+ School Finance Reporting Format · देखा गया 19 May 2026
UDISE+ annual returns require schools to report fee collection per class and term, which only stays clean when invoices are created on a regular schedule rather than ad-hoc through the year.
Inkwelly आपके स्कूल पर — खुद देखें
30 मिनट का डेमो। आपके मौजूदा ERP को आपके साथ खोलकर, कॉल पर ही आपका डेटा Inkwelly में लोड करते हैं। कॉल ख़त्म होते-होते एक तय तारीख़ का गो-लाइव प्लान आपके हाथ में।