How to create fee groups and assign them to classes in Inkwelly
For school office staff and principals who run different fees for primary, secondary, hostel, day-scholar or RTE students. By the end you will have a fee group ready, mapped to the right classes, so every new admission picks up the correct fees with no manual fiddling.
To create a fee group in Inkwelly: open Configuration → Fee Groups, click Add Fee Group, type a name like Primary or Hostel, pick the matching fee structure, and save. Then switch to the Class Mappings tab, click Assign Classes, pick the fee group, tick the classes that should follow it, and click Assign. Inkwelly auto-applies that fee group to every student in those classes — old and new.
Indian schools almost never charge one fee for every student. A CBSE day school in Lucknow may run separate fees for Pre-Primary, Primary, Middle and Secondary because CBSE recommends fee differentiation by stage in its 2018 Affiliation Bye-Laws. A boarding school adds a hostel cohort on top. Inkwelly handles all of this through fee groups — one group per audience, mapped to the classes that belong to it. The schools live on Inkwelly typically run 3 to 6 fee groups per session; a single group only works for very small play schools.
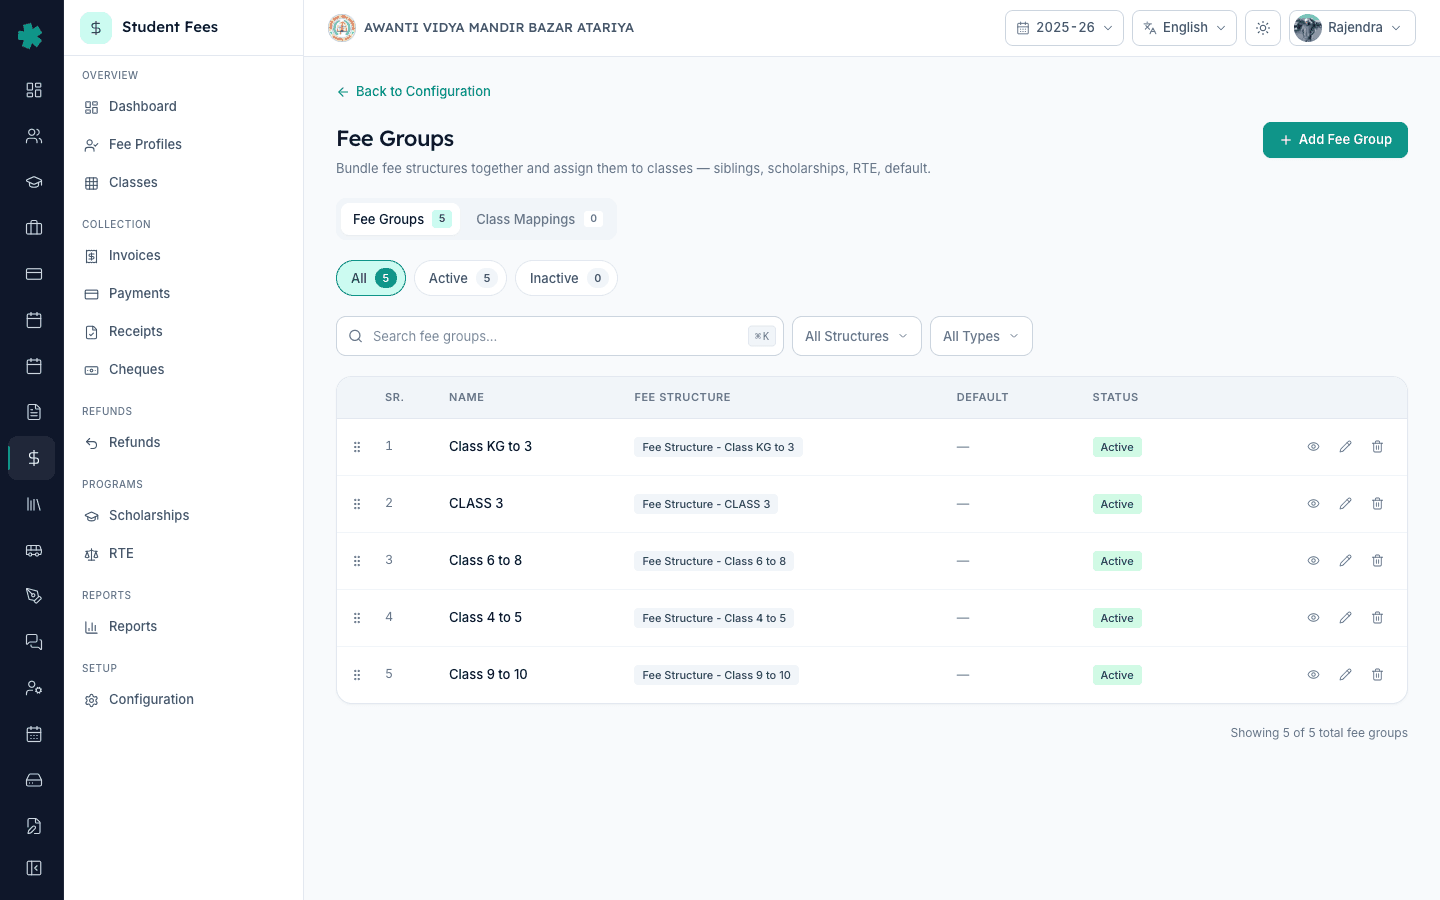
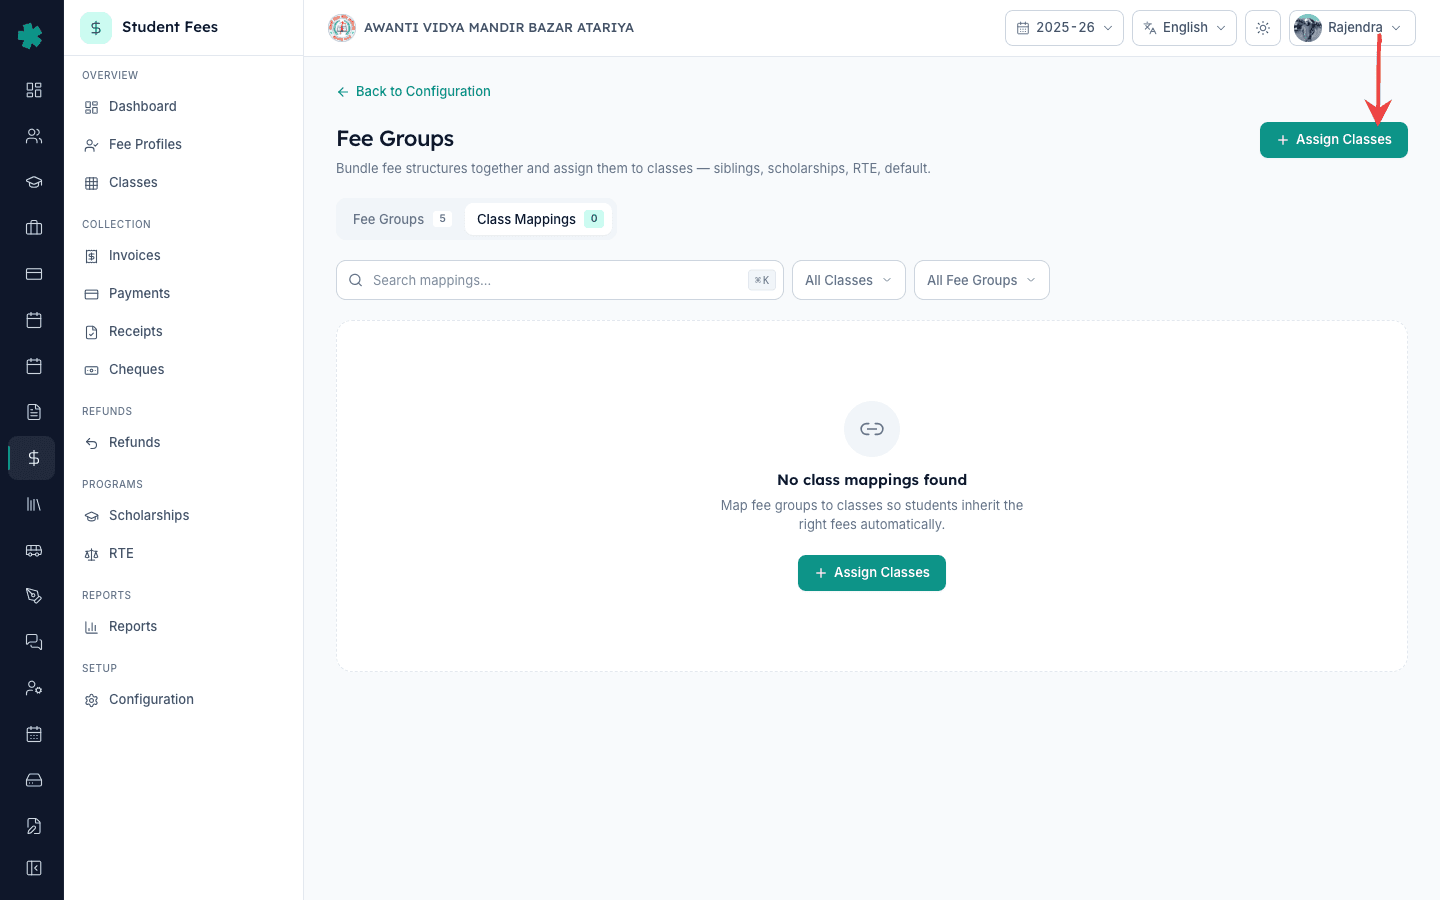
1. Open the Fee Groups page
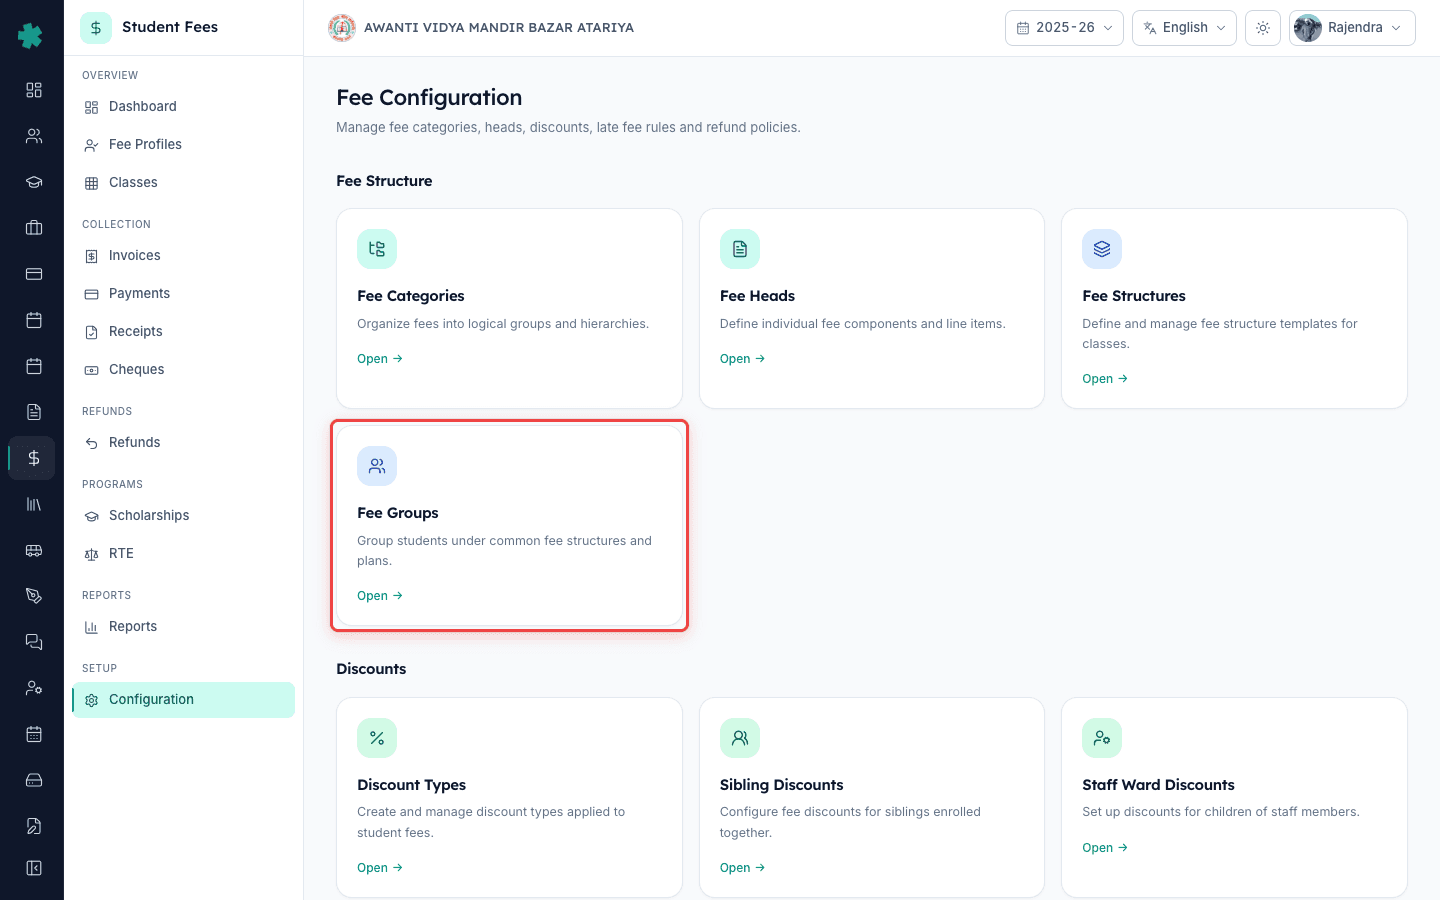
Open Inkwelly → Student Fee → Configuration. The Configuration page groups every setup tile in one place. Under the Fee Structure section, click the Fee Groups tile. The Fee Groups page opens with two tabs at the top — Fee Groups (the list) and Class Mappings (where you assign them to classes). You will use both in this tutorial.
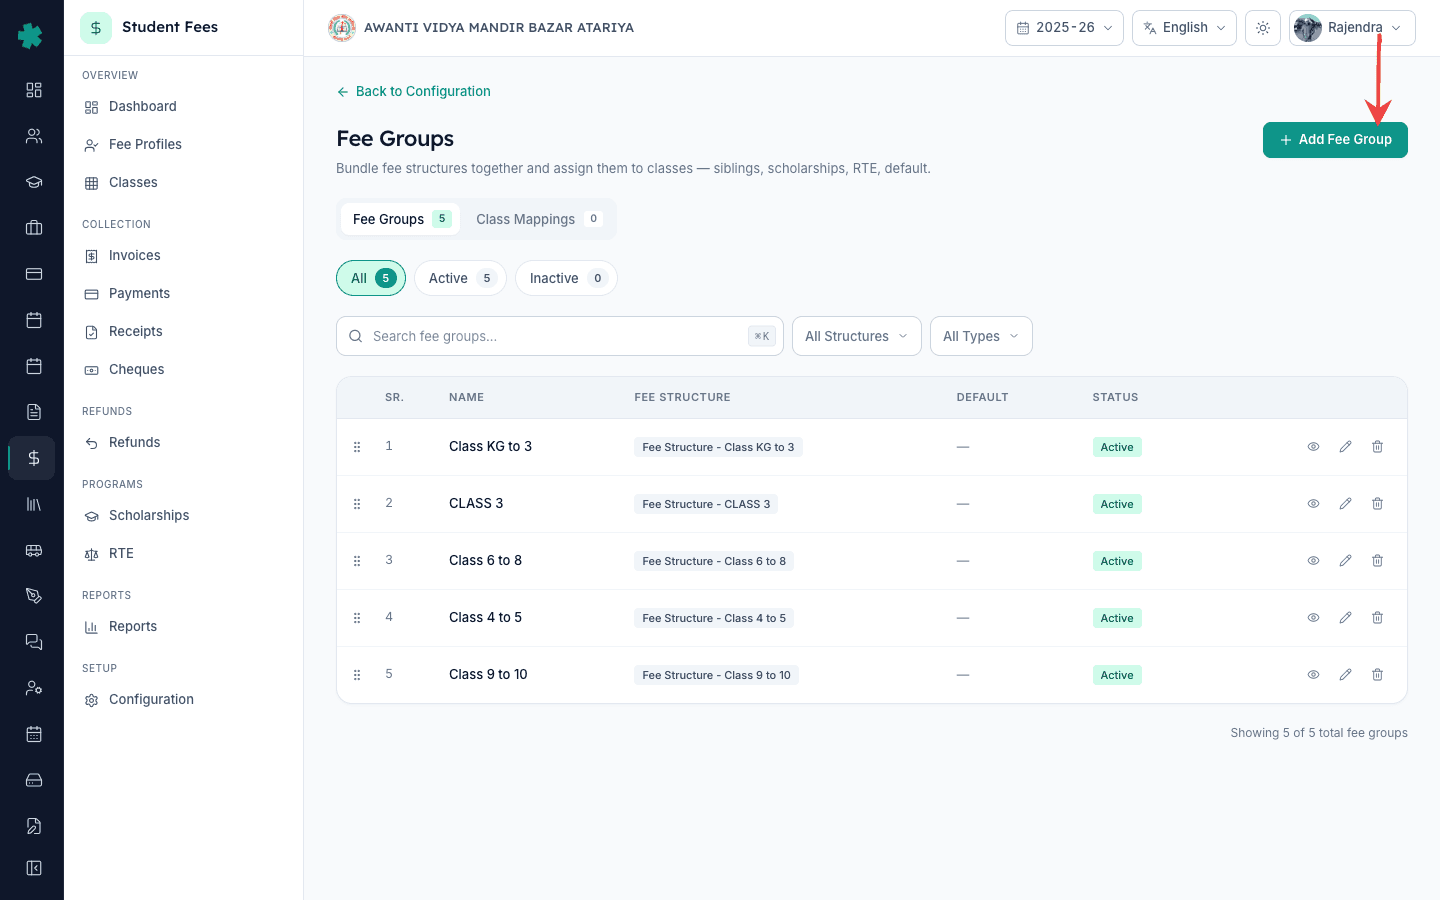
2. Click Add Fee Group
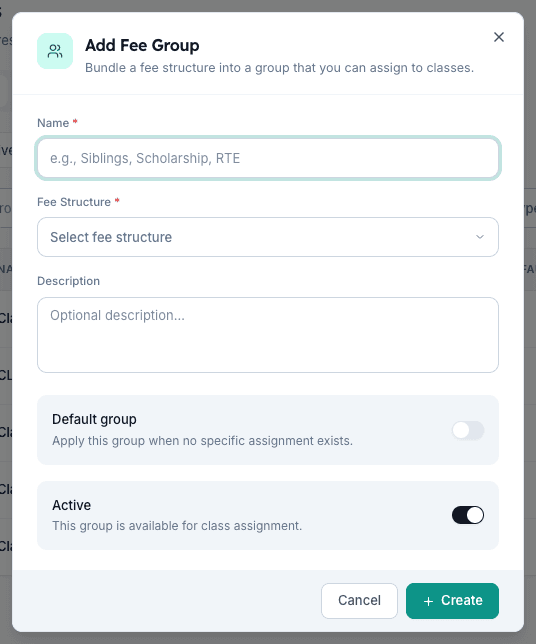
Stay on the Fee Groups tab. On the top right of the page, click the blue Add Fee Group button. Inkwelly opens a side dialog titled Add Fee Group with a short subtitle: Bundle a fee structure into a group that you can assign to classes. This is the only form you need for creating a group — no separate pricing screen, because pricing already lives on the fee structure you will attach.
3. Name the group and attach a fee structure
Type a clear, audience-style name in the Name field — Primary, Secondary, Hostel, Day Scholar, RTE, or Siblings work well. Then click the Fee Structure dropdown and pick the fee structure this group should bill from. The dropdown shows the total amount of the selected structure right below so you can sanity-check. Optionally add a one-line description for the office team, like Class 6 to 8 fees including transport.
4. Set the default flag and save
Decide whether this group is the school-wide default. Turn on the Default group switch only for the one group you want Inkwelly to fall back to when a class has no specific mapping (most schools mark Primary as default). Leave the Active switch on so the group is available for class assignment. Click Create. Inkwelly saves the group and shows it at the top of the list with a Default pill if applicable.
5. Switch to Class Mappings and click Assign Classes
Click the Class Mappings tab at the top — right next to Fee Groups. This is the screen that wires fee groups to actual classes. On the top right, click the blue Assign Classes button. Inkwelly opens an Assign Classes dialog with a Fee Group dropdown at the top, a searchable list of classes grouped by grade level below, and a tally of how many you have selected.
6. Pick the fee group and tick the classes
Click the Fee Group dropdown and pick the group you just created. Below it, Inkwelly shows the fee structure name and the total amount as a reminder. Now tick the classes that should follow this group — Class KG-A, Class 1-A, Class 1-B and so on. Use the search box for big schools, or click Select visible to grab every class under a grade in one click. Already-mapped classes show a small Mapped pill so you do not double-assign by accident.
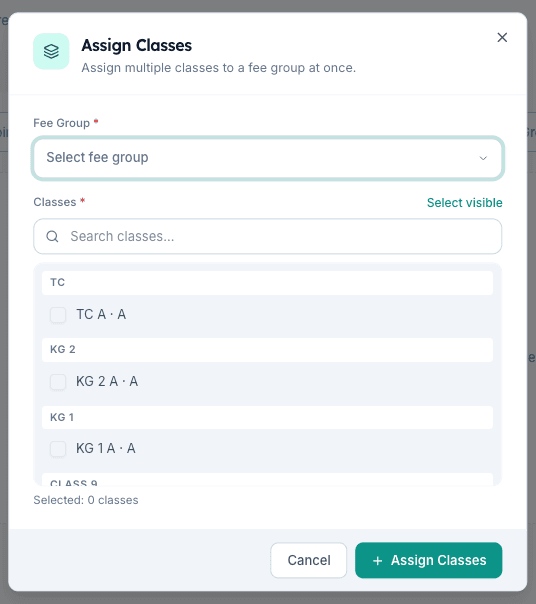
7. Confirm and click Assign
At the bottom of the dialog, Inkwelly shows the count — for example, Assign 8 Classes. If any of the selected classes already had a different mapping, a Replace existing mappings switch appears with a warning. Turn it on only if you want the new group to overwrite the old one. Click Assign. Inkwelly creates the mappings and shows a result card with Created / Updated / Skipped / Failed counts so you know exactly what changed.
What to try next. If you also need to bill specific students differently (a sibling, a scholarship holder, a hostel student in a day class), keep the class mapping for the cohort and override the fee structure on that one student from the fee profile. If the fee group does not yet exist for the bill cycle you need, build a fresh fee structure first — that has its own quick tutorial. For schools running RTE under the 25 percent reservation, mark RTE students with their own fee group so reimbursement claims tag them clearly.
See Inkwelly Student Fee in action
Book a 15-minute walkthrough — watch fee groups, class mappings and live billing on a real school account.
Frequently asked
6 questionsWhat is a fee group in a school fee system?
A fee group is a saved bundle of one fee structure plus a label like Primary, Hostel or RTE that Inkwelly maps to a set of classes. Every student in a mapped class inherits the group automatically, so the office never types fees per student.
How do I charge different fees for primary and secondary classes in Inkwelly?
Create two fee structures (Primary, Secondary), wrap each in its own fee group, and map the primary group to Class 1 to 5 and the secondary group to Class 6 to 10 from the Class Mappings tab. Inkwelly bills each cohort from its own group with no manual override per student.
Can I assign more than one fee group to the same class in Inkwelly?
No. Each class has exactly one fee group at a time — this keeps every student in that class on the same base fee. To bill a sibling, scholarship or hostel student differently, override the fee structure on that student's fee profile while keeping the class mapping for the rest.
Fee group kya hota hai aur kab banaye?
Fee group ek bundle hai jisme ek fee structure aur ek audience label (jaise Primary, Secondary, Hostel, RTE) hota hai. Jab aapke school ki sabhi classes alag-alag fees pay karti hain, tab har audience ke liye ek fee group banaiye aur usse classes pe assign kar dijiye.
Different class ka alag fee Inkwelly me kaise rakhe?
Pehle har audience ke liye alag fee structure banaiye (Primary, Secondary, Hostel). Phir Configuration → Fee Groups me jaake har structure ke liye ek group banaiye. Class Mappings tab me Assign Classes click kijiye, fee group chuniye, aur jo classes us group ko follow karengi unko tick karke Assign dabaiye.
What happens to existing students when I change a class's fee group in Inkwelly?
Existing students in that class stay linked to whatever group they already had until you re-run their fee calculation. New admissions pick up the new mapping immediately. If you want existing students switched too, open the fee profile and click Recalculate, or run a bulk recalculation from the class.
You might also like
2 readsSources & references
- CBSE Affiliation Bye-Laws 2018 — Chapter II (Fee structure and stage-wise fee guidance) · accessed 19 May 2026
CBSE Bye-Laws recommend differentiated fees by stage (Pre-Primary, Primary, Middle, Secondary) which is exactly what fee groups model in Inkwelly.
- Right to Education Act 2009 — Section 12(1)(c), 25 percent reservation and reimbursement · accessed 19 May 2026
The 25 percent RTE reservation requires schools to track RTE students separately for state reimbursement, which is the textbook case for a dedicated RTE fee group.
See Inkwelly on your school
30-minute demo. We open your current ERP with you and load your data into Inkwelly on the call. Dated go-live plan by the end of it.