फीस काउंटर पर थर्मल रिसीट प्रिंटिंग कैसे सेट करें Inkwelly में
यह गाइड उन स्कूल ऑफिस स्टाफ और अकाउंटेंट के लिए है जो काउंटर पर cash और UPI से फीस लेते हैं और अभिभावक को तुरंत एक पेपर रसीद देना चाहते हैं। अंत में आपके पास Inkwelly से जुड़ा 80mm थर्मल प्रिंटर होगा, रिसीट का layout सही सेट होगा और एक test print तैयार होगी जो हर अभिभावक को इसी रूप में मिलेगी।
Inkwelly में थर्मल रिसीट प्रिंटिंग सेट करने के लिए: 80mm थर्मल प्रिंटर खरीदिए जैसे Olivetti PRT80 या Epson TM-T82, उसे फीस-काउंटर PC में लगाइए, QZ Tray नाम का छोटा desktop printing app install कीजिए, Inkwelly → Student Fee → Configuration → Receipt Template खोलिए, Thermal Printer टैब पर क्लिक कीजिए, 80mm paper चुनिए, कितनी copies चाहिए set कीजिए, English में header और footer भरिए, verification QR on कीजिए, save कीजिए और किसी हाल की रसीद से test print निकाल लीजिए।
भारतीय स्कूल काउंटर पर printed receipt आज भी payment का सबसे माँगा जाने वाला प्रमाण है। 1,200 छात्रों वाला एक CBSE स्कूल साल भर में लगभग 4,800 फीस receipt देता है, और हर तिमाही के पहले दो हफ्तों में काउंटर पर एक ही सुबह में 80 से 120 अभिभावक आते हैं। 80mm थर्मल printer एक पूरी रसीद तीन सेकंड से कम में print करता है और इसमें ink नहीं लगती — खर्च बस यह है कि हर 1,500 से 2,000 print पर एक थर्मल paper roll लगता है। Inkwelly के साथ थर्मल printer जोड़ने पर फीस काउंटर का पाँच-मिनट का हाथ से लिखने वाला queue पंद्रह सेकंड के collect-and-print loop में बदल जाता है।
1. 80mm थर्मल printer और थर्मल paper roll खरीदिए
ज़्यादातर भारतीय स्कूलों के लिए 80mm desktop थर्मल printer सही शुरुआत है। Olivetti PRT80 वही मॉडल है जिसे कई Inkwelly स्कूल पहले से उपयोग करते हैं; Epson TM-T82 तब ठीक रहता है जब स्कूल का हार्डवेयर vendor relationship हो। कोई भी printer जो ESC/POS support और 80mm paper का दावा करता है, चलेगा। एक काउंटर के लिए USB connection चुनिए, और LAN तब जब दो काउंटर एक ही printer share करते हों। साथ ही 80mm थर्मल paper roll का एक डिब्बा भी खरीद लीजिए — स्कूलों में आम तौर पर हफ़्ते में एक roll खर्च होता है।
2. फीस-काउंटर PC पर QZ Tray install कीजिए
Inkwelly थर्मल printers को print commands QZ Tray के माध्यम से भेजता है — एक छोटा free desktop printing app जो background में चलता रहता है। फीस-काउंटर PC पर qz.io से QZ Tray download कीजिए, installer चलाइए और default options accept कीजिए। Install के बाद QZ Tray icon Windows के system tray या macOS के menu bar में दिखता है। उसी PC के browser में Inkwelly खोलिए, और जब पहली बार कोई print चलेगा तब QZ Tray inkwelly.com से बात करने की अनुमति माँगेगा — Allow दबाइए और Remember this permission पर tick लगा दीजिए। QZ Tray के बिना थर्मल printer तक print नहीं पहुँचता।
3. Configuration → Receipt Template → Thermal Printer खोलिए
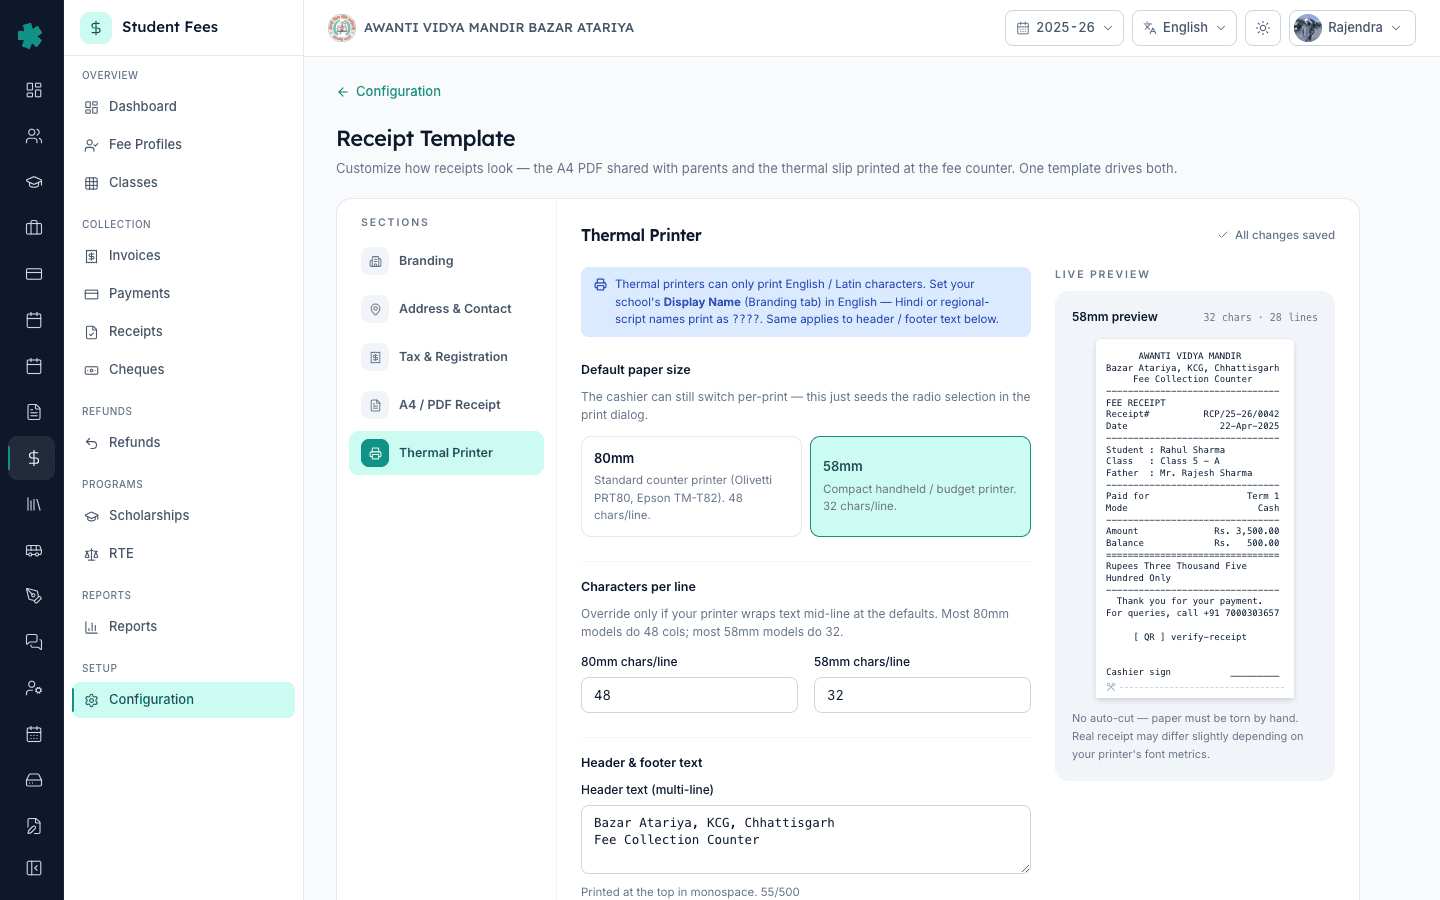
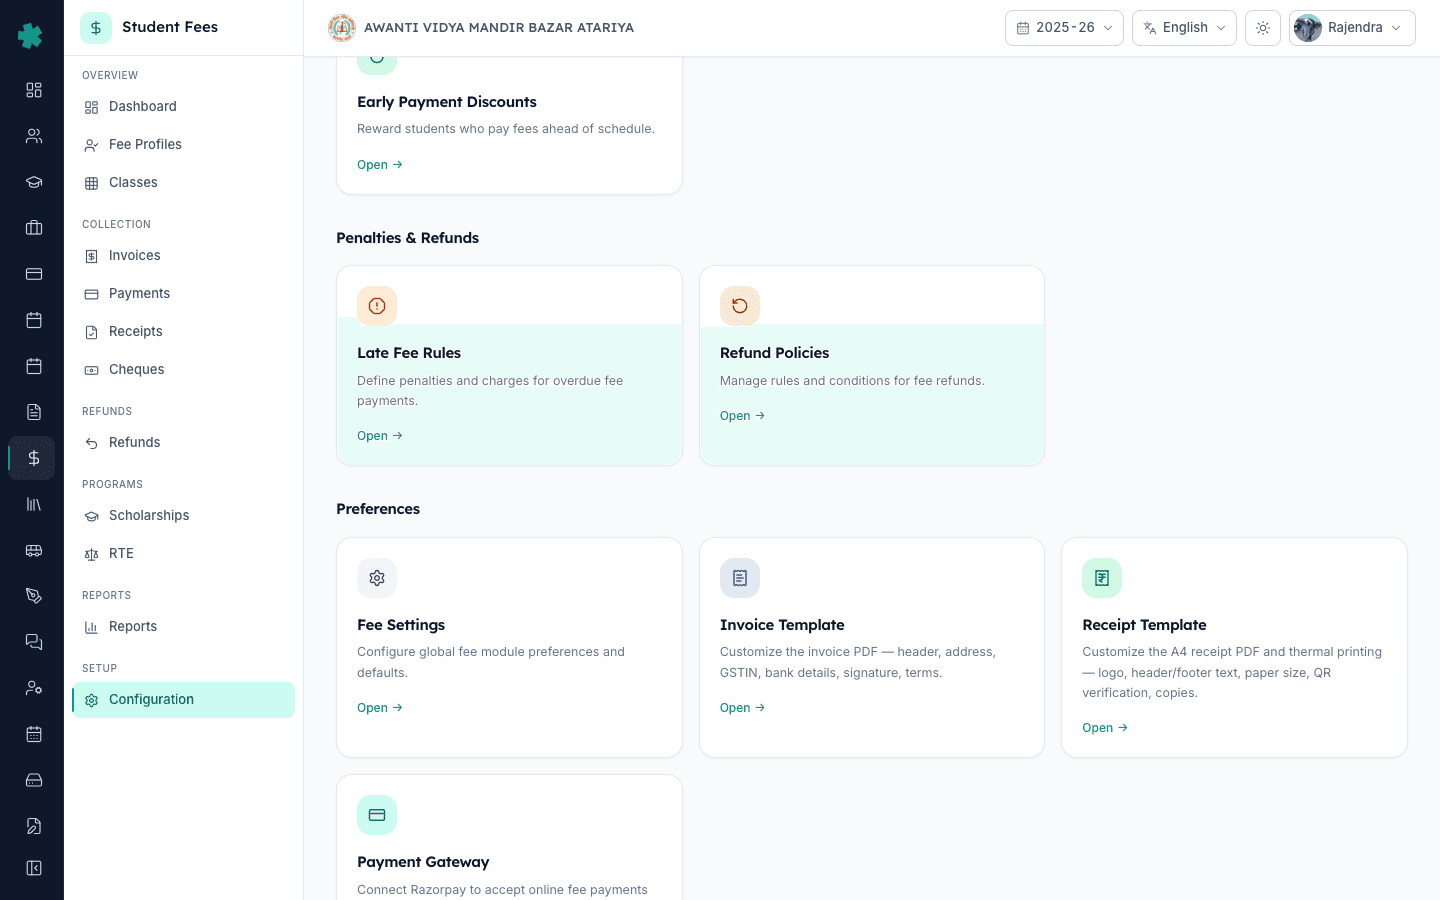
Inkwelly में बाएँ साइडबार से Student Fee खोलिए, SETUP के अंतर्गत Configuration पर click कीजिए, Preferences section तक scroll कर के Receipt Template tile पर click कीजिए। Receipt Template पेज खुलता है जिसमें बाएँ साइडबार पर पाँच sections होते हैं — Branding, Address & Contact, Tax & Registration, A4 / PDF Receipt, और Thermal Printer। Thermal Printer पर click कीजिए। दाएँ pane में पेपर slip को नियंत्रित करने वाली हर setting दिखती है और दाईं तरफ एक live preview होता है जो आप टाइप करते ही update होता है। यही एक पेज काउंटर पर होने वाली हर थर्मल print को चलाता है।
4. Default paper size में 80mm चुनिए
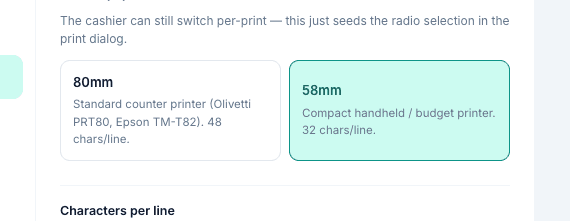
Thermal Printer panel के सबसे ऊपर Default paper size के दो cards दिखते हैं — 80mm और 58mm। यदि आपने standard counter printer लिया है तो 80mm पर click कीजिए (एक line में 48 characters आते हैं और adult के लिए आराम से पढ़ा जा सकता है)। 58mm तभी चुनिए जब स्कूल में छोटा handheld printer हो (32 characters per line, छोटा text)। Cashier रसीद screen से per-print बदलाव कर सकता है, पर यह setting हर counter staff के लिए default तय करती है। Characters per line में 48 (80mm) और 32 (58mm) के default values वैसे ही छोड़िए, जब तक आपका printer मॉडल बीच line में text तोड़ न रहा हो — जो बहुत कम होता है।
5. Copies, header और footer text set कीजिए
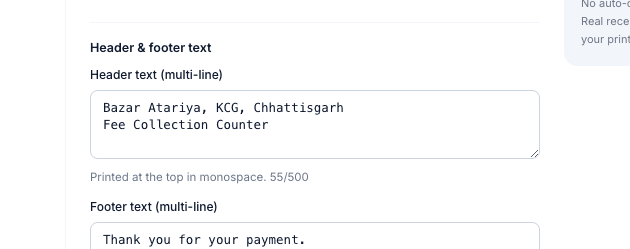
Print options section तक scroll कीजिए और Copies per print set कीजिए — 1 केवल parent copy print करता है, 2 parent और एक office copy दोनों print करता है (ज़्यादातर स्कूल 2 चुनते हैं), और 3 उन स्कूलों के लिए है जो ट्रस्ट record copy भी रखते हैं। ऊपर Header & footer text section पर जाइए। Header text में स्कूल का नाम और Fee Counter जैसी एक line टाइप कीजिए — और इसे English में रखिए, क्योंकि थर्मल printer हिंदी या क्षेत्रीय script print नहीं कर पाते और हिंदी text ??? के रूप में निकलता है। Footer text में एक धन्यवाद line और queries के लिए phone number रखिए — जैसे Thank you for your payment और For queries call 9876543210। दोनों fields में line breaks वैसे ही रहते हैं; दाईं तरफ का live preview बिल्कुल वैसी ही slip दिखाता है जैसी print होगी।
6. Verification QR on कीजिए और auto-cut on ही रहने दीजिए
इसी Print options section में Print verification QR on कीजिए। Inkwelly हर थर्मल slip के नीचे एक QR code print करता है; जब अभिभावक या auditor इसे scan करते हैं तो browser में एक छोटा Inkwelly verify पेज खुलता है जो रसीद की प्रमाणिकता और date, amount तथा student name दिखाता है। Auto-cut paper on ही रखिए ताकि printer हर रसीद को साफ़-साफ़ अलग करे — इसे off तभी कीजिए जब आपके printer में cutter ही न हो। Print logo on thermal receipt ज़्यादातर स्कूलों के लिए off रहने दीजिए क्योंकि थर्मल bitmap logo print को धीमा करते हैं और कभी-कभी धुंधले निकलते हैं; इसे तभी on कीजिए जब आपके हार्डवेयर vendor ने साफ़ output की पुष्टि की हो।
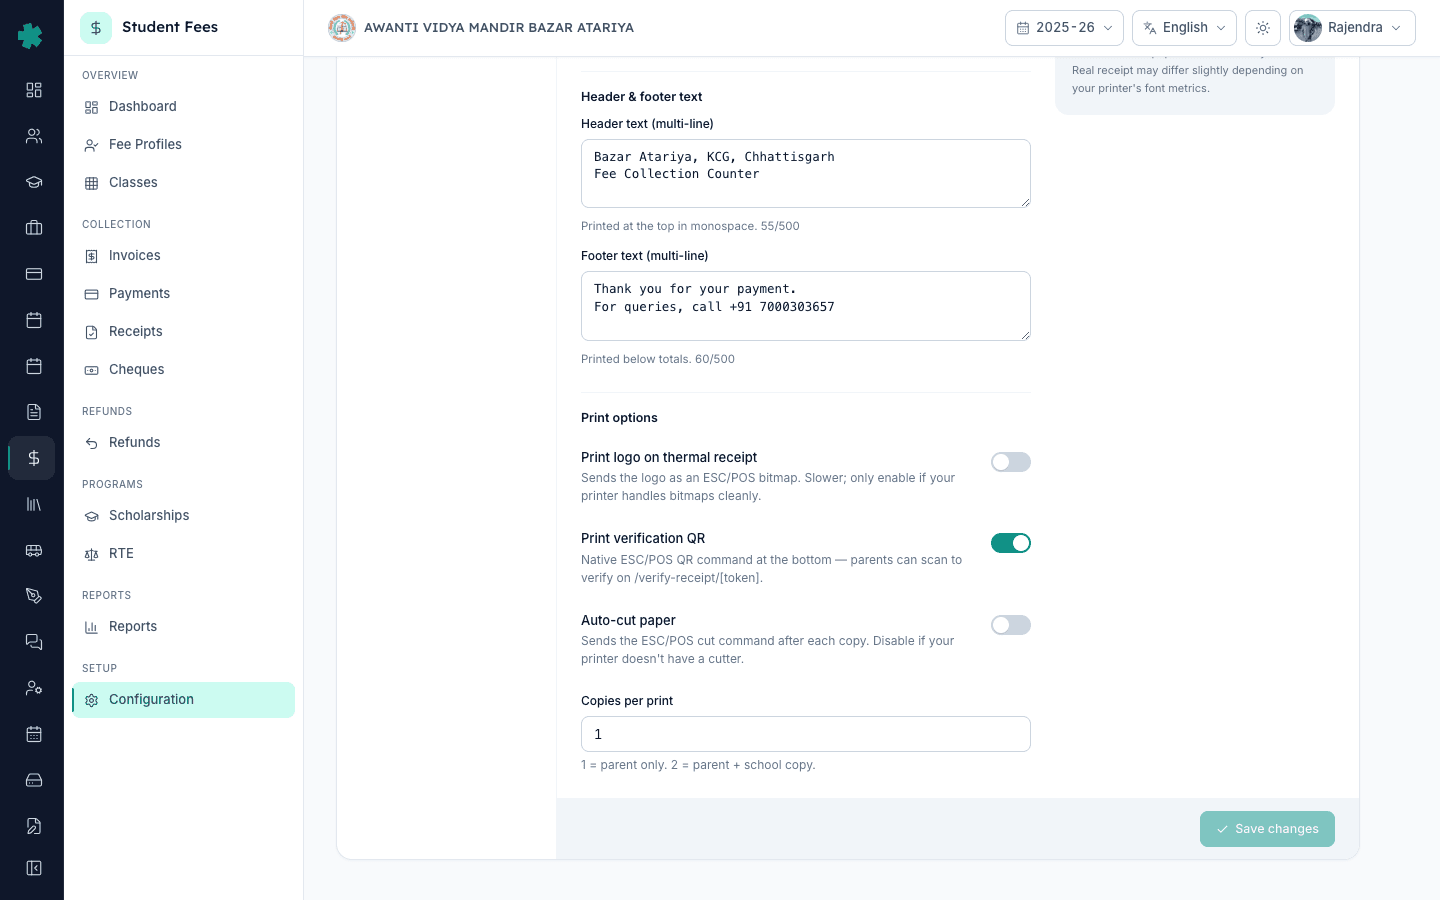
7. Template save कीजिए और हाल की रसीद से test print निकालिए
पेज के नीचे Save changes पर click कीजिए। Inkwelly Receipt template saved का toast दिखाता है। अब एक नए tab में Student Fee → Receipts खोलिए, कोई भी हाल की paid रसीद चुनिए, detail पेज पर Print दबाइए और print dialog में Thermal चुनिए। QZ Tray पहली बार permission माँगेगा, आप Allow दबाते हैं, और printer एक ताज़ी paper slip निकालता है जिसमें आपका header, student का नाम, amount, QR code और footer line होते हैं। यह slip अभिभावक को दे दीजिए — आगे से हर counter print बिल्कुल इसी तरह दिखेगी।
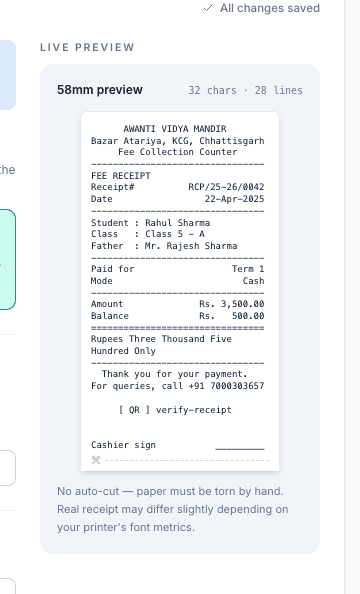
अगला कदम — थर्मल printing चालू होने के बाद counter staff को How to collect a cash, UPI, card or bank-transfer fee payment at the counter in Inkwelly से रोज़ की collection flow सिखाइए ताकि हर payment के अंत में एक printed slip निकले। Emailed receipts के लिए A4 PDF template को How to customise the receipt template for A4 fee receipts in Inkwelly से सही रखिए। और जब स्कूल online फीस payment लेने का निर्णय करे तो How to connect Razorpay to accept online fee payments in Inkwelly से parent-initiated UPI का loop पूरा कीजिए।
Inkwelly Student Fees को अपने counter पर काम करते हुए देखिए
अक्सर पूछे गए सवाल
7 सवालभारतीय स्कूल को फीस counter के लिए कौन-सा थर्मल printer खरीदना चाहिए?
ज़्यादातर भारतीय स्कूलों के लिए ₹7,000 से ₹12,000 के बीच का 80mm desktop थर्मल printer सही है — Olivetti PRT80 कई Inkwelly स्कूलों की common पसंद है, और Epson TM-T82 तब बेहतर है जब स्कूल का हार्डवेयर vendor relationship हो। ध्यान रखिए कि मॉडल ESC/POS support और 80mm paper बताए, एक counter के लिए USB और दो counter एक साथ इस्तेमाल कर रहे हों तो LAN चुनिए।
Inkwelly की Thermal Printer settings में paper size क्या रखें?
यदि आपने standard desktop counter printer लिया है तो 80mm चुनिए — एक line में 48 characters आते हैं, adult के लिए आराम से पढ़ने योग्य रहता है और यही size अभिभावक को printed bill जैसा लगता है। 58mm तभी चुनिए जब स्कूल में 32 characters per line वाला छोटा handheld printer हो। Cashier रसीद screen से per-print size बदल सकता है, इसलिए Inkwelly की setting सिर्फ default होती है।
थर्मल slip पर स्कूल के नाम की जगह question mark क्यों आते हैं?
थर्मल printers सिर्फ English और Latin characters print कर सकते हैं — Inkwelly के Thermal Printer पेज पर स्कूल का Display Name, Header text और Footer text English में टाइप होने चाहिए। यदि Branding tab पर Display Name हिंदी या किसी और भारतीय script में है तो slip पर वहाँ ???? print होते हैं। Configuration → Receipt Template → Branding खोलिए और स्कूल का नाम original के साथ-साथ English में भी टाइप कर के save कीजिए।
हर payment पर थर्मल रसीद की कितनी copies print करनी चाहिए?
भारतीय स्कूलों में सबसे common setting दो है — एक paper slip अभिभावक को और एक identical copy दिन के record के लिए counter पर। जो स्कूल trust या accountant copy भी रखते हैं वे तीन चुनते हैं। छोटे स्कूल जिनके लिए Inkwelly का audit log ही काफी है वे एक चुनते हैं। यह Configuration → Receipt Template → Thermal Printer → Copies per print में set होती है; cashier print dialog में per-print बदलाव भी कर सकता है।
Fee counter par thermal printer kaise lagaye Inkwelly me?
Pehle 80mm thermal printer counter PC ke USB me lagaiye (Olivetti PRT80 ya Epson TM-T82 chalega). Phir QZ Tray naam ka chhota desktop printing app qz.io se download karke install kar lijiye — yahi app Inkwelly se commands le kar printer ko bhejti hai. Ab Inkwelly me Student Fee → Configuration → Receipt Template → Thermal Printer kholiye, 80mm paper choose kijiye, copies 2 set kijiye, header me school ka naam English me likhiye, QR on rakhiye aur Save kijiye. Kisi receipt ke detail page se Print → Thermal pe click kar ke test slip nikaal lijiye.
Thermal printer ka paper size kya rakhe — 80mm ya 58mm?
Zyadatar Indian schools ke liye 80mm paper sahi rehta hai — 48 characters ek line me aate hain, parent ko padhne me clear lagta hai aur counter printer (Olivetti PRT80 jaisa) yahi size leta hai. 58mm tab chuniye jab school me handheld printer ho jo chhota slip nikaalta hai (32 chars per line, paper bhi sasta milta hai). Default setting Configuration → Receipt Template → Thermal Printer me hai, lekin cashier print dialog se ek baar ke liye change bhi kar sakta hai.
फीस counter पर print करने के लिए क्या Inkwelly को internet चाहिए?
हाँ — रसीद Inkwelly के servers पर तैयार होती है, इसलिए फीस-counter PC को Inkwelly खोलने और Collect या Receipt detail पेज तक पहुँचने के लिए internet चाहिए। असली printing counter PC पर QZ Tray लोकल रूप से करता है, इसलिए पेज लोड होने के बाद नेटवर्क की एक छोटी रुकावट भी चालू slip को रुकने नहीं देती। कम bandwidth वाली जगहों पर जहाँ संभव हो, Inkwelly को wired LAN connection पर लगाइए।
आपको ये भी पसंद आ सकता है
3 लेखस्रोत व संदर्भ
- Bureau of Indian Standards — IS 14965 Code of practice for thermal printers · देखा गया 19 May 2026
BIS specifies the thermal-print specifications Indian retail and office printers should follow, including paper widths of 80mm and 58mm referenced in the Inkwelly Thermal Printer settings.
- Epson ESC/POS Command Reference for thermal receipt printers · देखा गया 19 May 2026
The ESC/POS standard defines the command set Inkwelly sends through QZ Tray to drive any compatible thermal receipt printer.
- Reserve Bank of India — Guidelines on issuance of receipts for cash and digital payments · देखा गया 19 May 2026
RBI guidelines require an institution accepting cash or UPI payments to issue a printed or verifiable receipt at the point of payment.
Inkwelly आपके स्कूल पर — खुद देखें
30 मिनट का डेमो। आपके मौजूदा ERP को आपके साथ खोलकर, कॉल पर ही आपका डेटा Inkwelly में लोड करते हैं। कॉल ख़त्म होते-होते एक तय तारीख़ का गो-लाइव प्लान आपके हाथ में।