Razorpay कैसे जोड़ें ऑनलाइन फीस भुगतान स्वीकार करने के लिए
यह गाइड उन स्कूल अकाउंटेंट और प्रिंसिपल के लिए है जो पहली बार ऑनलाइन फीस संग्रह शुरू कर रहे हैं। अंत में अभिभावक UPI, कार्ड, NEFT और वॉलेट से सीधे आपके स्कूल के Razorpay अकाउंट में invoice का भुगतान कर सकेंगे और हर भुगतान अपने आप Inkwelly में निपटी हुई receipt के रूप में दर्ज होगा।
Inkwelly में Razorpay जोड़ने के लिए: dashboard.razorpay.com पर sign in करें और API Keys generate करें, Key Id और Key Secret copy करें, Inkwelly → Settings → Online payments खोलें, API Keys सेक्शन में दोनों paste करें, save करें ताकि Webhook URL और Secret मिल जाएँ, उन्हें Razorpay में register करें (छह events tick करें), फिर तय करें कि gateway fee स्कूल देगा या अभिभावक। पूरी प्रक्रिया लगभग 15 मिनट लेती है।
Razorpay भारतीय स्कूलों में सबसे अधिक प्रयोग में आने वाला payment gateway है और Inkwelly फिलहाल केवल इसी के साथ सीधे जुड़ता है। Razorpay की प्रकाशित दरें कार्ड पर लगभग 2%, ₹2,000 से ऊपर UPI पर लगभग 0.5%, और ₹2,000 तक के UPI लेनदेन पर 0% हैं — क्योंकि NPCI के zero-MDR नियम के तहत छोटे person-to-merchant भुगतानों पर शुल्क नहीं लगता। 1,200 छात्रों वाला स्कूल ₹40,000 औसत वार्षिक फीस पर सालाना लगभग ₹4.8 करोड़ का लेनदेन करता है — 1% का blended gateway fee भी लगभग ₹4.8 लाख होता है, इसलिए convenience-fee का चुनाव वास्तविक P&L मद है, छोटी बात नहीं। Inkwelly में सेव की गई keys AES-256 से encrypt होकर रखी जाती हैं और पहली बार सेव करने के बाद कभी clear रूप में लॉग नहीं होतीं।
1. Inkwelly Settings में Online payments खोलें
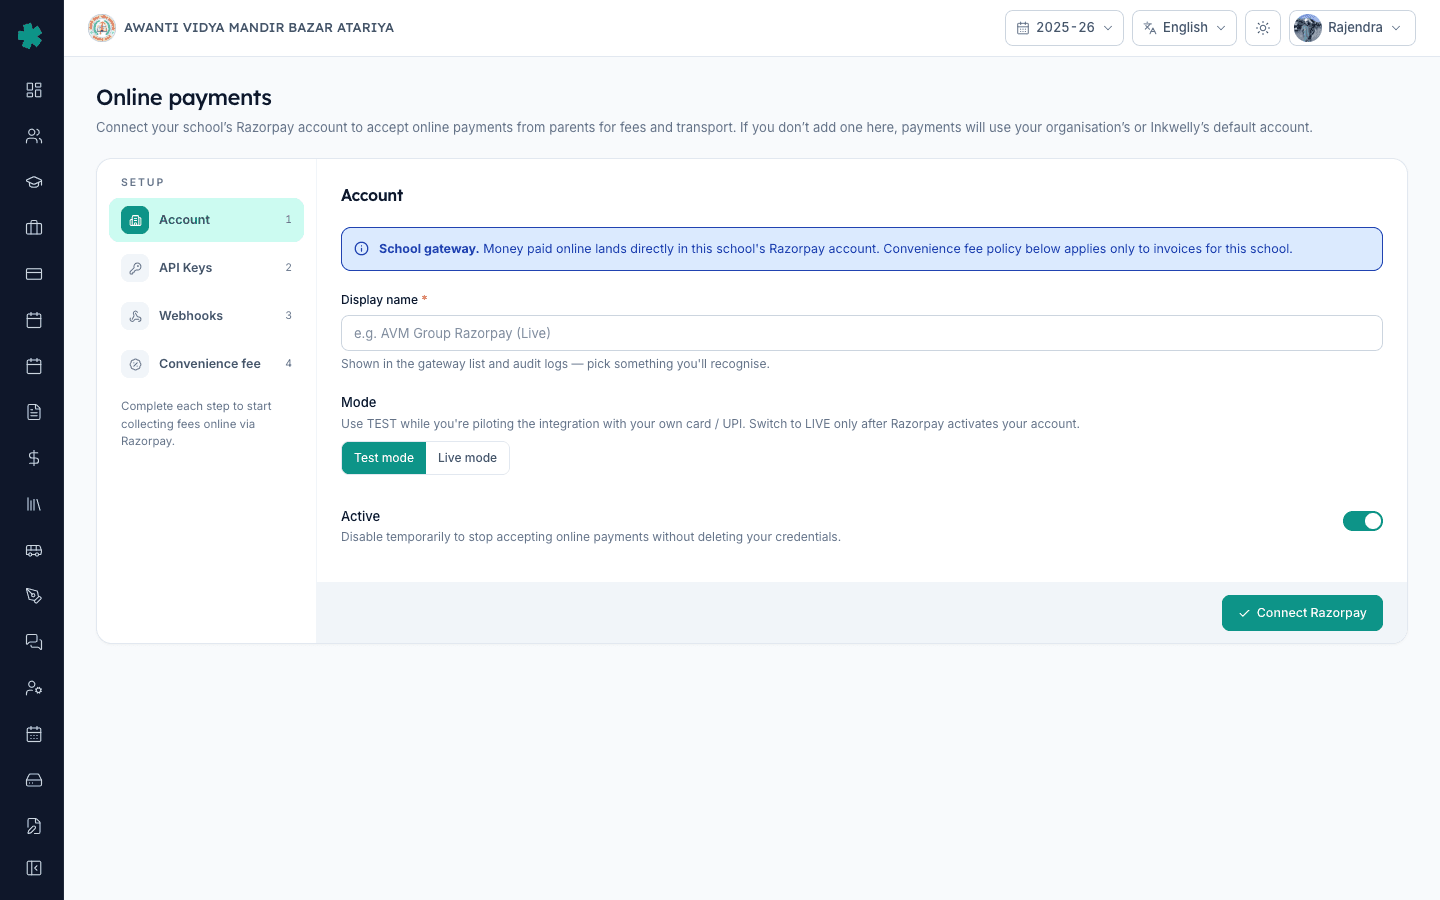
Inkwelly के school sidebar से Student Fee → Configuration खोलें, फिर Integrations के अंतर्गत Payment Gateway tile पर क्लिक करें। यह tile आपको school-wide Online payments पेज पर ले जाता है, जो Settings → Payment gateways पर है। यही पेज Settings → Online payments से सीधे भी खुलता है — दोनों रास्ते उसी चार-सेक्शन setup wizard पर पहुँचते हैं जहाँ बाएँ साइडबार में Account, API Keys, Webhooks और Convenience fee सूचीबद्ध होते हैं।
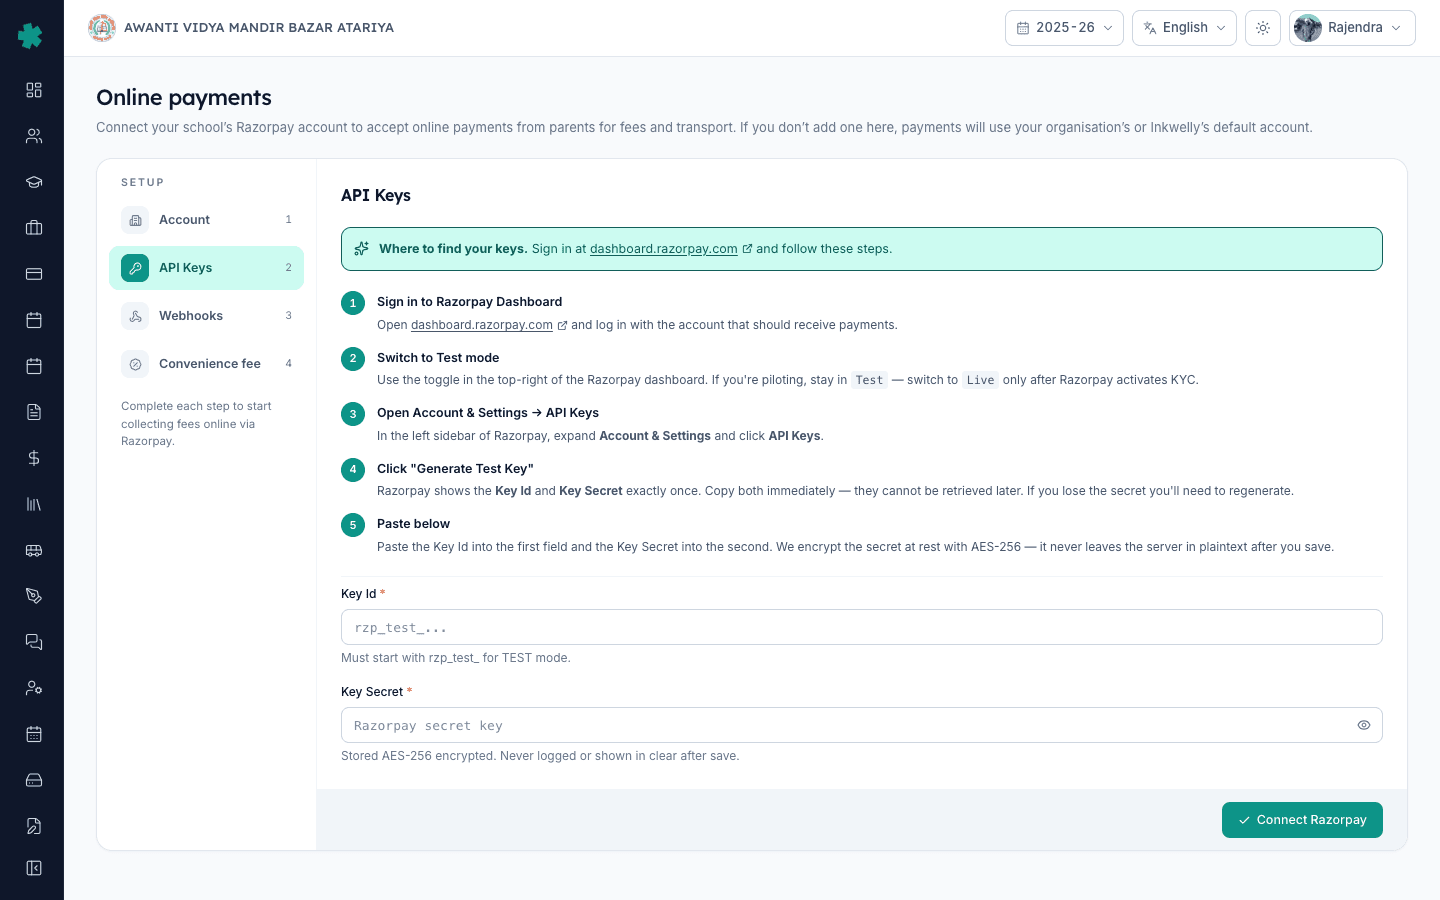
2. अपने Razorpay dashboard में API Keys generate करें
नए browser tab में dashboard.razorpay.com खोलें और sign in करें। ऊपर दाईं ओर के toggle से Test mode चुनें (पायलट के लिए) या Live mode चुनें (KYC active होने के बाद)। बाएँ साइडबार से Account & Settings खोलें और API Keys पर क्लिक करें। Generate Test Key या Generate Live Key पर क्लिक करें। Razorpay Key Id और Key Secret एक ही बार स्क्रीन पर दिखाता है — दोनों को तुरंत किसी अस्थायी note में copy कर लें। यदि आप Secret copy किए बिना उस स्क्रीन को बंद करते हैं, तो नई jodi generate करनी होगी और दोबारा शुरू करना होगा।
3. Inkwelly के Account सेक्शन में details भरें
Inkwelly के Online payments पेज पर पहली बार setup में Account सेक्शन डिफ़ॉल्ट रूप से खुला रहता है। एक display name भरें जिसे ऑफिस हर receipt और audit log पर पहचान सके — उदाहरण AVM Group Razorpay (Live)। मिलान करता mode चुनें — पायलट के लिए Test, असली पैसे के लिए Live। Active toggle चालू रखें ताकि gateway भुगतान स्वीकार करने योग्य रहे। Mode और key का prefix मेल खाना चाहिए: Test mode में rzp_live_ key अस्वीकार होगी और इसके विपरीत भी, इसलिए दोनों एक साथ सेट करें।
4. Key Id और Key Secret को API Keys सेक्शन में paste करें
बाएँ साइडबार से API Keys पर क्लिक करें। Razorpay Key Id को पहले field में paste करें — इसे Test के लिए rzp_test_ और Live के लिए rzp_live_ से शुरू होना चाहिए, अन्यथा Inkwelly सेव करने से इनकार करेगा। Key Secret को दूसरे field में paste करें। Connect Razorpay पर क्लिक करते ही Inkwelly secret को AES-256 से encrypt कर देता है; इसके बाद यह लॉग, audit trail या export में clear रूप में कहीं नहीं लिखी जाती। नीचे दाईं ओर Connect Razorpay दबाएँ। Inkwelly gateway account बना देता है और तुरंत अगले step के लिए एक Webhook URL और Webhook Secret जनरेट कर देता है।
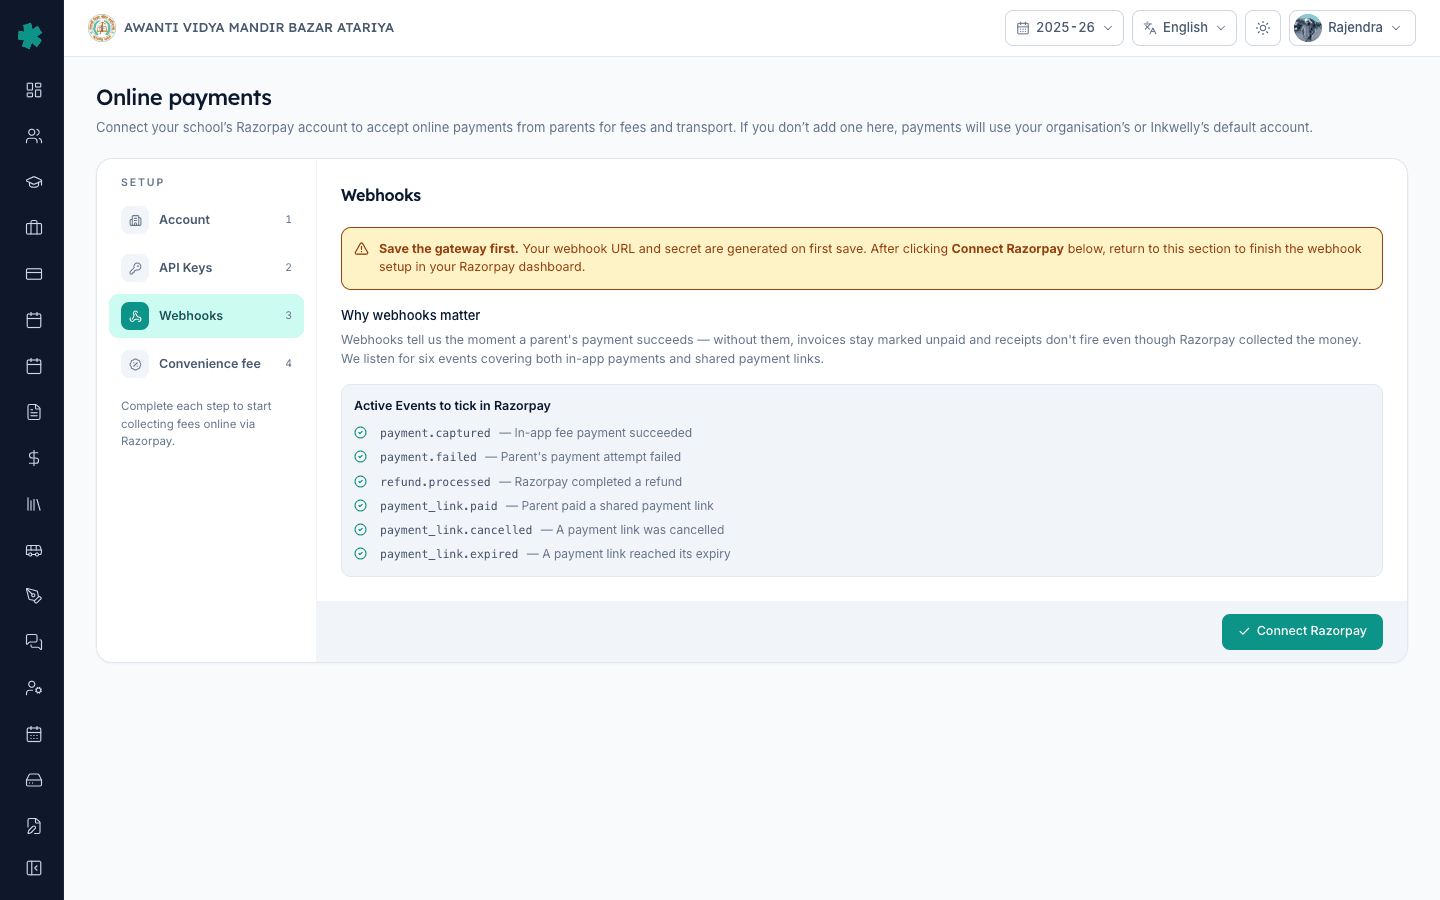
5. Razorpay में Webhook register करें
Inkwelly के साइडबार से Webhooks पर क्लिक करें। Copy बटन से Webhook URL और Webhook Secret दोनों copy कर लें। अपने Razorpay tab में Settings → Webhooks खोलें (direct link: dashboard.razorpay.com/app/webhooks) और Add New Webhook पर क्लिक करें। URL को Webhook URL field में और Secret को Secret field में paste करें। Inkwelly जिन छह events को सुनता है उन सभी को tick करें: payment.captured, payment.failed, refund.processed, payment_link.paid, payment_link.cancelled और payment_link.expired। एक alert email भरें ताकि delivery विफल होने पर Razorpay चेतावनी भेज सके। पुष्टि करें कि webhook mode आपकी keys से मेल खाता है — Live keys के लिए Live mode webhook — और Create Webhook पर क्लिक करें। Razorpay तुरंत एक test ping भेजता है; यदि credentials सही हैं तो webhook Active दिखेगा।
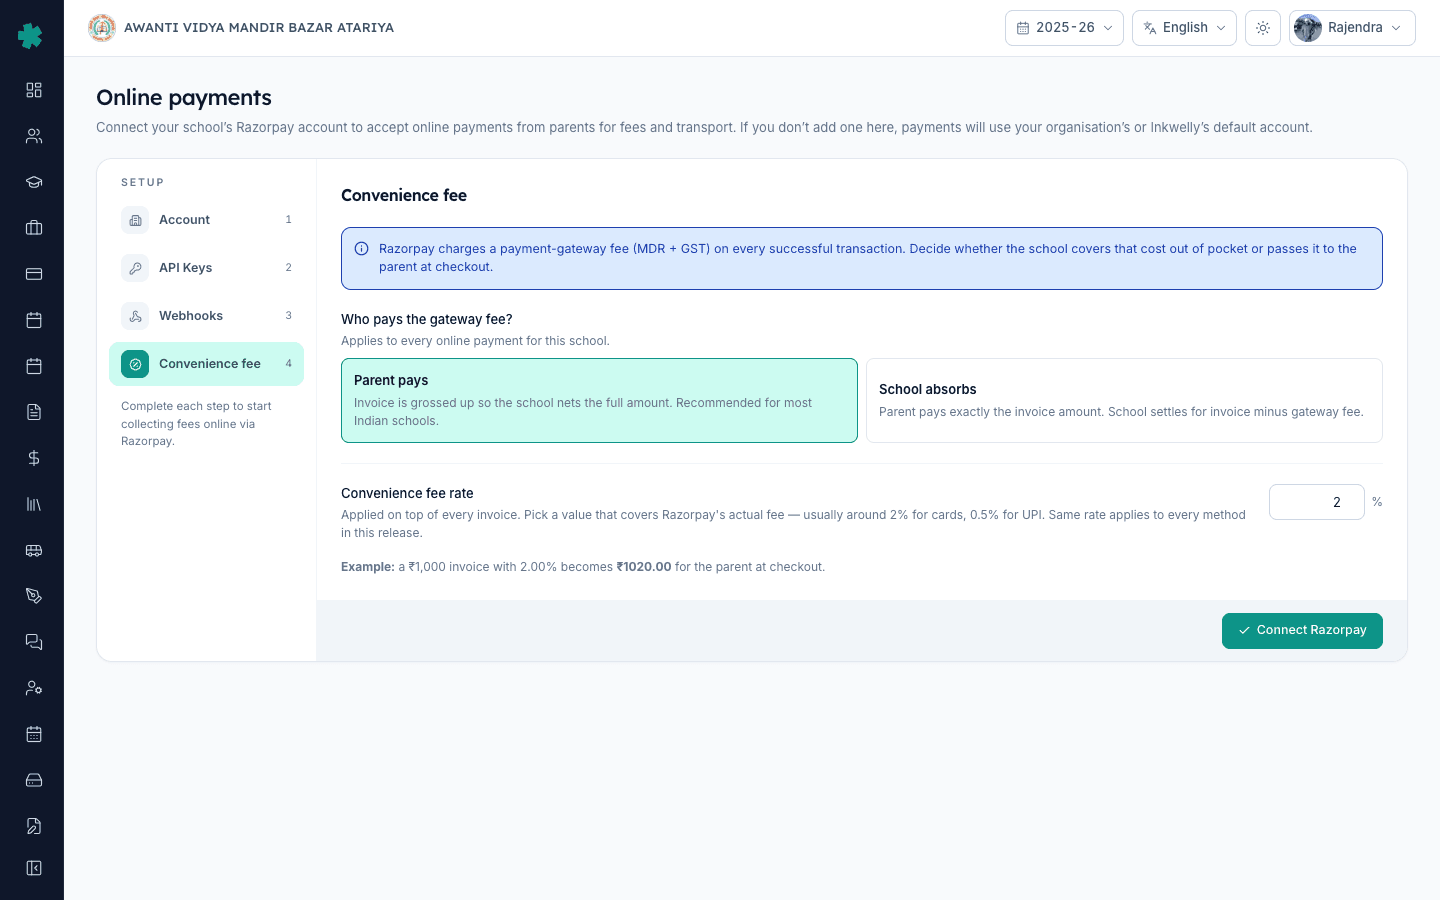
6. तय करें gateway fee कौन देगा
Inkwelly के साइडबार से Convenience fee पर क्लिक करें। दो विकल्पों में से एक चुनें। Parent pays चुनने पर हर invoice gross up हो जाता है ताकि स्कूल को पूरी रकम मिले — उदाहरण ₹1,000 का invoice 2% के साथ checkout पर ₹1,020 हो जाता है और स्कूल को पूरे ₹1,000 मिलते हैं। School absorbs चुनने पर अभिभावक invoice का सटीक amount देता है और स्कूल को Razorpay की fee घटाकर बची रकम मिलती है। ज़्यादातर भारतीय स्कूल Parent pays 2% चुनते हैं ताकि collection का face value बना रहे। Parent pays के लिए 0 से 10 प्रतिशत के बीच एक Convenience fee rate सेट करें जो कार्ड और UPI दोनों पर Razorpay की blended लागत को कवर करे। Save changes दबाएँ।
7. Test connection चलाएँ और Status सेक्शन देखें
साइडबार से Status पर क्लिक करें। Test connection पर क्लिक करें। Inkwelly आपकी saved credentials से Razorpay को एक read-only call करता है; यदि call सफल होती है, card हरे रंग में बदल जाता है और Razorpay credentials verified के साथ Last verified at timestamp दिखाता है। यदि call विफल होती है, तो Razorpay का कारण ज्यों का त्यों दिखाया जाता है — आम कारण हैं गलत mode-key संयोजन, rotate हुई secret जो Inkwelly में अद्यतन नहीं की गई, या निष्क्रिय Razorpay अकाउंट। समस्या ठीक करें, फिर से सेव करें, और तब तक Test connection दोहराएँ जब तक badge हरा न हो जाए।
Online payments चालू होने के बाद अगला कदम है यह पुष्टि करना कि वास्तविक भुगतान वापस receipt के रूप में दर्ज होता है — इसके लिए How to reconcile an online payment received through Razorpay in Inkwelly का अनुसरण करें, जिसमें auto-post प्रवाह और Awaiting confirmation में रुके किसी भी भुगतान के लिए Mark as reconciled action दिखाया गया है। महीने के अंत में gateway charges report How to download the Gateway Charges (Razorpay MDR) report in Inkwelly से download करें ताकि प्रति लेनदेन MDR और GST एक अलग P&L मद के रूप में दर्ज हो।
Inkwelly Student Fees को काम करते हुए देखें
अक्सर पूछे गए सवाल
7 सवालInkwelly Razorpay से कैसे जुड़ता है फीस भुगतान के लिए?
Inkwelly आपकी Razorpay Key Id और Key Secret प्रति स्कूल AES-256 से encrypt करके रखता है। जब कोई अभिभावक invoice का भुगतान करता है, Inkwelly उन्हीं keys से एक Razorpay Order बनाता है; Razorpay फिर UPI, कार्ड, NEFT, IMPS या वॉलेट से रकम वसूलता है और रजिस्टर किए webhook events के माध्यम से Inkwelly को सूचित करता है। पैसा सीधे आपके स्कूल के Razorpay-लिंक्ड बैंक खाते में निपटता है, Inkwelly के माध्यम से नहीं।
Razorpay kaise connect kare Inkwelly se?
Pehle dashboard.razorpay.com par sign in karke API Keys generate kijiye — Test mode me rzp_test_ wala Key Id aur Key Secret milega, Live mode me rzp_live_. Inkwelly me Student Fee → Configuration → Payment Gateway tile open kijiye, ya direct Settings → Online payments par jaiye. Account section me display name aur mode chuniye, API Keys section me dono fields paste kijiye, Connect Razorpay dabaiye. Phir Webhooks section se URL aur Secret copy karke Razorpay ke Settings → Webhooks me register kijiye, chhe events tick kijiye, aur Convenience fee section me decide kijiye kaun gateway fee uthayega.
Convenience fee parent ya school deta hai?
Yeh aapki choice hai. Inkwelly Convenience fee section me do options deta hai. Parent pays select karne par invoice ka amount checkout par badh jaata hai — jaise ₹1,000 ka invoice 2% ke saath ₹1,020 ho jata hai, aur school ko poora ₹1,000 milta hai. School absorbs select karne par parent invoice ka exact amount deta hai, aur school ko gateway fee ke baad bachi rakam milti hai. Aam tor par CBSE aur state board schools 2% Parent pays choose karte hain kyunki collection ka face value bana rehta hai.
क्या Inkwelly UPI Autopay समर्थित करता है या केवल एक-बार UPI भुगतान?
Inkwelly फिलहाल Razorpay के standard Checkout flow और Payment Links को समर्थन देता है — दोनों UPI, कार्ड, NEFT, IMPS और वॉलेट को एक-बार के भुगतान के रूप में कवर करते हैं। UPI Autopay जैसी mandates (हर किस्त की due date पर auto-debit) रोडमैप पर हैं और इनके लिए Razorpay को आपके अकाउंट पर subscription mandates सक्षम करना होगा। अभी अभिभावक को हर किस्त के लिए WhatsApp, SMS या email पर नया payment link मिलता है।
Razorpay स्कूल फीस पर प्रति लेनदेन कितना शुल्क लेता है?
Razorpay की standard Checkout योजना की प्रकाशित दरें भारतीय credit और debit कार्ड पर लगभग 2%, ₹2,000 से ऊपर के UPI लेनदेन पर लगभग 0.5%, और ₹2,000 तक के UPI पर 0% हैं — क्योंकि NPCI का zero-MDR नियम छोटे person-to-merchant भुगतानों पर लागू होता है। Net banking और वॉलेट पर लगभग 1.5% से 2% तक लगता है। Gateway fee पर 18% GST अलग से लगती है। हमेशा अपने Razorpay dashboard के Pricing पेज पर ताज़ा दरें देखें क्योंकि ये बदलती रहती हैं।
यदि Inkwelly में सेव करने के बाद Razorpay Key Secret खो जाए तो क्या होगा?
Razorpay Key Secret केवल एक बार स्क्रीन पर दिखाता है और वही secret दोबारा कभी नहीं देता। Inkwelly सेव के समय अपनी encrypted copy रखता है, लेकिन यदि Razorpay key को revoke या rotate कर देता है, तो आपको dashboard.razorpay.com → Account & Settings → API Keys में नई jodi generate करनी होगी और उसे Inkwelly के API Keys सेक्शन में paste करना होगा। Inkwelly में सेव के बाद Key Secret field masked रहता है; आप उसे केवल तब फिर से भरते हैं जब credentials rotate हो रहे हों।
Inkwelly में ऑनलाइन भुगतान कितनी जल्दी receipt के रूप में दिखता है?
बशर्ते webhook सही ढंग से रजिस्टर हो, कुछ सेकंड के भीतर। जैसे ही अभिभावक का बैंक debit पुष्टि करता है, Razorpay Inkwelly के Webhook URL पर payment.captured भेजता है; Inkwelly आपके Webhook Secret से उस webhook का signature सत्यापित करता है, invoice को paid मार्क करता है, receipt बनाता है और receipt-sent notification भेजता है। यदि webhook गायब या गलत configured है, तो भुगतान Payments में Awaiting confirmation में पड़ा रहेगा और आपको उसे Mark as reconciled से मैन्युअली बंद करना होगा।
आपको ये भी पसंद आ सकता है
2 लेखस्रोत व संदर्भ
- Razorpay Documentation — API Keys and Webhooks · देखा गया 19 May 2026
Razorpay's official guidance that the Key Secret is shown exactly once during generation and must be stored securely, and that webhooks are the primary post-payment notification channel.
- Reserve Bank of India — Payment and Settlement Systems regulations on MDR · देखा गया 19 May 2026
RBI's regulatory framework for merchant discount rate (MDR) on card and digital payments, under which Razorpay's per-transaction pricing is published.
- National Payments Corporation of India — UPI Zero MDR notification · देखा गया 19 May 2026
NPCI's circular that mandates zero merchant discount rate on UPI person-to-merchant transactions up to ₹2,000, which is why low-value UPI fee collections incur no gateway fee.
Inkwelly आपके स्कूल पर — खुद देखें
30 मिनट का डेमो। आपके मौजूदा ERP को आपके साथ खोलकर, कॉल पर ही आपका डेटा Inkwelly में लोड करते हैं। कॉल ख़त्म होते-होते एक तय तारीख़ का गो-लाइव प्लान आपके हाथ में।