एक छात्र को अलग फीस स्ट्रक्चर कैसे असाइन करें Inkwelly में
यह गाइड उन स्कूल अकाउंटेंट और ऑफिस स्टाफ के लिए है जिन्हें केवल एक छात्र को अलग फीस प्लान पर ले जाना है — hostel से day में बदलाव, बीच सत्र में बोर्ड परिवर्तन, या sibling नियम का अपवाद — बाकी पूरी क्लास को बिना छुए। अंत में वह छात्र सही फीस स्ट्रक्चर से बिल होगा और सभी invoice नई दरों पर recalculate हो चुके होंगे।
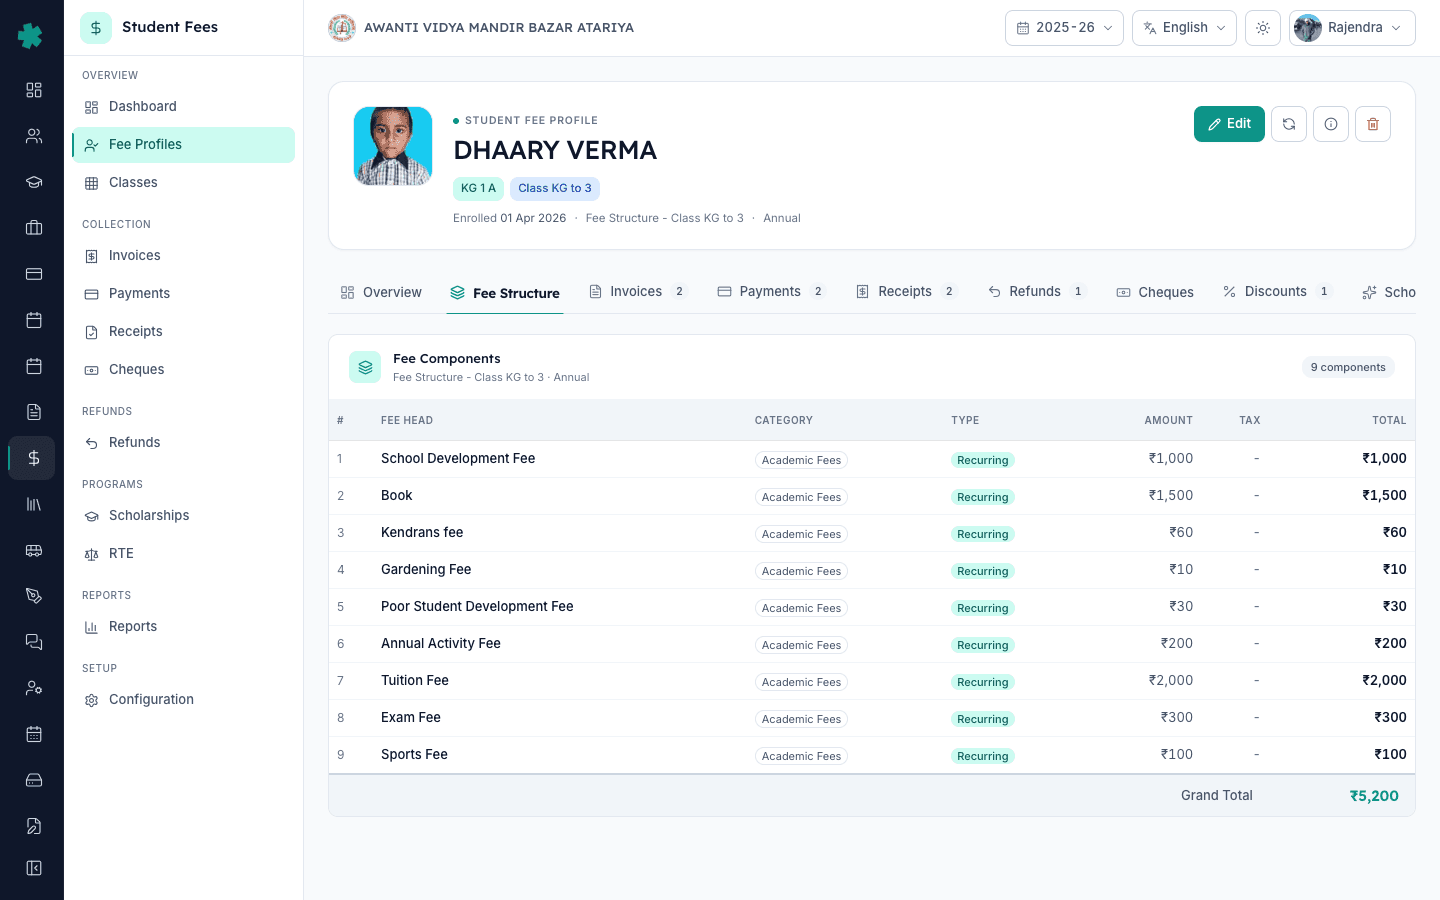
Inkwelly में एक छात्र को अलग फीस स्ट्रक्चर असाइन करने के लिए: Student Fee → Fee Profiles खोलें, छात्र को खोजें, profile खोलें, Fee Structure tab पर वर्तमान प्लान देखें, profile header में Edit दबाएँ, dropdown से ऐसा Fee Group चुनें जो नए स्ट्रक्चर से जुड़ा हो, Update दबाएँ, फिर Recalculate दबाएँ। Inkwelly उस छात्र को नए प्लान पर ले जाता है, breakdown ताज़ा कर देता है और क्लास के बाकी छात्रों पर कोई असर नहीं पड़ता।
भारतीय स्कूलों में प्रति-छात्र फीस override सामान्य है। 1,200 छात्रों वाला एक CBSE day school साल में औसतन 30 से 60 मध्य-सत्र परिवर्तन संभालता है: Class 8 का छात्र hostel cohort में जाना, बीच सत्र में State Board से CBSE में आने वाला Board-change applicant, sibling-discount cohort जिसे क्लास default कवर नहीं करता, या RTE छात्र जिसकी फीस Right to Education Act 2009 के 25 प्रतिशत आरक्षण नियम के अनुसार चलनी चाहिए। Inkwelly का fee profile हर छात्र का Fee Group एक प्रति-छात्र फ़ील्ड के रूप में रखता है, इसलिए एक छात्र के लिए इसे बदलने से किसी और पर असर नहीं पड़ता।
1. Fee Profiles सूची खोलें
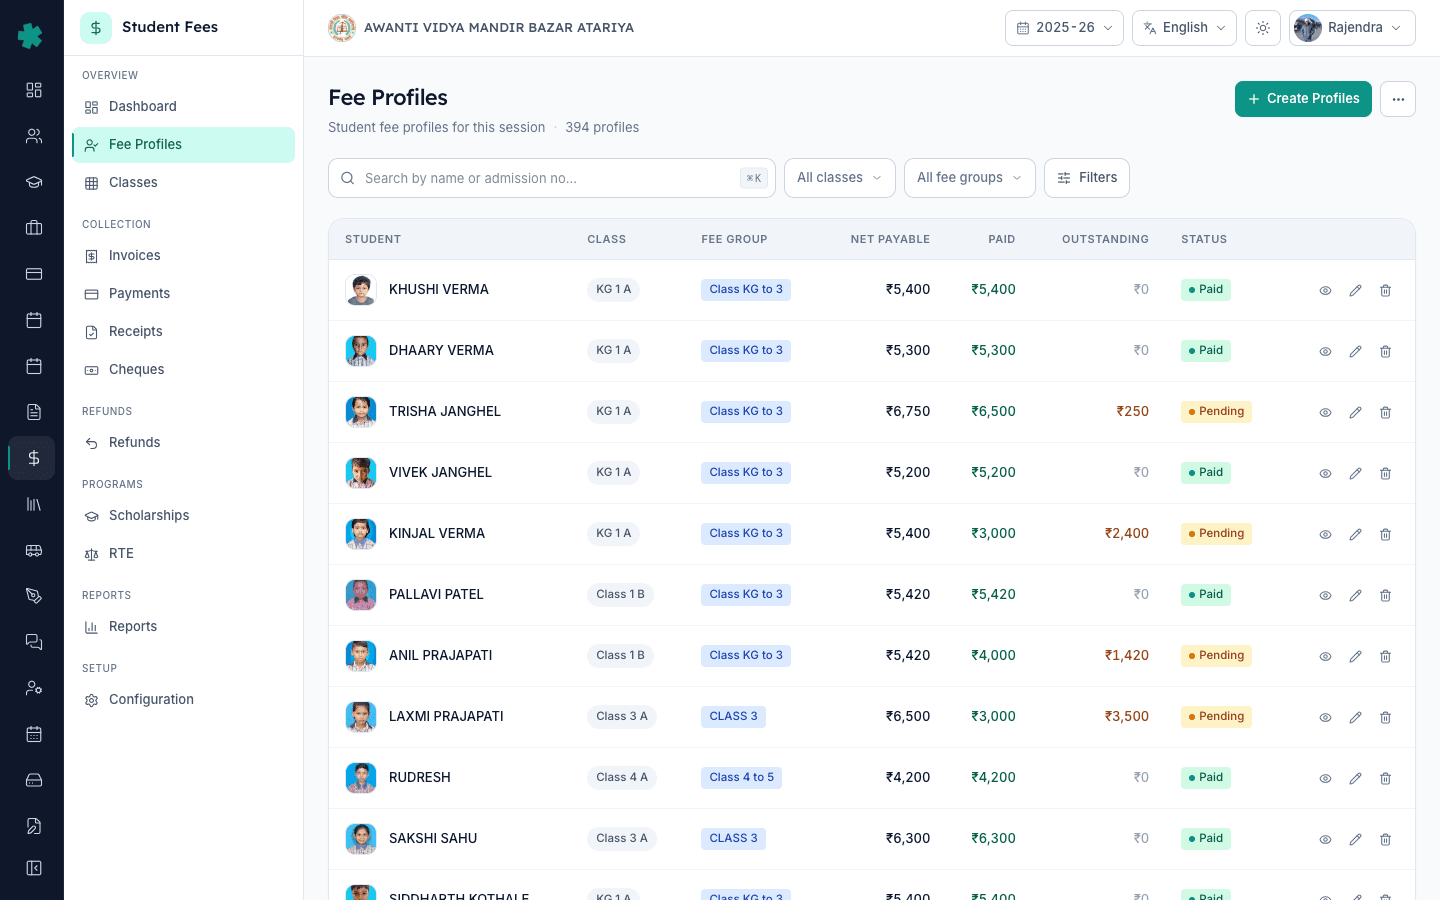
Inkwelly → Student Fee खोलें। बाएँ साइडबार में OVERVIEW के अंतर्गत Fee Profiles पर क्लिक करें। Fee Profiles पेज वर्तमान सत्र के हर छात्र को उसके Fee Group, क्लास, बकाया राशि और अंतिम भुगतान तिथि के साथ दिखाता है। ऊपर के filter bar में search box और class तथा status filter होते हैं, जिससे 2,000 छात्रों वाले स्कूल में भी सही profile पाँच सेकंड से कम में मिल जाता है।
2. छात्र खोजें और profile खोलें
Fee Profiles सूची के ऊपर वाले search box में छात्र का admission number, पहला नाम या अंतिम नाम टाइप करें। आप जैसे-जैसे टाइप करते हैं Inkwelly सूची को छोटा करता जाता है। छात्र की पंक्ति पर क्लिक करके fee profile detail पेज खोलें। Profile header पर नाम, admission number, class chip और वर्तमान Fee Group एक नीले pill के रूप में दिखता है — यही pill बताता है कि अभी कौनसा Fee Group इस छात्र को बिल कर रहा है।
3. वर्तमान प्लान देखने के लिए Fee Structure tab खोलें
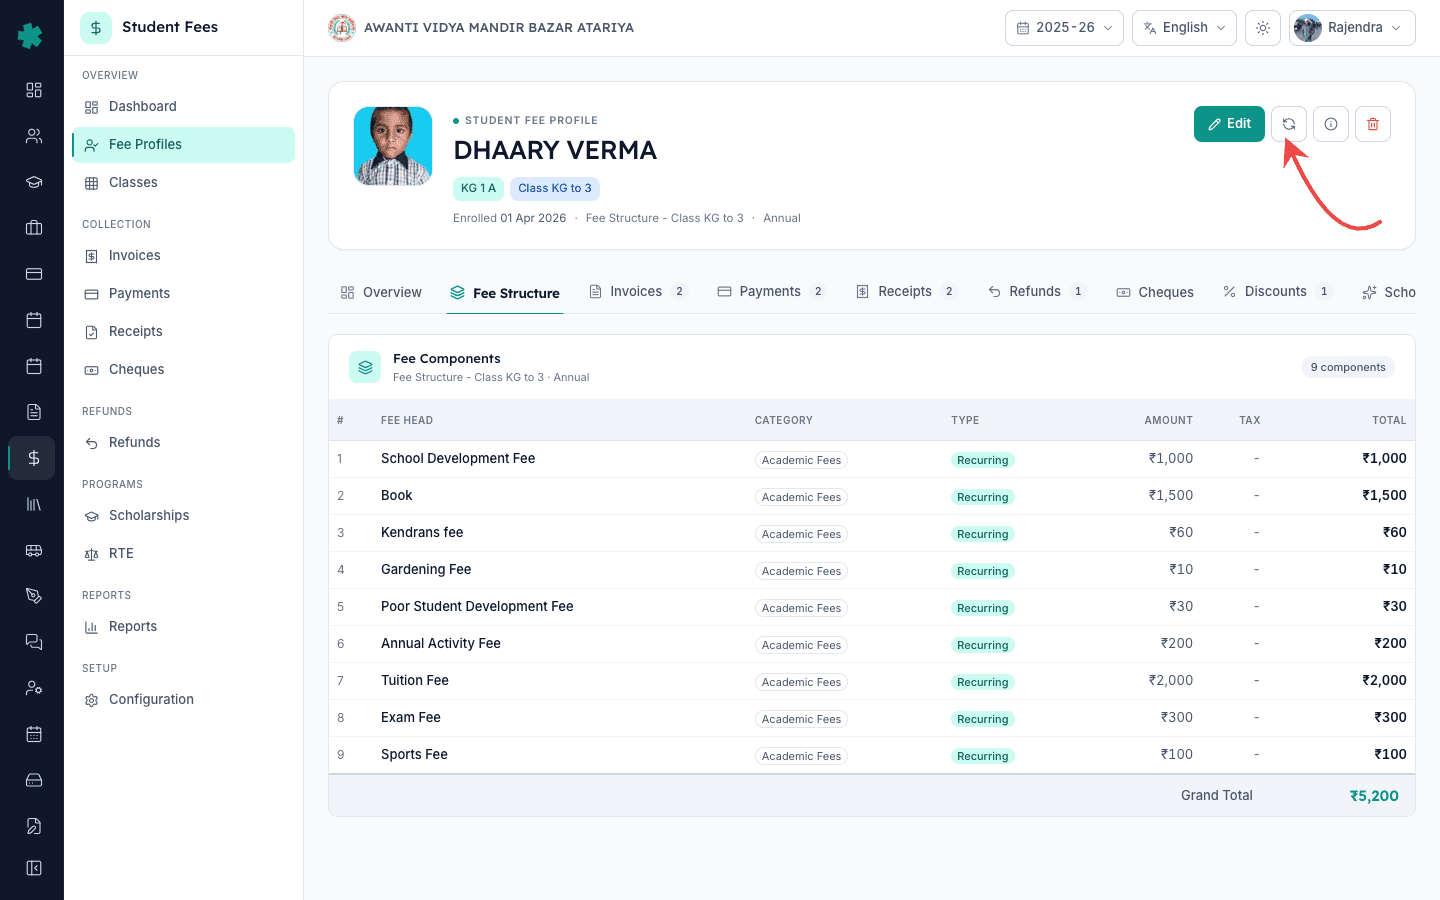
Profile detail पेज पर दूसरी पंक्ति की navigation में Fee Structure tab पर क्लिक करें। Inkwelly उस स्ट्रक्चर की Fee Components तालिका दिखाता है जिस पर यह छात्र अभी है — हर fee head उसकी राशि, tax और कुल के साथ, और नीचे Grand Total। इसे ध्यान से पढ़ें ताकि आपको पता रहे कि क्या बदलने वाला है। यदि छात्र गलत प्लान पर है, तो यहीं दिखेगा: तालिका के ऊपर लिखा स्ट्रक्चर का नाम और कुल राशि वह नहीं होगी जिसे प्रिंसिपल ने स्वीकृत किया था।
4. Profile header पर Edit दबाएँ
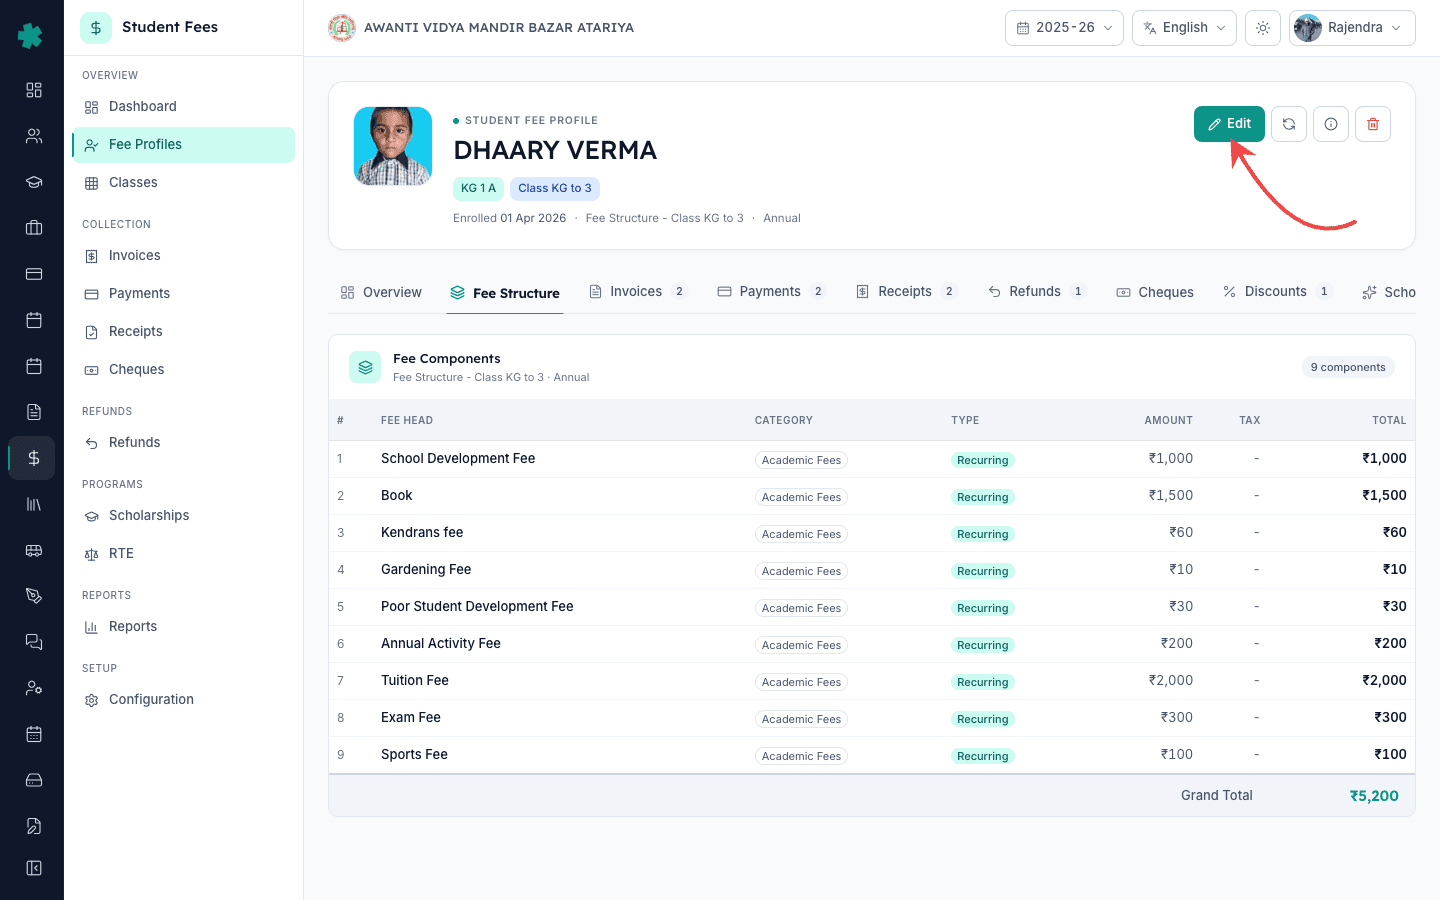
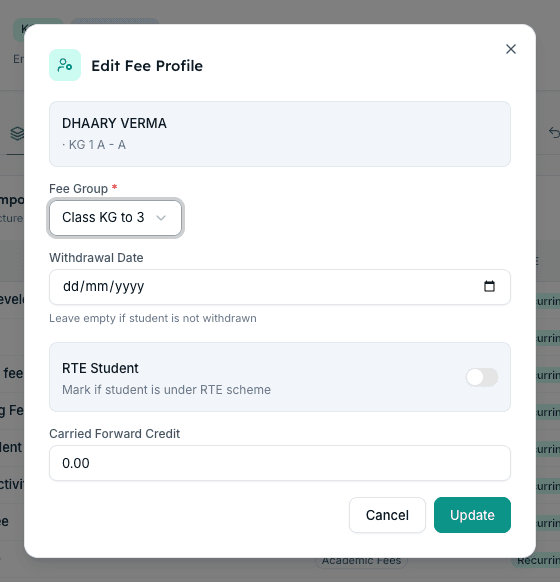
Profile header के ऊपर दाईं ओर, छात्र के नाम के पास नीला Edit बटन क्लिक करें। Inkwelly Edit Fee Profile dialog खोलता है। सबसे ऊपर छात्र का identity card होता है — नाम, admission number, क्लास — उसके बाद Fee Group dropdown, एक वैकल्पिक Withdrawal Date picker, RTE Student switch और Carried Forward Credit field। Override का असली काम Fee Group dropdown में होता है, क्योंकि Inkwelly का हर Fee Group एक ही फीस स्ट्रक्चर से जुड़ा होता है।
5. अलग Fee Group चुनें और Update दबाएँ
Fee Group dropdown पर क्लिक करें। Inkwelly इस सत्र के सभी सक्रिय Fee Group, और हर एक का जुड़ा फीस स्ट्रक्चर भी दिखाता है — Primary, Hostel, RTE, Sibling Cohort, इत्यादि। वह Fee Group चुनें जिसका स्ट्रक्चर आप इस छात्र को पाने देना चाहते हैं। बाकी फ़ील्ड वैसे ही छोड़ दें, जब तक कि छात्र को RTE के रूप में चिह्नित न करना हो या Carried Forward Credit दर्ज न करना हो। Update दबाएँ। Inkwelly तुरंत सफलता का toast दिखाता है और profile header पर नीला Fee Group pill तत्काल अपडेट हो जाता है।
6. Invoices और बकाया ताज़ा करने के लिए Recalculate दबाएँ
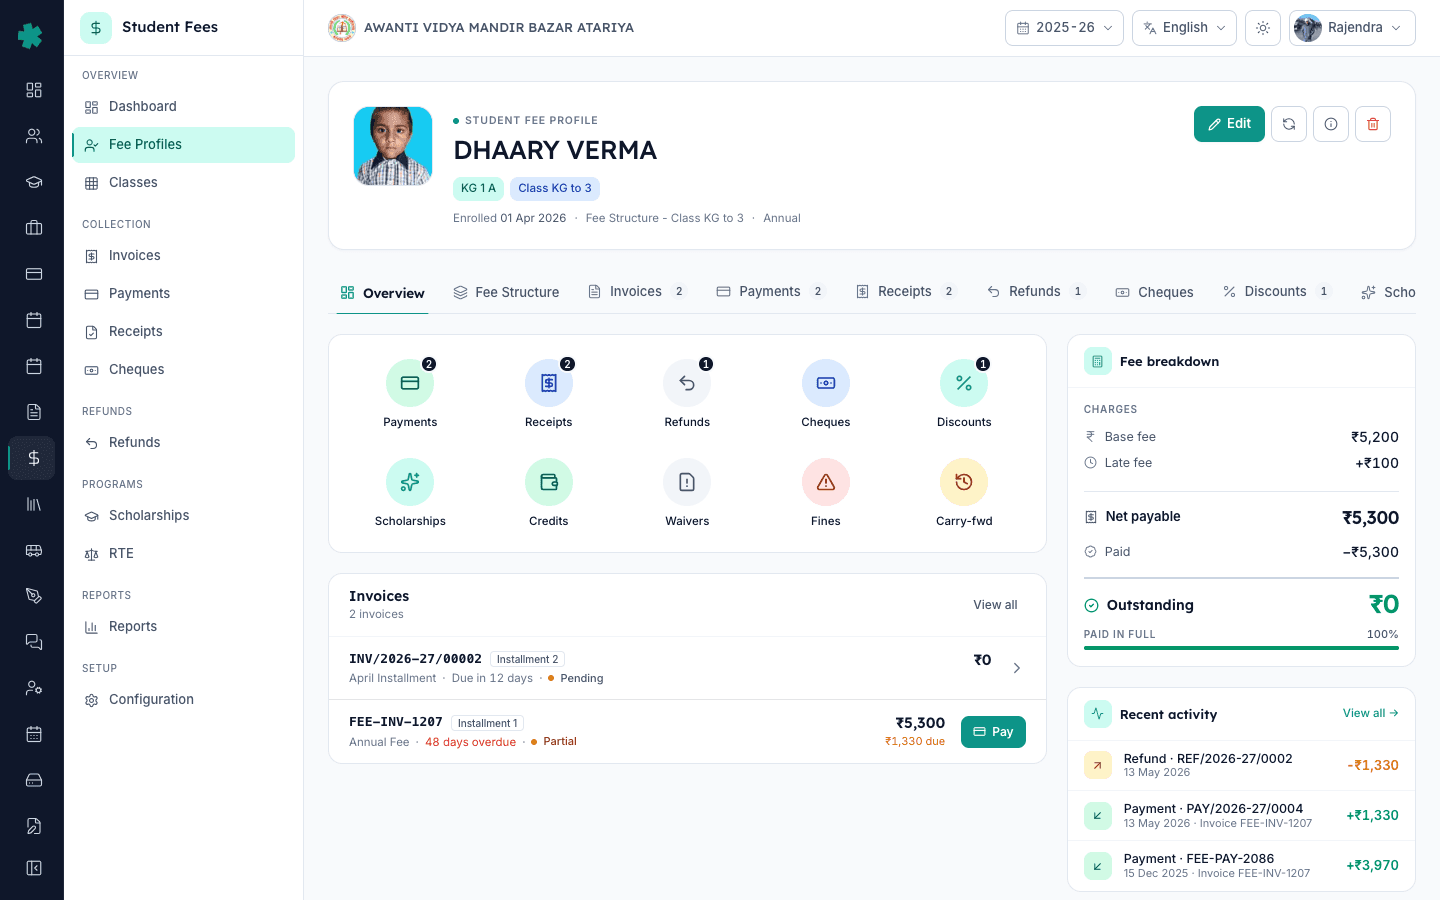
Profile header पर वापस आएँ और Edit के पास वाला गोल refresh icon क्लिक करें — यही Recalculate है। Inkwelly एक पुष्टि कार्ड दिखाता है: pending invoice नए स्ट्रक्चर के विरुद्ध फिर से बनेंगे, paid invoice लॉक रहेंगे और बकाया राशि ताज़ा होगी। Recalculate दबाएँ। अब Fee Structure tab नया प्लान दिखाएगा, Invoices tab में नई किस्तें नई राशियों पर दिखेंगी, और profile के दाएँ कॉलम का breakdown भी इस बदलाव को दर्शाएगा।
अगला कदम। यदि override स्थायी है क्योंकि छात्र cohort बदल गया है (day से hostel, State Board से CBSE), तो admission record भी अपडेट करें ताकि अगले सत्र में सही Fee Group स्वतः लागू हो। यदि यह काम अक्सर पड़ता है, तो हर अपवाद cohort — sibling, scholarship, hostel, board-change — के लिए अलग Fee Group बनाएँ और एक-एक छात्र को असाइन करें। RTE 25 प्रतिशत आरक्षण वाले छात्रों के लिए उसी Edit dialog में RTE Student switch चालू करें ताकि reimbursement claim में वे स्पष्ट रूप से tag हों।
Inkwelly Student Fee को काम करते हुए देखें
15 मिनट का walkthrough बुक करें — असली स्कूल अकाउंट पर प्रति-छात्र override flow देखें।
अक्सर पूछे गए सवाल
6 सवालInkwelly में सिर्फ एक छात्र का फीस स्ट्रक्चर कैसे बदलें?
Student Fee → Fee Profiles खोलें, छात्र को खोजें, उसकी पंक्ति पर क्लिक करें और profile header में Edit दबाएँ। Fee Group dropdown से अलग group चुनें — Inkwelly में हर Fee Group एक ही फीस स्ट्रक्चर से जुड़ा होता है, इसलिए group बदलने पर केवल उस छात्र का स्ट्रक्चर बदलता है। Update दबाएँ और फिर Recalculate। क्लास के बाकी छात्र अपने मूल प्लान पर बने रहते हैं।
क्लास को फीस स्ट्रक्चर असाइन करने और एक छात्र को असाइन करने में क्या अंतर है?
क्लास असाइनमेंट Fee Group को क्लास से map करके होता है — उस क्लास का हर छात्र group का फीस स्ट्रक्चर स्वतः पाता है। एक छात्र की असाइनमेंट केवल उस profile पर Fee Group बदलकर क्लास default को override करती है। क्लास mapping ज्यों की त्यों रहती है; केवल वह एक छात्र नए प्लान पर जाता है।
क्या स्ट्रक्चर बदलने पर पुराने invoice फिर से लिखे जाते हैं?
नहीं। Paid invoice अपनी मूल राशि के साथ लॉक रहते हैं ताकि receipt और ledger सटीक रहें। Recalculate दबाने पर pending invoice नई फीस स्ट्रक्चर की दरों पर फिर से बन जाते हैं। यदि किसी refund या सुधार के कारण पहले से paid invoice भी बदलना है, तो उसे रद्द करके फिर से जारी करें — स्ट्रक्चर बदलना उसका हल नहीं है।
Ek student ka fee structure kaise change kare Inkwelly me?
Student Fee → Fee Profiles me jaiye, student ka naam ya admission number search kijiye, profile open kijiye, aur top-right me Edit dabaiye. Edit dialog me Fee Group dropdown se naya group chuniye (har fee group ek fee structure se juda hota hai). Update dabaiye, phir Edit ke pass wala refresh icon (Recalculate) click kijiye. Sirf is student ka plan change hoga — class ke baki students apne hi plan par rahenge.
Class ka default fee structure override kaise kare ek student ke liye?
Class default Inkwelly me class-to-fee-group mapping se aata hai. Ek student ke liye usse override karne ke liye Fee Profiles → student profile open kijiye, Edit dabaiye, aur Fee Group dropdown se alag group chuniye. Yeh sirf us profile par lagega, class mapping waisi ki waisi rahegi. Update aur Recalculate dabakar invoices refresh kar lijiye.
एक छात्र के लिए override कब करें और क्लास default कब बदलें?
एक छात्र के स्तर पर override तब करें जब बदलाव केवल एक या दो छात्रों के लिए हो — hostel switch, बीच सत्र में बोर्ड परिवर्तन, sibling-नियम अपवाद, या RTE 25 प्रतिशत आरक्षण की seat। क्लास default तब बदलें जब उस क्लास के हर छात्र को नए प्लान पर जाना हो, जैसे पूरी grade के लिए नई फीस स्वीकृति लागू होना।
आपको ये भी पसंद आ सकता है
3 लेखस्रोत व संदर्भ
- CBSE Affiliation Bye-Laws 2018 — Chapter II (Fee structure and stage-wise fee guidance) · देखा गया 19 May 2026
CBSE bye-laws require schools to publish a fixed fee structure approved by the management committee; per-student overrides must be recorded for board audits.
- Right of Children to Free and Compulsory Education Act, 2009 — Section 12(1)(c) · देखा गया 19 May 2026
RTE Act mandates 25 percent reservation for disadvantaged children with state-funded reimbursement, requiring per-student fee structure differentiation for RTE seats.
- Council for the Indian School Certificate Examinations — Affiliation Manual, Section on Fee Policy · देखा गया 19 May 2026
CISCE requires ICSE and ISC affiliated schools to maintain documented per-student fee records, including any deviations from the published class fee.
Inkwelly आपके स्कूल पर — खुद देखें
30 मिनट का डेमो। आपके मौजूदा ERP को आपके साथ खोलकर, कॉल पर ही आपका डेटा Inkwelly में लोड करते हैं। कॉल ख़त्म होते-होते एक तय तारीख़ का गो-लाइव प्लान आपके हाथ में।