किसी छात्र की फीस पर डिस्काउंट कैसे लगाएं Inkwelly में
यह गाइड उन स्कूल अकाउंटेंट और प्रिंसिपल के लिए है जो किसी एक छात्र के लिए नियम के बाहर एक विशेष छूट देना चाहते हैं — RTE quota के ऊपर top-up, परिवार की हार्डशिप, ट्रस्ट या बोर्ड का फैसला, या sibling नियम के अपवाद के तौर पर। अंत में Inkwelly में उस छात्र की फीस प्रोफाइल पर एक approved discount जुड़ा होगा और Outstanding उतनी ही राशि से कम दिखेगा।
Inkwelly में किसी छात्र की फीस पर डिस्काउंट लगाने के लिए: Student Fee → Fee Profiles से छात्र की प्रोफाइल खोलें, Discounts tab पर जाएँ, Add Discount पर क्लिक करें, सूची में से एक Discount Type चुनें, रुपये की राशि भरें (या डिफ़ॉल्ट रहने दें), एक पंक्ति का कारण लिखें और सेव करें। यदि टाइप approval माँगता है तो discount Pending में जाता है — प्रिंसिपल उसी tab से Approve दबाते हैं और Inkwelly profile पुनः गणना करके Outstanding को उसी राशि से घटा देता है।
Per-student discount जानबूझकर Inkwelly के rule engine के बाहर रखा गया है। Sibling, staff-ward और early-payment discount हर पात्र परिवार पर अपने आप लगते हैं, पर फीस प्रोफाइल की Discounts tab उन मामलों के लिए है जिन्हें ये नियम नहीं ढक सकते — जैसे Class 8 का एक RTE छात्र जिसे सरकारी slab से थोड़ा अधिक top-up चाहिए, single-parent परिवार जिसे ट्रस्ट ने raahat दी, या बोर्ड-स्तर पर लिया गया एक विशेष फैसला। Tier-2 शहर के 1,200 छात्रों वाले एक CBSE स्कूल में हर सत्र में आम तौर पर 30 से 50 ऐसे per-student discount दर्ज होते हैं, जिनमें से ज़्यादातर जनवरी–मार्च में आते हैं जब परिवार hardship application जमा करते हैं। Inkwelly हर discount का पूरा audit रखता है — किसने लगाया, किसने approve किया और क्या कारण दर्ज है — ताकि प्रिंसिपल बाद में ट्रस्टी या RTE inspector को फाइल समझा सके।
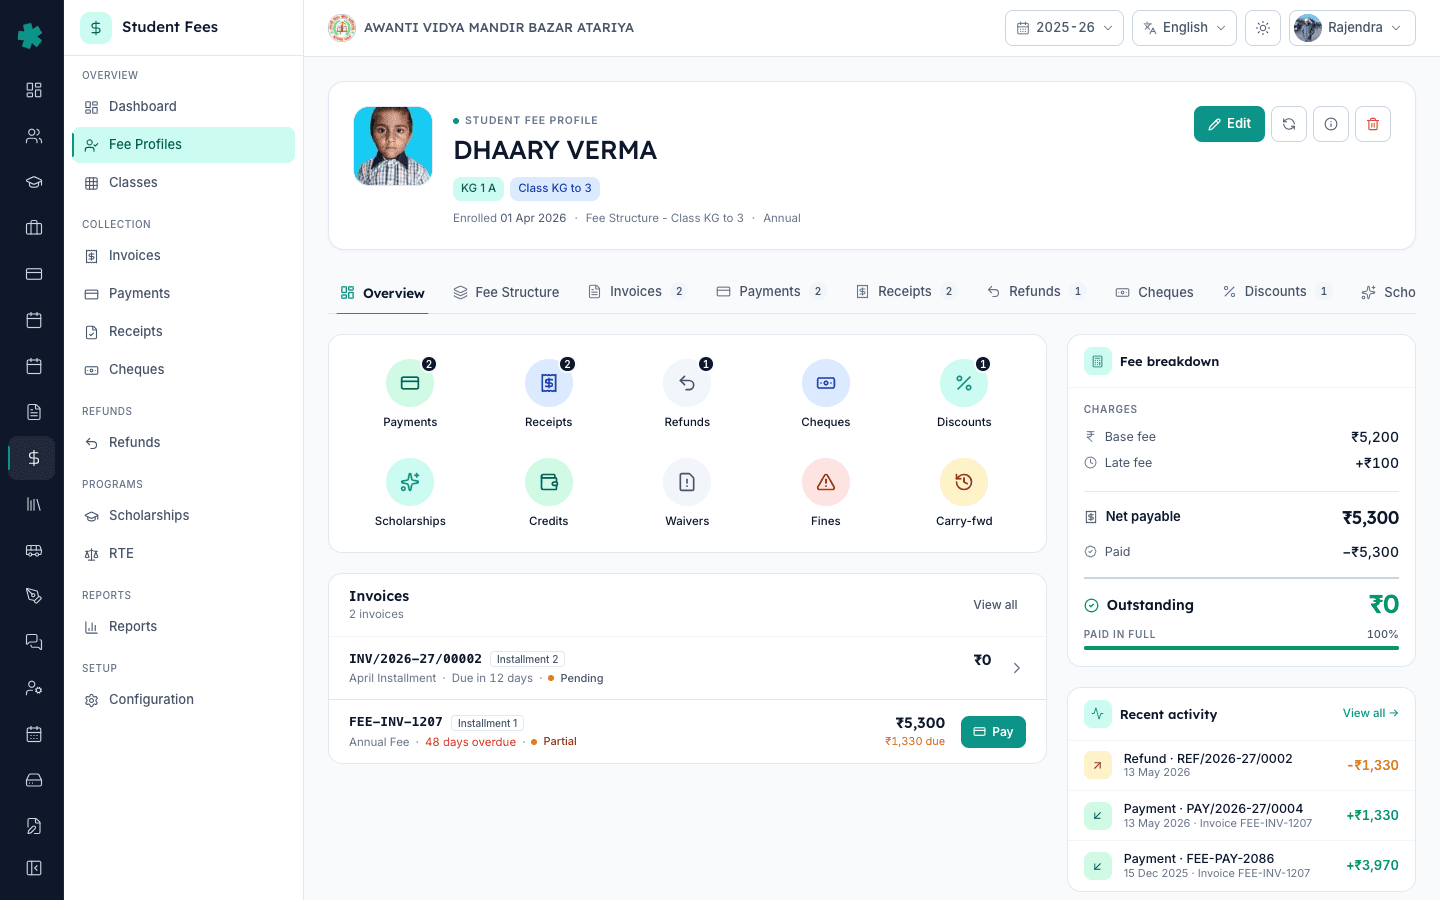
1. छात्र की फीस प्रोफाइल खोलें
बाएँ साइडबार से Inkwelly → Student Fee खोलें, फिर Fee Profiles पर क्लिक करें। छात्र को नाम, admission नंबर या क्लास से search करें और row पर क्लिक करके profile खोलें। Header पर छात्र का नाम, क्लास और सेक्शन, असाइन किया गया फीस स्ट्रक्चर और चार बटन दिखेंगे — Edit, Recalculate, Info, Delete। उसके नीचे tab strip में Overview, Fee Structure, Invoices, Payments, Receipts, Refunds, Cheques, Discounts और Scholarships दिखाई देते हैं।
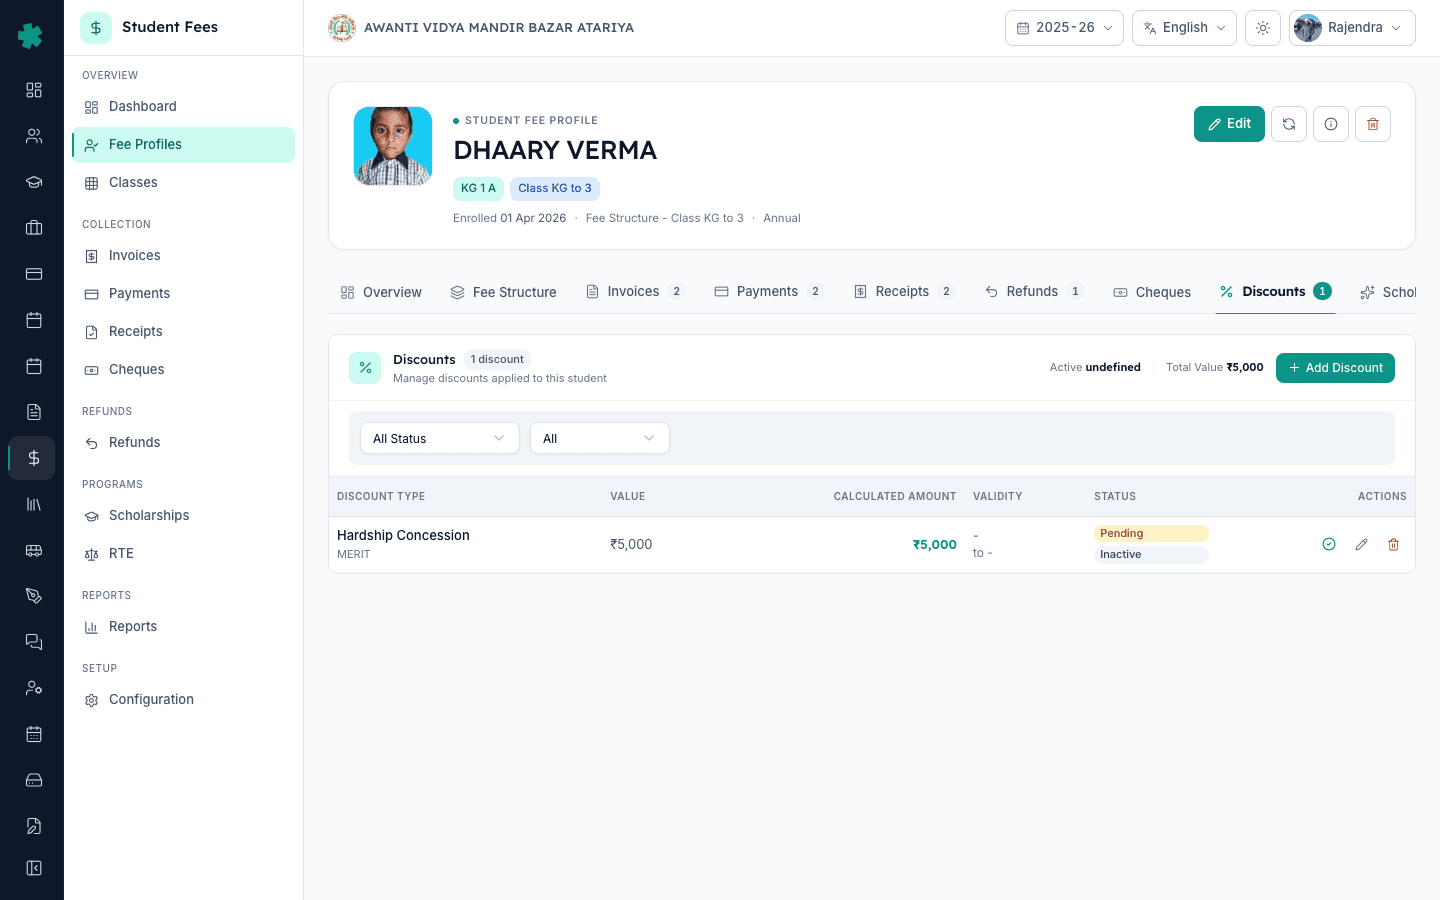
2. Discounts tab पर क्लिक करें
Profile पर Discounts tab पर क्लिक करें। पेज पर एक summary strip दिखती है जिसमें discount की संख्या, active count और रुपये में कुल मूल्य लिखा होता है। उसके नीचे इस छात्र पर पहले से लगाए गए हर discount की पंक्ति होती है — Discount Type, मूल्य, calculated रुपये राशि, validity की तिथियाँ और status pill (Pending, Approved, Auto Approved, Forwarded, Rejected या Expired)। ऊपर दाईं ओर Add Discount बटन होता है; खाली profile पर वही बटन कार्ड के बीच में दिखता है।
3. Add Discount दबाएँ और Discount Type चुनें
ऊपर दाईं ओर Add Discount पर क्लिक करें। Add Discount dialog खुलता है जिसमें सबसे ऊपर Discount Type picker होता है। उस situation के अनुसार सही टाइप चुनें — Hardship Concession, RTE Top-up, Bus Fee Waiver, Board Decision, Sibling Exception, या जो भी नाम आपके स्कूल ने Configuration → Discount Types में बनाए हैं। हर विकल्प के सामने उसका डिफ़ॉल्ट रुपये अमाउंट या प्रतिशत bracket में दिखता है। टाइप चुनते ही Inkwelly नीचे category और छोटा description दिखा देता है ताकि क्लर्क सही टाइप पुष्टि कर सके।
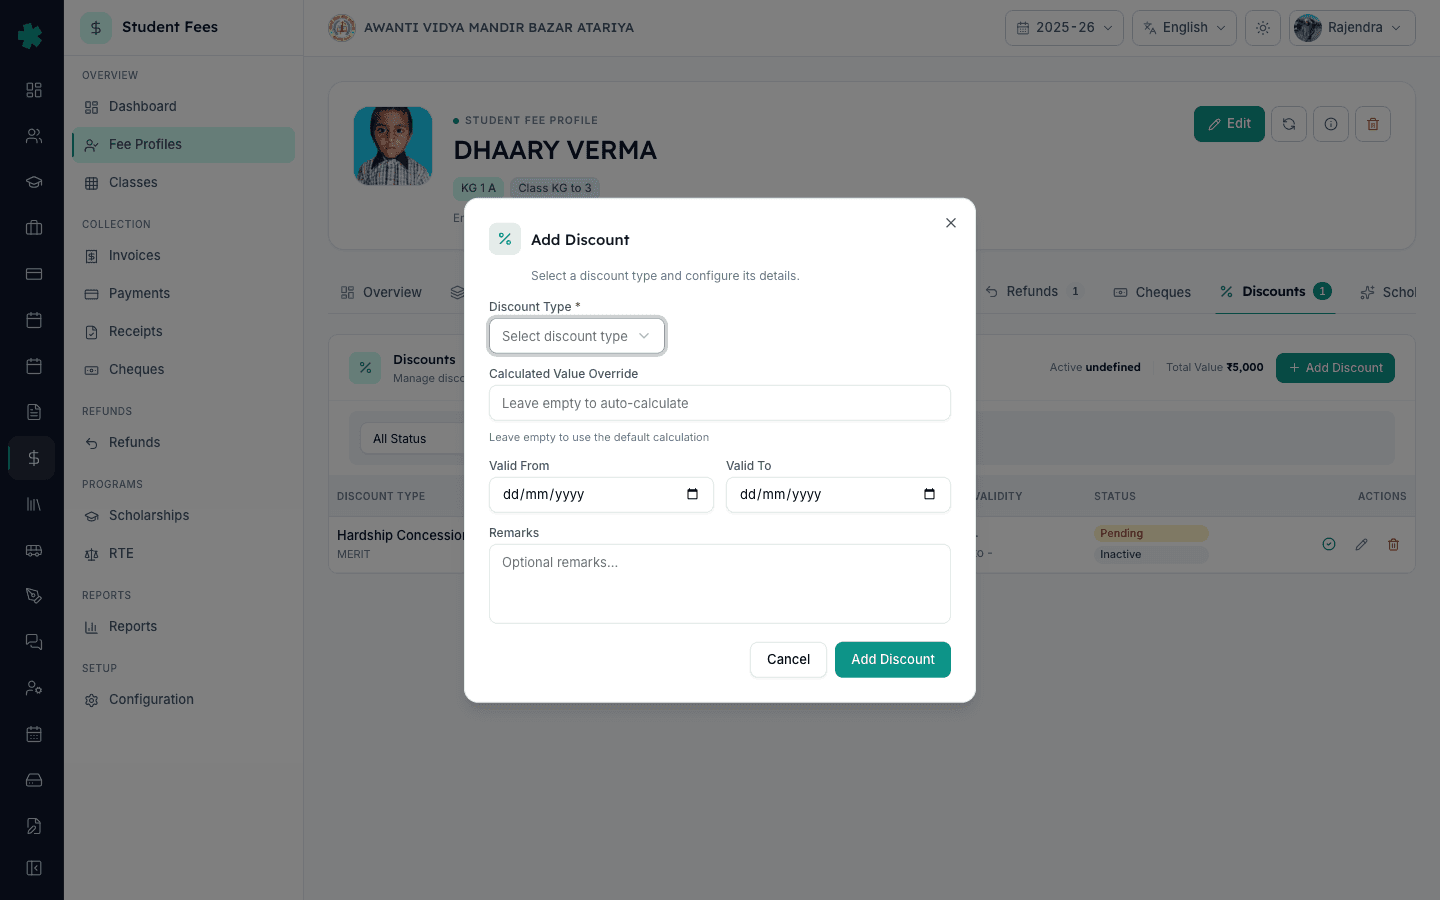
4. रुपये की राशि भरें (या डिफ़ॉल्ट के लिए खाली छोड़ें)
Calculated Value Override field में वह सटीक रुपये राशि भरें जिसे प्रिंसिपल ने इस मामले के लिए स्वीकृत किया है — उदाहरण के लिए, Class 5 के छात्र की hardship के लिए 5000। यदि आप Discount Type की डिफ़ॉल्ट राशि या प्रतिशत का उपयोग करना चाहते हैं तो इस field को खाली छोड़ दें। Valid From और Valid To की तिथियाँ optional हैं — ज़्यादातर एक बार वाले discount पूरे सत्र के लिए लागू रहते हैं, इसलिए तिथि तभी सेट करें जब छूट केवल एक term के लिए दी जा रही हो।
5. एक पंक्ति का कारण लिखें और सेव करें
Remarks field में एक पंक्ति का स्पष्ट कारण लिखें — उदाहरण के लिए, Parental hardship — approved by principal on 19 May, file no. F-2026-114 या RTE Class 8 top-up beyond government slab, NCPCR guidance। यही पंक्ति बाद में प्रिंसिपल, ट्रस्टी या RTE inspector पढ़ेंगे, इसलिए discount या concession जैसी अस्पष्ट entries काम नहीं आतीं। Add Discount पर क्लिक करें। यदि Discount Type को approval चाहिए तो Inkwelly discount को Pending स्थिति में सेव करता है; अन्यथा वह Auto Approved दर्ज होता है।
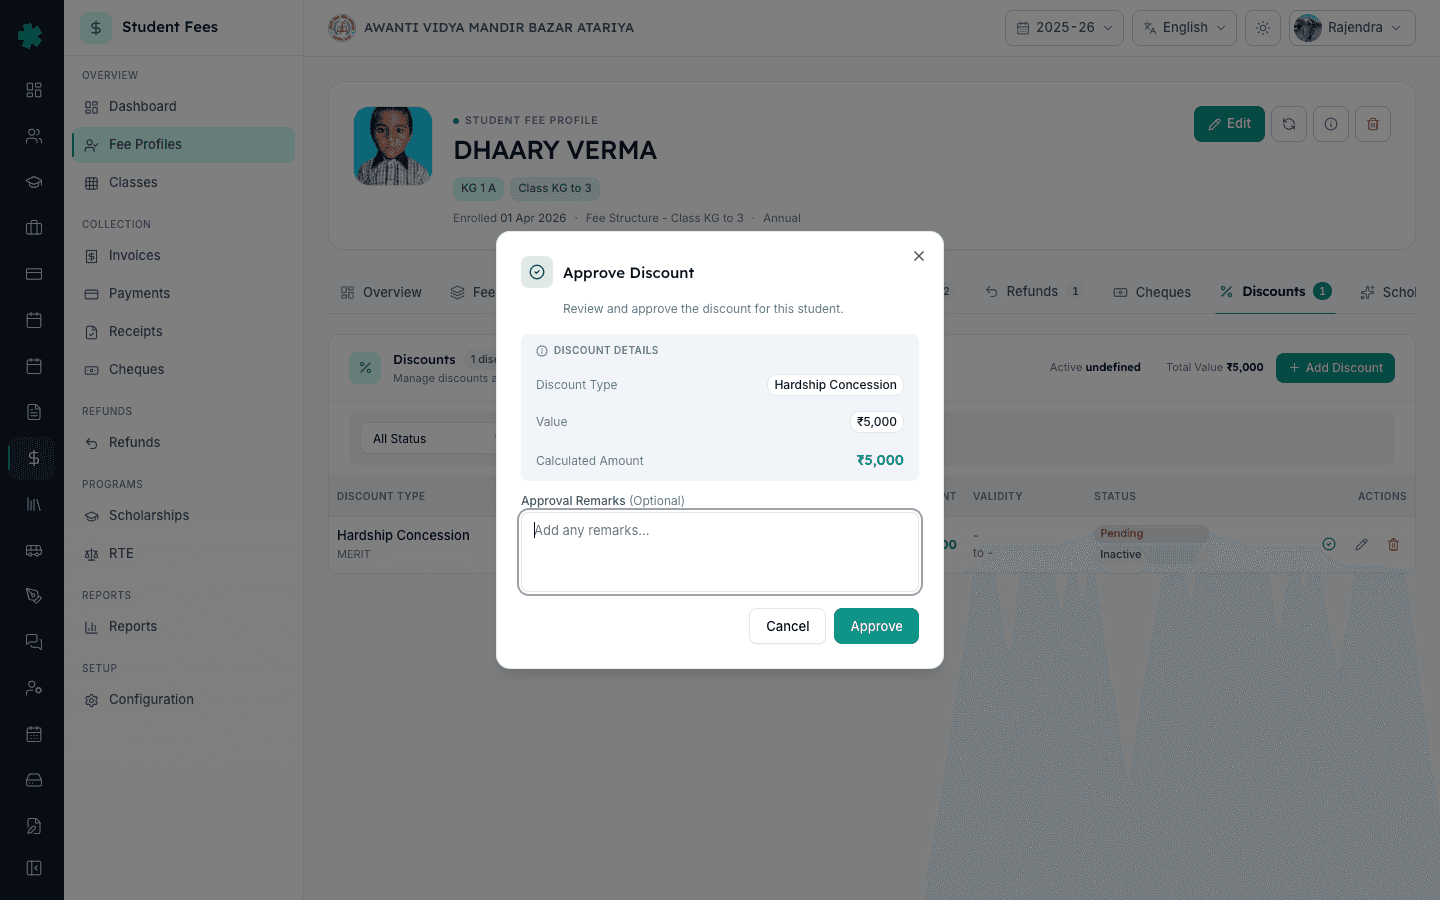
6. Discount को approve करें
नई पंक्ति Discounts tab पर पीले Pending pill और दाईं ओर हरे tick (approve icon) के साथ दिखती है। प्रिंसिपल या finance head के तौर पर sign-in करें और हरे tick पर क्लिक करें। Approve Discount dialog खुलकर discount type, value, रुपये राशि और एक optional Approval Remarks box दिखाता है। एक छोटी सी note लिखें जैसे Approved per trust meeting minutes 12 May 2026 और Approve दबाएँ। Inkwelly approver का नाम और समय stamp करके status को Approved कर देता है।
7. Recalculate करें और Outstanding में कमी की पुष्टि करें
Profile की Overview tab पर वापस जाएँ। Header पर Edit के बगल वाला Recalculate icon (refresh icon) क्लिक करें। Inkwelly breakdown फिर से calculate करता है — Base fee, Late fee, Net payable, Paid और Outstanding। Outstanding की पंक्ति अब उतनी ही राशि से कम होनी चाहिए जितना discount था। इस छात्र के लिए अगला कोई भी invoice खोलें — discount वहाँ नीचे एक line item के रूप में approval reference सहित दिखेगा, ताकि parent की receipt पर भी छूट का स्पष्ट उल्लेख रहे।
अगला कदम — यदि किसी छूट को आप बार-बार case-by-case लगा रहे हैं तो उसे एक rule में बदल दें। Multi-child परिवारों के लिए How to set up sibling discount rules in Inkwelly सेट करें, शिक्षकों के बच्चों के लिए How to set up staff-ward discount rules in Inkwelly, और सत्र की पूरी फीस अग्रिम चुकाने वाले परिवारों के लिए How to set up early-payment discount rules in Inkwelly। RTE छात्रों के लिए reimbursement अलग प्रवाह में होता है, इसलिए वहाँ How to mark RTE students and prepare claim का अनुसरण करें।
Inkwelly Student Fees को काम करते हुए देखें
अक्सर पूछे गए सवाल
6 सवालInkwelly में per-student discount कब लगाना चाहिए, rule कब बनाना चाहिए?
Per-student discount तब लगाएँ जब वह छूट किसी standing rule में फिट नहीं बैठती — जैसे एक बार वाला hardship case, सरकारी slab से ऊपर का RTE top-up, ट्रस्ट या बोर्ड का किसी एक परिवार पर लिया गया विशेष फैसला, या sibling नियम का अपवाद। यदि वही छूट 20–30 परिवारों पर एक ही तर्क से लगनी हो तो वह Configuration → Discounts में rule (sibling, staff-ward या early-payment) के रूप में बनानी चाहिए। Inkwelly दोनों को audit trail पर रखता है, लेकिन rule बेहतर scale करते हैं।
क्या Inkwelly में per-student discount को हर बार प्रिंसिपल अप्रूव करना ज़रूरी है?
यह Discount Type की सेटिंग पर निर्भर करता है। Configuration → Discount Types में हर टाइप के साथ एक Requires Approval toggle होता है। यदि वह on है तो उस टाइप के हर discount की शुरुआत Pending से होती है और तब तक Outstanding कम नहीं होता जब तक प्रिंसिपल या finance head Approve न करे। यदि वह off है तो Inkwelly discount को save करते ही Auto Approved कर देता है। ज़्यादातर स्कूल Hardship और Concession टाइप को approval-required रखते हैं और छोटे fixed waiver (जैसे ₹100 stationery rebate) को auto-approved।
Student ko special discount kaise de Inkwelly me?
Student Fee → Fee Profiles kholiye, student ko search karke uska profile open kijiye. Discounts tab par jaiye aur Add Discount button dabaiye. Discount Type select kijiye (jaise Hardship Concession ya RTE Top-up), rupee amount bhariye, ek line ka reason likhiye (jaise Parental hardship — approved by principal on 19 May), aur Add Discount click kijiye. Discount Pending me chala jayega. Phir principal sign-in karke green tick par click karke approve karega, tab Outstanding kam ho jayega.
Discount approve kaise kare Inkwelly me?
Principal ya finance head Inkwelly me sign-in karega, fir student ka fee profile khol kar Discounts tab par jayega. Pending status wale discount ke saamne green tick icon dikhega — uspar click kijiye. Approve Discount dialog kholega jisme discount type, value, calculated amount aur Approval Remarks ka box hoga. Ek choti si note likhiye (jaise Approved per trust meeting minutes 12 May 2026) aur Approve dabaiye. Status Approved ho jayega aur approver ka naam record ho jayega.
क्या Inkwelly में per-student discount को सिर्फ़ Tuition या सिर्फ़ Transport फीस तक सीमित किया जा सकता है?
हाँ, यह Discount Type की setup से तय होता है। Configuration → Discount Types में Applicability field से यह नियंत्रित किया जाता है कि discount सभी फीस heads पर लागू हो या केवल चुने हुए heads पर। उसे Specific Fee Heads पर सेट करें, संबंधित heads link करें (केवल Tuition, या Tuition और Library आदि), और उसी टाइप से लगाए गए हर discount का calculated रुपये अमाउंट केवल उन्हीं heads पर लागू होगा। छात्र की Discounts tab पर calculated राशि इन्हीं eligible heads के आधार पर दिखेगी।
Inkwelly में per-student discount, fee waiver और scholarship में क्या अंतर है?
Discount उस छात्र की structure-level फीस को घटाता है — audit पर `discount applied` लिखा जाता है और calculated राशि Outstanding से कट जाती है। Waiver पहले से बन चुके invoice की राशि को बाद में माफ़ करता है और dashboard की waiver टाइल पर दिखता है। Scholarship sponsored होती है — उसके पीछे एक named donor या programme होता है, राशि scholarship बजट से जाती है और छात्र scholarship roll पर दिखता है। Inkwelly तीनों को एक ही फीस profile पर ट्रैक करता है ताकि प्रिंसिपल हर छात्र पर पूरी छूट की तस्वीर देख सके।
आपको ये भी पसंद आ सकता है
3 लेखस्रोत व संदर्भ
- CBSE Affiliation Bye-Laws — Chapter VII, Fee Structure · देखा गया 19 May 2026
CBSE bye-laws require affiliated schools to publish a fixed annual fee structure and to document any case-by-case concessions in writing, which is what a per-student Inkwelly discount records.
- Right of Children to Free and Compulsory Education Act, 2009 — Section 12 (RTE quota) and Section 13 (No capitation fee) · देखा गया 19 May 2026
The RTE Act allows schools to extend concessions to disadvantaged students and prohibits any unrecorded fee adjustments, so every per-student concession must be saved against the profile with a documented reason.
- National Commission for Protection of Child Rights — School Fee Guidance Note · देखा गया 19 May 2026
NCPCR fee guidance expects transparent, written concession policies and an auditable approval trail per case — which is what the principal-approval workflow on the Discounts tab provides.
Inkwelly आपके स्कूल पर — खुद देखें
30 मिनट का डेमो। आपके मौजूदा ERP को आपके साथ खोलकर, कॉल पर ही आपका डेटा Inkwelly में लोड करते हैं। कॉल ख़त्म होते-होते एक तय तारीख़ का गो-लाइव प्लान आपके हाथ में।