How to apply a discount to a student's fees in Inkwelly
For school accountants and principals handing out a one-off concession that the rule engine cannot cover — RTE quota top-up, parental hardship, a board-level retention decision or a sibling exception outside the standard percentage. By the end you will have a discount saved against the student's fee profile in Inkwelly, approved by the principal, and visible on the Outstanding line.
To apply a discount to a student's fees in Inkwelly: open the student's fee profile from Student Fee → Fee Profiles, click the Discounts tab, click Add Discount, pick a discount type from the list, enter the rupee amount or override the default, add a one-line reason, and save. The discount sits in Pending until the principal clicks Approve from the same tab, then Inkwelly recalculates the breakdown and reduces the Outstanding line by that amount.
Per-student discounts sit outside Inkwelly's rule engine on purpose. Sibling discounts, staff-ward discounts and early-payment discounts apply automatically across all eligible families, but the Discounts tab on a fee profile is for the cases those rules cannot cover — for example, a Class 8 RTE student needing a small top-up beyond the government slab, a single-parent family in genuine hardship that the trust voted to waive, or a board-decision concession the school chairman granted on a specific case. A typical 1,200-student CBSE school in a Tier-2 city processes around 30 to 50 such per-student discounts each session, mostly between January and March when families file hardship applications. Inkwelly keeps every discount auditable — who applied it, who approved it, and what reason was recorded — so the principal can defend the file to a trustee or an RTE inspector later.
1. Open the student's fee profile
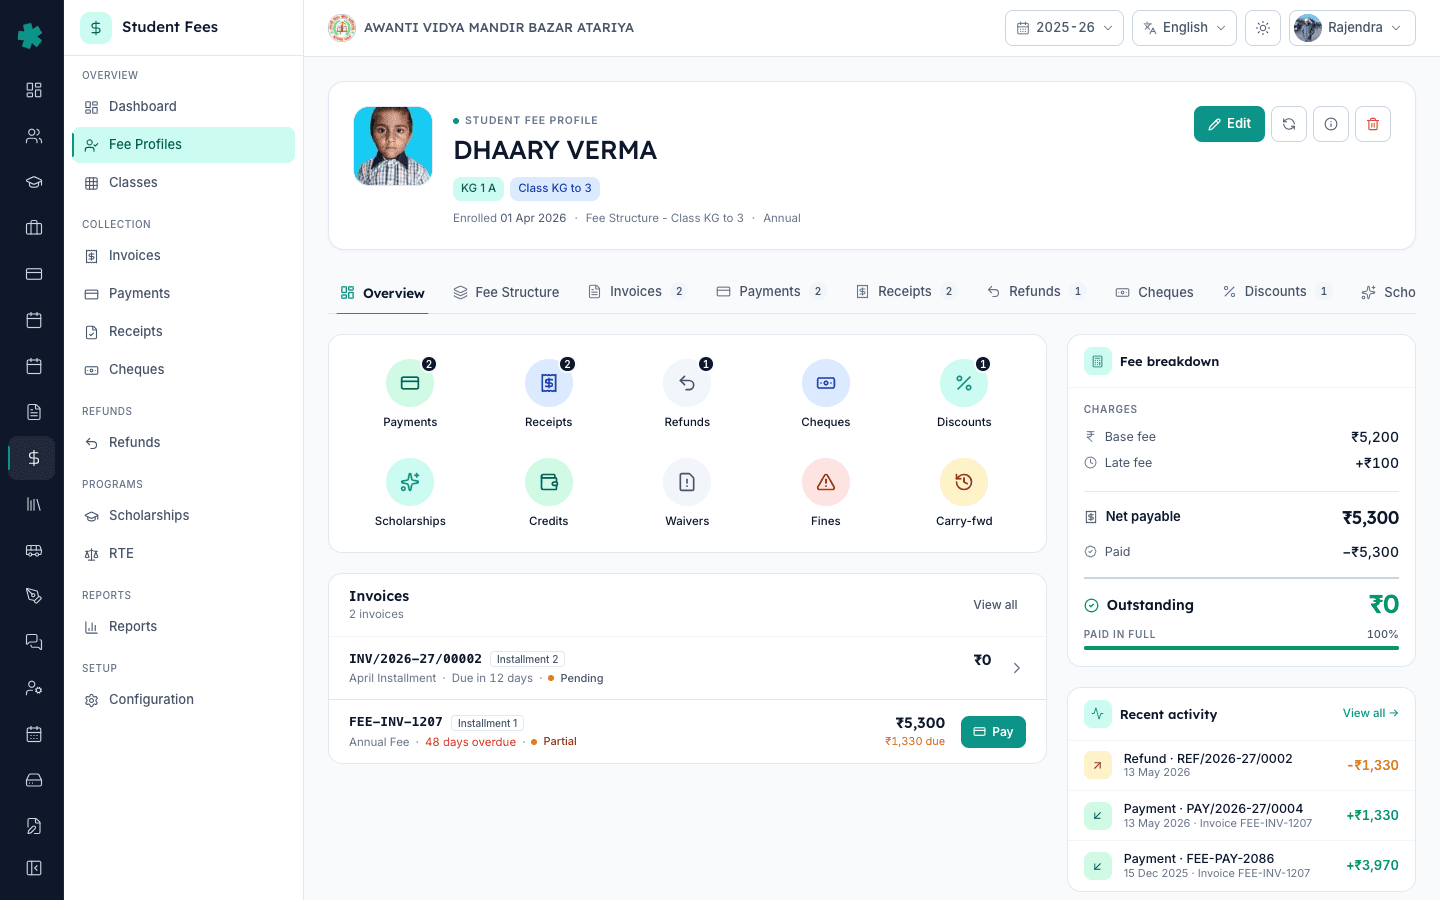
Open Inkwelly → Student Fee from the left sidebar, then click Fee Profiles. Search for the student by name, admission number or class. Click the row to open the profile. The header shows the student name, class and section, the assigned fee structure, and a row of header buttons — Edit, Recalculate, Info, Delete. Below the header, the tab strip shows Overview, Fee Structure, Invoices, Payments, Receipts, Refunds, Cheques, Discounts and Scholarships.
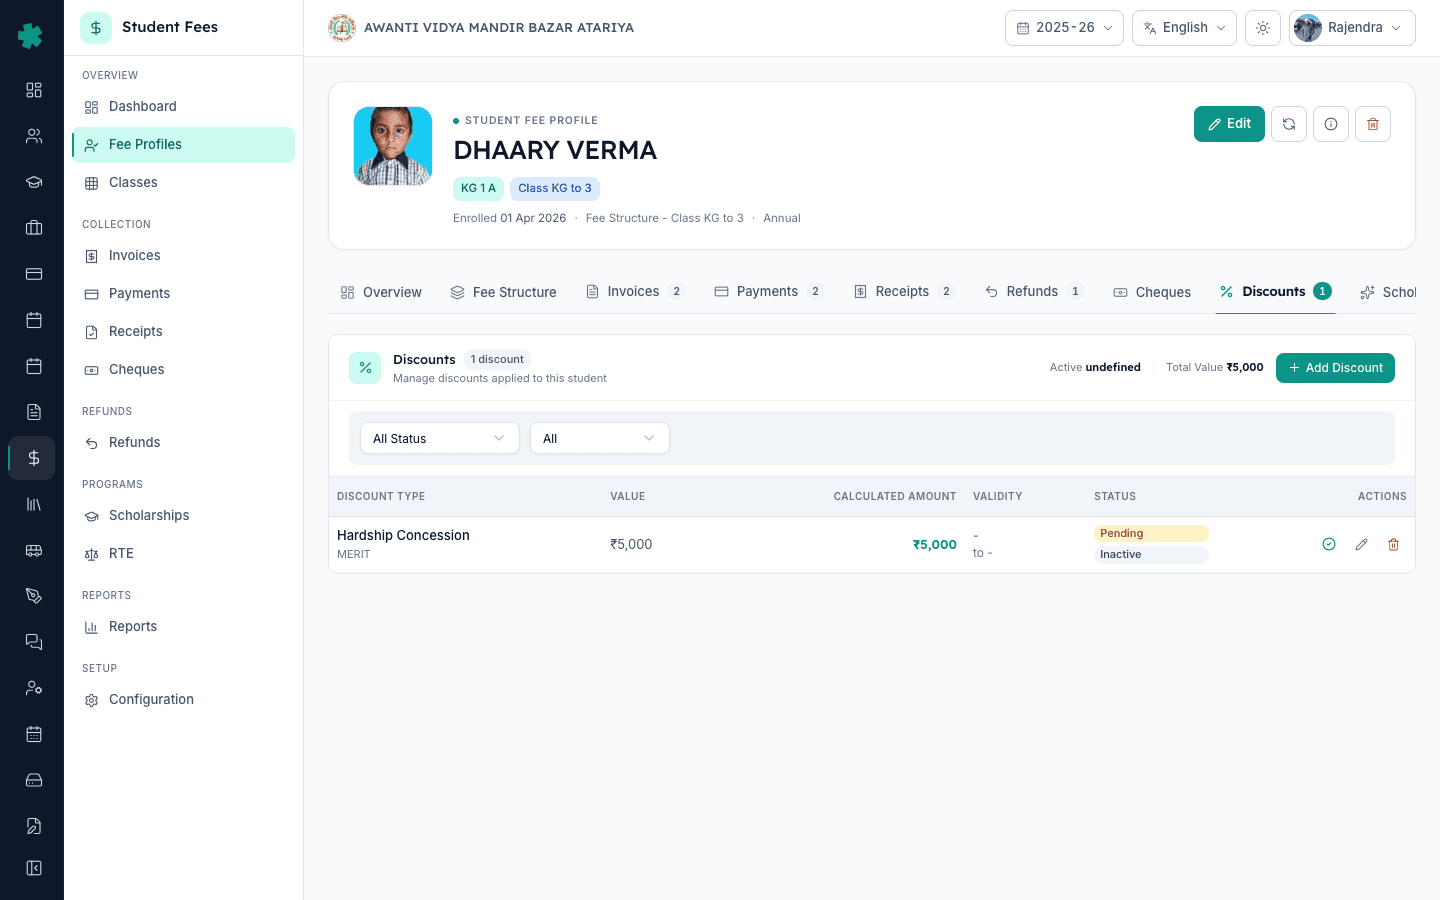
2. Click the Discounts tab
Click the Discounts tab on the profile. The page shows a summary strip with the number of discounts, the active count and the total discount value in rupees. Below that, every discount already applied to this student is listed with the discount type, the value, the calculated rupee amount, the validity dates and the status pill — Pending, Approved, Auto Approved, Forwarded, Rejected or Expired. The top right has an Add Discount button; on an empty profile the same button sits in the centre of the card.
3. Click Add Discount and pick a discount type
Click Add Discount on the top right. The Add Discount dialog opens with a Discount Type picker at the top. Pick the type that matches the situation — Hardship Concession, RTE Top-up, Bus Fee Waiver, Board Decision, Sibling Exception, or whichever names your school has set up under Configuration → Discount Types. Each option shows its default rupee amount or percentage in parentheses. Inkwelly displays the category and a short description below the picker as soon as you select it, so the clerk can confirm the right type before moving on.

4. Enter the rupee amount (or leave blank for the default)
In the Calculated Value Override field, enter the exact rupee amount the principal has approved for this case — for example, 5000 for a one-off hardship concession on a Class 5 student. Leave the field blank if you want to use the default amount or percentage that the Discount Type carries. The validity dates (Valid From and Valid To) are optional — most one-off discounts are open-ended and apply for the rest of the session, so the office only sets dates when the concession is meant for a single term.
5. Write a one-line reason and save
Write a one-line reason in the Remarks field. Keep it specific — for example, "Parental hardship — approved by principal on 19 May, file no. F-2026-114" or "RTE Class 8 top-up beyond government slab, NCPCR guidance". This is the line the principal, trustee or RTE inspector reads later, so vague entries like "discount" or "concession" do not help. Click Add Discount. Inkwelly saves the discount with the Pending status if the Discount Type requires approval, or with the Auto Approved status if it does not.
6. Approve the discount
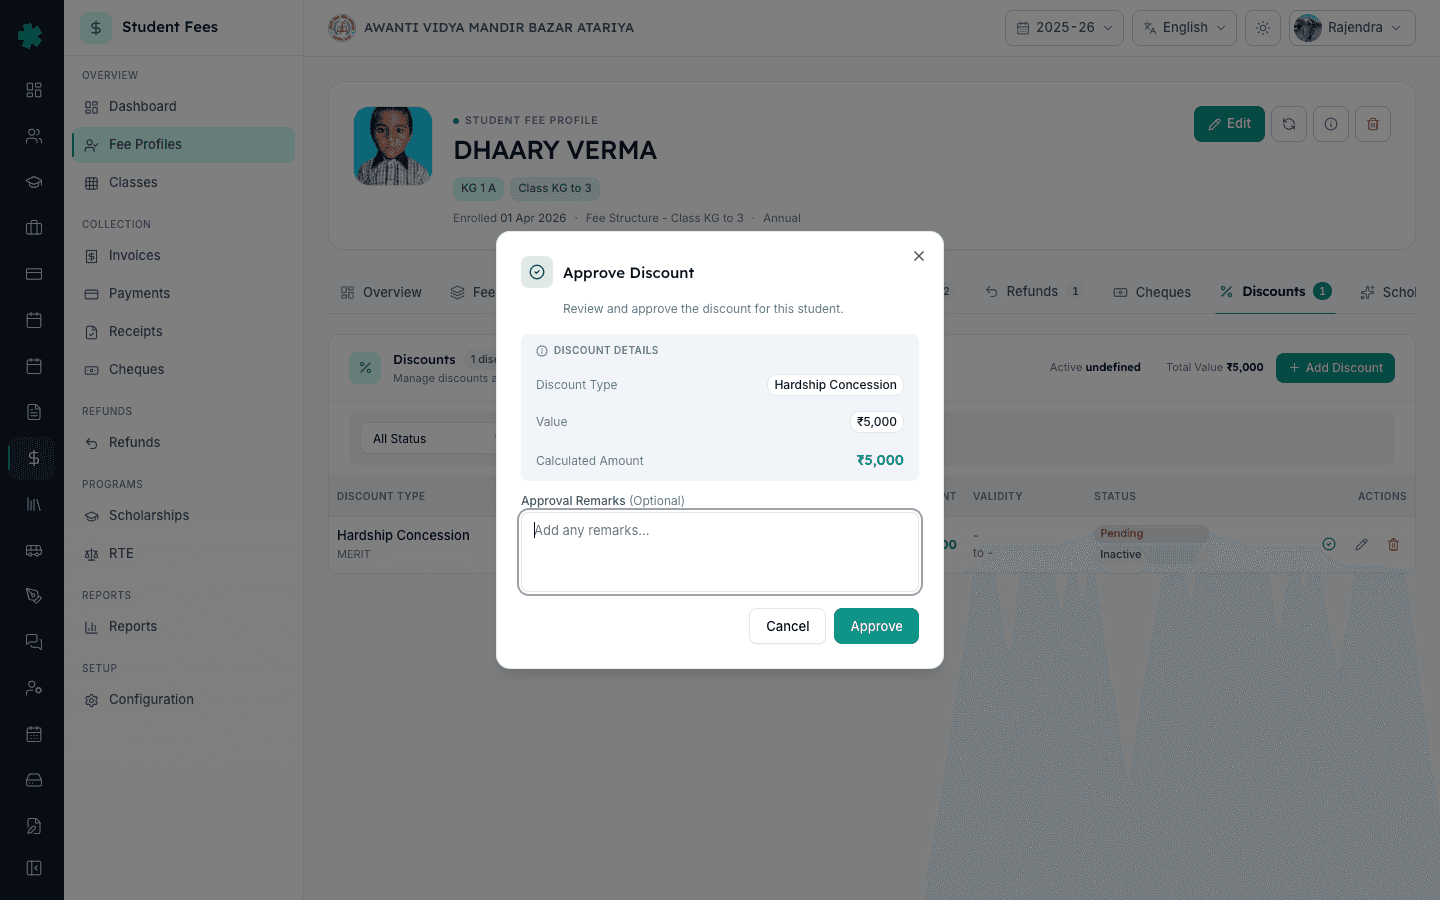
The new row appears on the Discounts tab with a yellow Pending pill and the approve icon (a green tick) on the right. Sign in as the principal or finance head and click the green tick. The Approve Discount dialog shows the discount type, the value, the rupee amount and an optional Approval Remarks field. Type a short note such as "Approved per trust meeting minutes 12 May 2026" and click Approve. Inkwelly stamps the approver name, the approval time and changes the status to Approved.
7. Recalculate and confirm the Outstanding drops
Go back to the profile Overview tab. Click the Recalculate icon (the refresh icon next to Edit on the header). Inkwelly recomputes the breakdown — Base fee, Late fee, Net payable, Paid and Outstanding. The Outstanding line should now show the discount amount knocked off. Open any future invoice for this student and the discount line item appears at the bottom of the invoice with the approval reference, so the parent receipt is clear about where the concession came from.
Next step — if the discount you keep applying case-by-case is starting to look like a pattern, move it to a rule instead. Set up How to set up sibling discount rules in Inkwelly for multi-child families, How to set up staff-ward discount rules in Inkwelly for teachers' children, and How to set up early-payment discount rules in Inkwelly for families clearing the annual fees upfront. For RTE students who need a different reimbursement flow altogether, follow How to mark RTE students and prepare claim instead.
See Inkwelly Student Fees in action
Frequently asked
6 questionsWhen should I use a per-student discount instead of a rule in Inkwelly?
Use the per-student discount when the concession does not fit any standing rule — for example, a one-off hardship case, an RTE top-up beyond the government slab, a board-level decision granted to a specific family, or a sibling exception outside the standard percentage. If the same concession would apply to twenty or thirty families on the same logic, it belongs in a rule under Configuration → Discounts (sibling, staff-ward or early-payment). Inkwelly logs both kinds against the audit trail, but rules scale better.
Does an Inkwelly per-student discount need principal approval every time?
It depends on the Discount Type setting. When the school's office sets up a Discount Type under Configuration → Discount Types, there is a Requires Approval toggle. If it is on, every discount of that type starts in Pending and the principal or finance head must click Approve before the amount reduces the Outstanding. If it is off, Inkwelly marks the discount Auto Approved on save. Most schools keep Hardship and Concession types as approval-required, and small fixed waivers (like a ₹100 stationery rebate) as auto-approved.
Student ko special discount kaise de Inkwelly me?
Student Fee → Fee Profiles kholiye, student ko search karke uska profile open kijiye. Discounts tab par jaiye aur Add Discount button dabaiye. Discount Type select kijiye (jaise Hardship Concession ya RTE Top-up), rupee amount bhariye, ek line ka reason likhiye (jaise Parental hardship — approved by principal on 19 May), aur Add Discount click kijiye. Discount Pending me chala jayega. Phir principal sign-in karke green tick par click karke approve karega, tab Outstanding kam ho jayega.
Discount approve kaise kare Inkwelly me?
Principal ya finance head Inkwelly me sign-in karega, fir student ka fee profile khol kar Discounts tab par jayega. Pending status wale discount ke saamne green tick (CheckCircle) icon dikhega — uspar click kijiye. Approve Discount dialog kholega jisme discount type, value, calculated amount aur Approval Remarks ka box hoga. Ek choti si note likhiye (jaise Approved per trust meeting minutes 12 May 2026) aur Approve dabaiye. Status Approved ho jayega aur approver ka naam record ho jayega.
Can a per-student discount in Inkwelly be limited to only Tuition or only Transport fees?
Yes, through the Discount Type setup. Under Configuration → Discount Types, the Applicability field controls whether the discount applies to all fee heads or only specific ones. Set it to Specific Fee Heads, link the heads (Tuition only, or Tuition and Library, etc.), and every discount applied with that type will be restricted accordingly. On the student's Discounts tab the calculated rupee amount reflects only the eligible heads.
How is a per-student discount different from a fee waiver or a scholarship in Inkwelly?
A discount reduces the structure-level fee for that student — the audit line says discount applied, and the calculated amount is deducted from Outstanding. A waiver writes off an amount already invoiced, usually after the invoice is generated, and shows on the waiver tile of the dashboard. A scholarship is sponsored — there is a named donor or programme behind it, the funds come from the scholarship budget, and the student appears on the scholarship roll. Inkwelly tracks all three on the same fee profile so the principal can see the full concession picture per student.
You might also like
3 readsSources & references
- CBSE Affiliation Bye-Laws — Chapter VII, Fee Structure · accessed 19 May 2026
CBSE bye-laws require affiliated schools to publish a fixed annual fee structure and to document any case-by-case concessions in writing, which is what a per-student Inkwelly discount records.
- Right of Children to Free and Compulsory Education Act, 2009 — Section 12 (RTE quota) and Section 13 (No capitation fee) · accessed 19 May 2026
The RTE Act allows schools to extend concessions to disadvantaged students and prohibits any unrecorded fee adjustments, so every per-student concession must be saved against the profile with a documented reason.
- National Commission for Protection of Child Rights — School Fee Guidance Note · accessed 19 May 2026
NCPCR fee guidance expects transparent, written concession policies and an auditable approval trail per case — which is what the principal-approval workflow on the Discounts tab provides.
See Inkwelly on your school
30-minute demo. We open your current ERP with you and load your data into Inkwelly on the call. Dated go-live plan by the end of it.