फीस प्रोफाइल कैसे बनाएं नए दाखिले वाले छात्रों के लिए
यह गाइड स्कूल के एडमिशन ऑफिस और फीस क्लर्क के लिए है जो किसी नए दाखिले वाले छात्र, फिर से दाखिल हुए छात्र, या सत्र के बीच आए छात्रों के बैच को फीस से जोड़ रहे हैं। अंत में आपके पास Inkwelly में हर चयनित छात्र के लिए फीस प्रोफाइल तैयार होगी — सही Fee Group, सही enrollment date और पहले से गणना की हुई Net Payable राशि के साथ।
Inkwelly में नए दाखिले वाले छात्रों के लिए फीस प्रोफाइल बनाने के लिए: Student Fee → Fee Profiles खोलें, ऊपर दाईं ओर मौजूद Create Profiles पर क्लिक करें, छात्र पिकर को क्लास या एडमिशन तिथि से फ़िल्टर करें, हर ऐसे छात्र पर टिक लगाएं जिसकी प्रोफाइल बनानी है, नीचे फ़ॉर्म में मेल खाता Fee Group और enrollment date चुनें, और Create दबाएं। जिन छात्रों की प्रोफाइल पहले से बनी है उन्हें Inkwelly अपने आप छोड़ देता है, ग्रुप से जुड़ा फीस स्ट्रक्चर अटैच करता है, और नई प्रोफाइल को Fee Profiles सूची में Net Payable के साथ दिखाता है।
अधिकांश भारतीय स्कूल अपने सत्र का बड़ा हिस्सा फरवरी से अप्रैल के बीच दाखिल करते हैं, और शेष पूरे साल में मिड-सेशन एडमिशन के रूप में आता रहता है। CBSE से संबद्ध स्कूल हर सत्र में औसतन क्लास strength का 8 से 12 प्रतिशत नया दाखिला दर्ज करते हैं (CBSE 2024 affiliation returns); 1,200 छात्रों वाले स्कूल के लिए यह सत्र की शुरुआत में लगभग 110 नई प्रोफाइल बनाना होता है। जब Admissions module किसी छात्र को सेव करता है तो Inkwelly फीस प्रोफाइल अपने आप बना देता है, लेकिन bulk Create Profiles flow एक मैनुअल fallback है — इसका उपयोग तब करें जब एडमिशन कागज़ पर हुए हों, जब एडमिशन बंद होने के बाद कोई नया Fee Group जोड़ा गया हो, या जब आपने पुराने ERP से छात्रों को बिना उनके फीस लिंक के import किया हो।
1. Fee Profiles खोलें
बाएं साइडबार से Inkwelly → Student Fee खोलें, फिर OVERVIEW सेक्शन के अंतर्गत Fee Profiles पर क्लिक करें। यह पेज इस सत्र की हर फीस प्रोफाइल को छात्र का नाम, क्लास, Fee Group, कुल फीस, paid राशि, outstanding और status pill के साथ दिखाता है। पेज के ऊपर दाईं ओर Create Profiles बटन है — यही bulk action आप आगे उपयोग करेंगे।
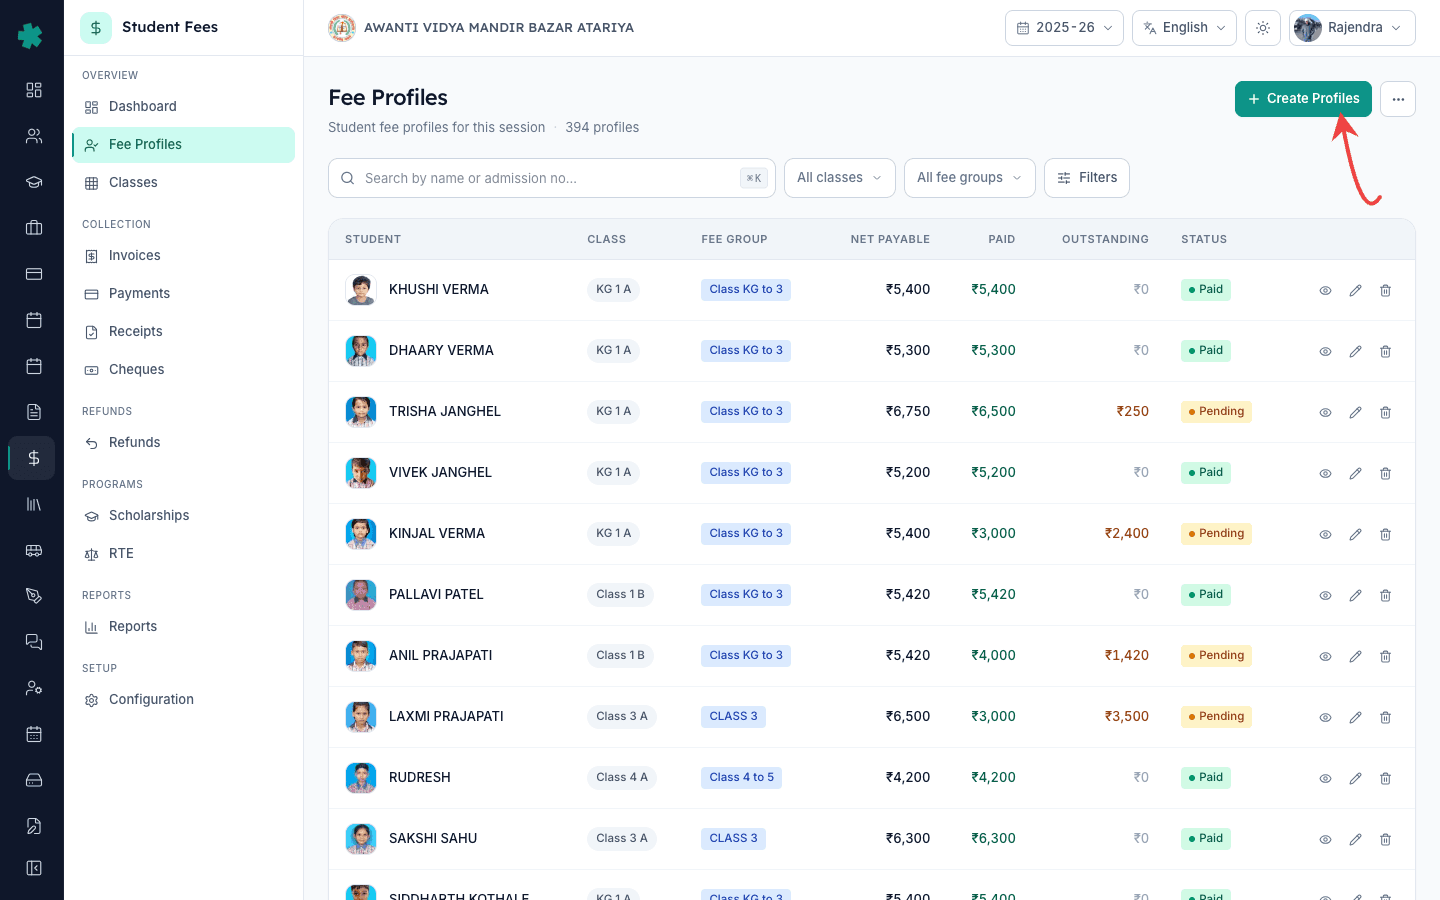
2. Create Profiles पर क्लिक करें
Fee Profiles पेज के ऊपर दाईं ओर मौजूद Create Profiles बटन पर क्लिक करें। Inkwelly एक अलग Create Fee Profiles पेज खोलता है जिसमें दो हिस्से होते हैं: ऊपर एक Select Students टेबल और नीचे profile फ़ॉर्म। Breadcrumb में Fee Dashboard / Students / Create दिखेगा ताकि किसी भी समय आप बिना selection खोए वापस जा सकें।
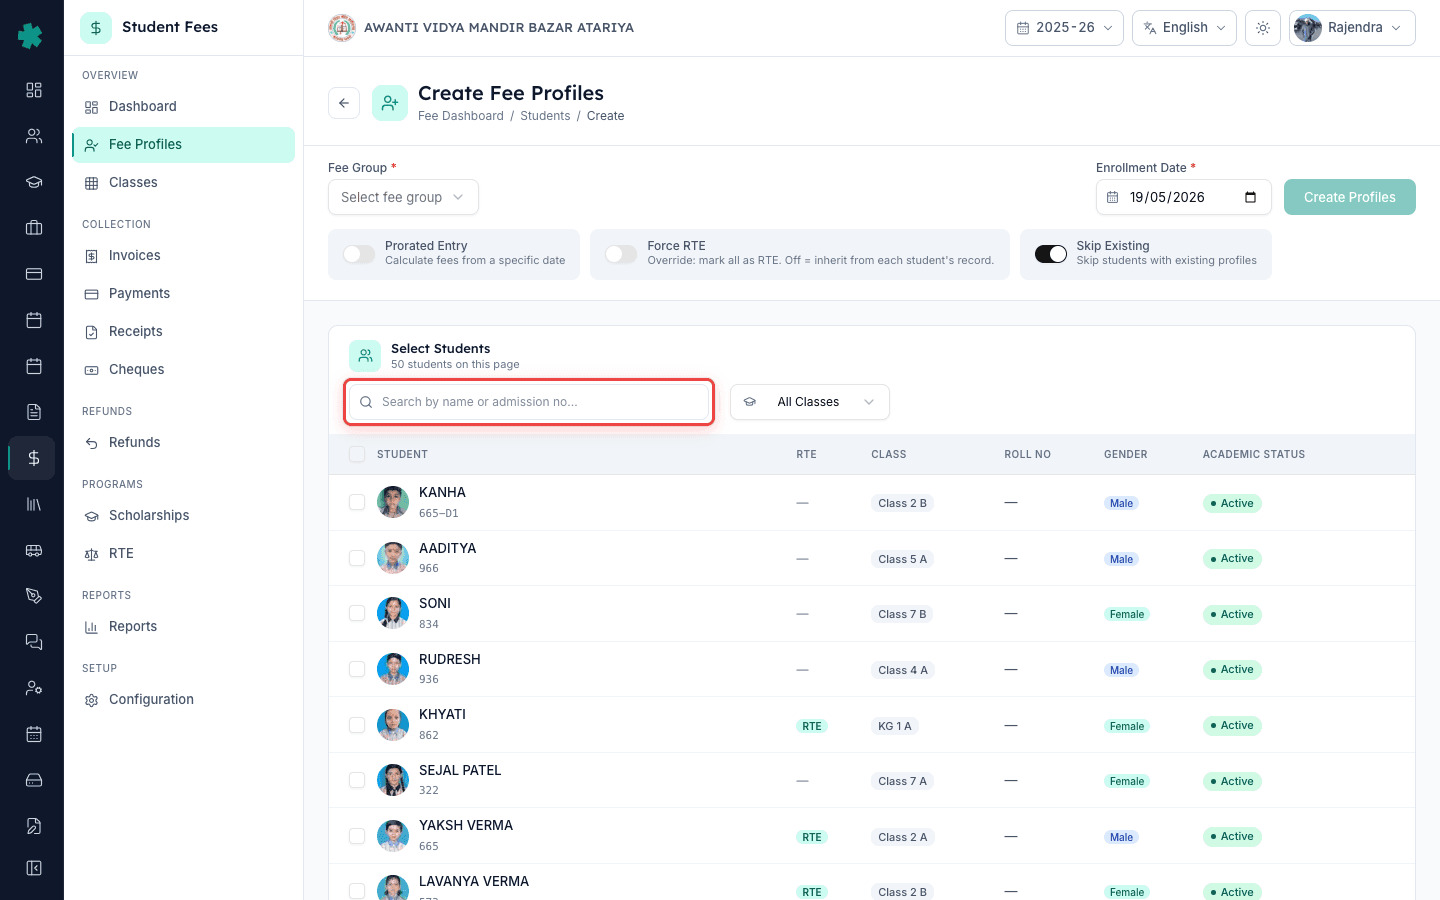
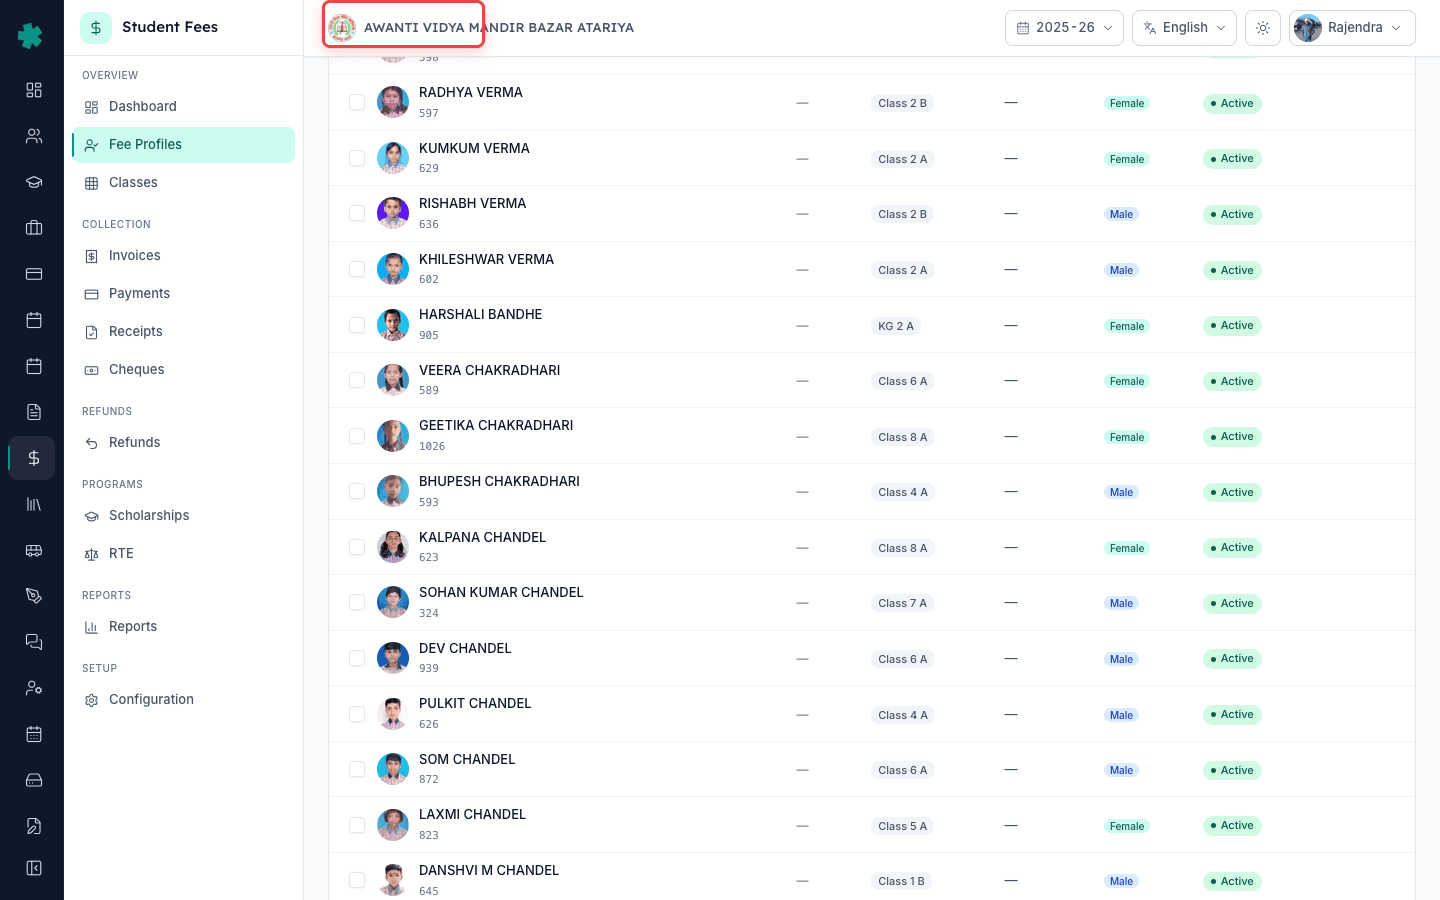
3. छात्रों को फ़िल्टर करें और चुनें
Search बॉक्स से छात्र को नाम या admission number से ढूँढें, या All Classes ड्रॉपडाउन से क्लास चुनकर बैच फ़िल्टर करें। हर उस row पर checkbox टिक करें जिसकी प्रोफाइल बनानी है, या header checkbox से पूरे page को एक साथ चुनें। Inkwelly पिकर के ऊपर Selected counter दिखाता है — फ़ॉर्म पर जाने से पहले यह संख्या अपेक्षित headcount से मिलाकर देखें। जिन छात्रों का इस सत्र का academic record नहीं है, उनकी row धुंधली दिखती है और चुनी नहीं जा सकती।
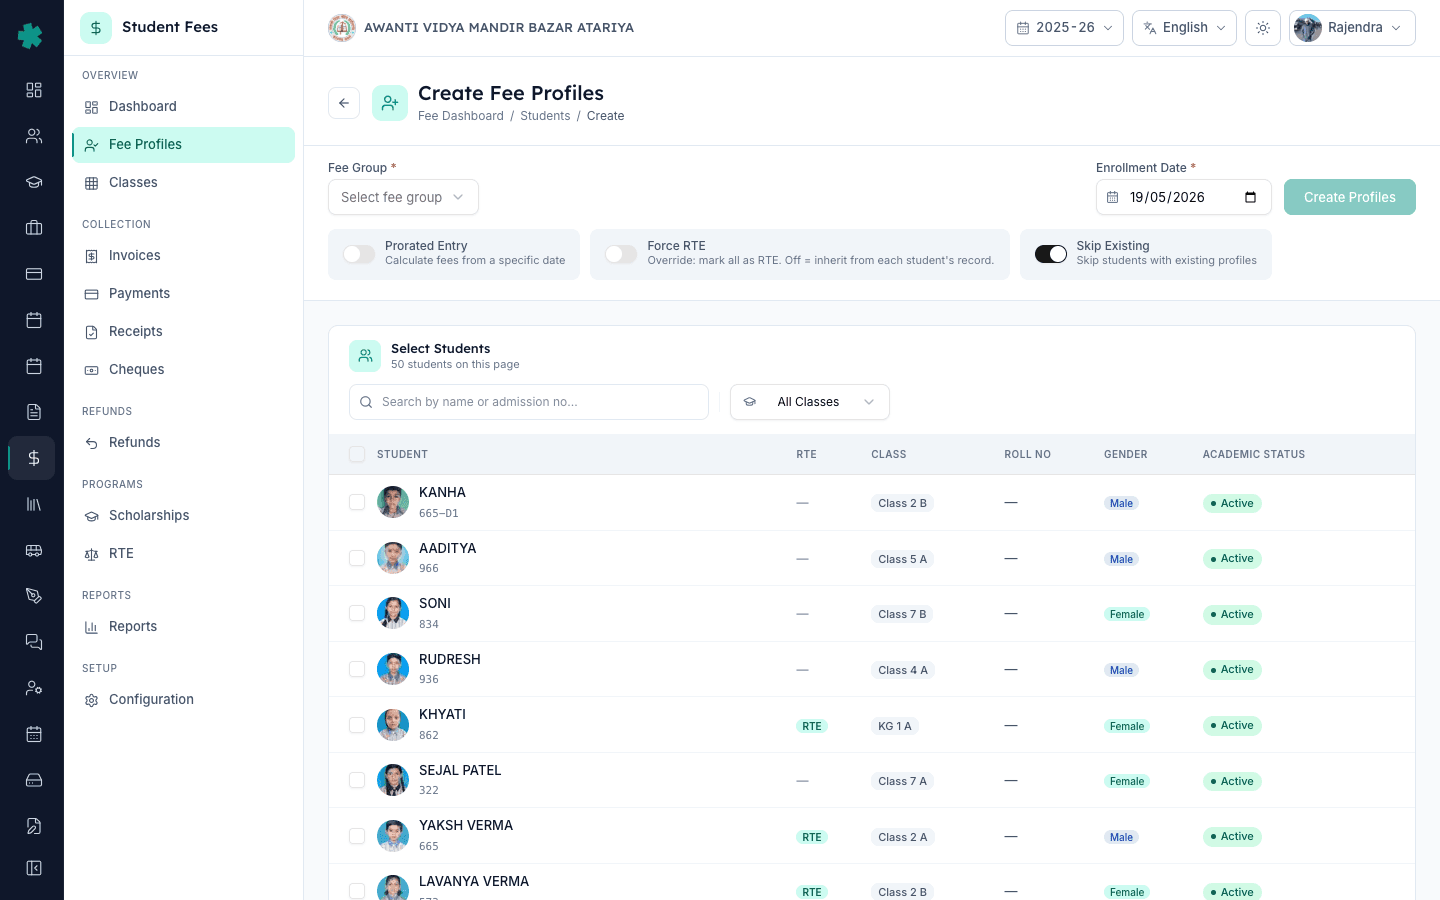
4. Fee Group और enrollment date चुनें
पिकर के नीचे फ़ॉर्म में Fee Group ड्रॉपडाउन खोलें और उन छात्रों की क्लास band के लिए सही ग्रुप चुनें — उदाहरण KG से Class 3 का ग्रुप, या सीनियर सेकेंडरी hostel का ग्रुप। Inkwelly ग्रुप के नाम के साथ उससे जुड़े फीस स्ट्रक्चर की कुल राशि दिखाता है ताकि आप सही प्लान की पुष्टि कर सकें। Enrollment Date सेट करें — आमतौर पर नए सत्र के लिए 1 अप्रैल, या mid-year joiner के लिए आज की तिथि। यदि छात्र एक या अधिक किस्तों की due date बीत जाने के बाद शामिल हो रहा है, तो Prorated Entry on करें और Prorated From Date चुनें ताकि Inkwelly केवल शेष किस्तें ही बिल करे।
5. पुष्टि करें और बनाएं
Skip Existing toggle on रहने दें ताकि Inkwelly उन छात्रों को चुपचाप छोड़ दे जिनकी प्रोफाइल पहले से है — यह वही व्यवहार है जो आप चाहते हैं जब बैच में नए और पहले से profiled छात्र साथ हों। दाईं ओर मौजूद Create N Profiles बटन पर क्लिक करें। Inkwelly हर चयनित छात्र के लिए एक प्रोफाइल बनाता है, ग्रुप से जुड़ा फीस स्ट्रक्चर अटैच करता है, enrollment date लागू करता है, और Fee Profiles सूची पर वापस ले जाता है। स्क्रीन के नीचे एक toast दिखता है जिसमें कितनी प्रोफाइल बनीं, कितनी छोड़ी गईं और कितनी विफल रहीं — तीनों संख्याएं स्पष्ट होती हैं।
अगला कदम — Invoices → Generate पर जाएं और How to bulk-generate invoices for an installment का अनुसरण करके नए बैच के लिए पहली किस्त एक क्लिक में बिल करें। यदि किसी एक छात्र को अलग फीस स्ट्रक्चर चाहिए (hostel switch, board change), तो उसकी प्रोफाइल खोलकर How to assign a fee structure to a single student का अनुसरण करें। यदि नए बैच में RTE-quota का छात्र शामिल है, तो creation के समय Force RTE toggle चालू करें या बाद में How to mark RTE-eligible students and prepare a reimbursement claim का अनुसरण करें।
Inkwelly Student Fees को काम करते हुए देखें
अक्सर पूछे गए सवाल
6 सवालक्या हर नए दाखिले के लिए मुझे मैन्युअल रूप से फीस प्रोफाइल बनानी होगी?
नहीं, अधिकांश मामलों में नहीं। जैसे ही Inkwelly का Admissions module किसी छात्र को इस सत्र में सेव करता है, फीस प्रोफाइल अपने आप बन जाती है — bulk Create Profiles flow एक मैनुअल fallback है। इसका उपयोग तब करें जब आपके स्कूल ने एडमिशन कागज़ पर लिए हों और अब वे Inkwelly में भर रहे हों, जब एडमिशन बंद होने के बाद कोई नया Fee Group जोड़ा गया हो, जब आपने किसी पुराने ERP से छात्रों को बिना उनके फीस लिंक के import किया हो, या जब कोई क्लास सत्र के बीच में अलग फीस स्ट्रक्चर पर जाए।
Naye student ka fee profile kaise banaye Inkwelly me?
Student Fee menu kholiye, sidebar me Fee Profiles par jaiye, top-right ke Create Profiles button par click kijiye. Select Students table me search ya class filter se naye students dhundhiye, har row par tick lagaiye. Neeche form me Fee Group select kijiye, Enrollment Date set kijiye, aur Create N Profiles button dabaiye. Already profile wale students automatically skip ho jate hain.
Bulk profile create karne mein kitni der lagti hai?
100 students ka batch typically 5 se 10 second me create ho jata hai. Selection aur form bharne me 2-3 minute lagte hain. Skip Existing toggle on rakhne se safe rehte hain — agar batch me kuch students ka profile pehle se hai, woh skip ho jate hain aur baaki create ho jate hain ek hi click me.
बैच में जिन छात्रों की फीस प्रोफाइल पहले से है उनका क्या होता है?
जब Skip Existing चालू हो (डिफ़ॉल्ट और recommended), तो Inkwelly selection में मौजूद उन छात्रों को चुपचाप छोड़ देता है जिनकी इस सत्र की active प्रोफाइल पहले से है और केवल बाकी छात्रों के लिए प्रोफाइल बनाता है। अंत में toast सटीक विभाजन दिखाता है — उदाहरण Created: 84 | Skipped: 16 | Failed: 0 — ताकि आपके पास बदलाव का प्रमाण रहे। Skip Existing तभी बंद करें जब आप duplicate पर स्पष्ट error चाहते हों।
Mid-session admissions के लिए Prorated Entry वास्तव में क्या करता है?
Prorated Entry Inkwelly को बताता है कि पूरी वार्षिक फीस के बजाय केवल उन किस्तों को बिल करें जो Prorated From Date के दिन या उसके बाद आती हैं। यदि छात्र जुलाई में जुड़ रहा है और अप्रैल व जून की किस्तें बीत चुकी हैं, तो Inkwelly नई प्रोफाइल से उन दो किस्तों को हटा देता है ताकि अभिभावक से उन महीनों की फीस न मांगी जाए जब उनका बच्चा स्कूल में नहीं था। यही तरीका CBSE और अधिकांश राज्य बोर्ड mid-year intake के लिए अपेक्षित मानते हैं।
क्या एक Create Profiles बैच में अलग-अलग छात्रों को अलग-अलग Fee Group असाइन किया जा सकता है?
नहीं, एक bulk create call हर चयनित छात्र पर एक ही Fee Group लागू करती है। यदि आपके बैच में day scholar और hostel students दोनों हैं, तो bulk create दो बार चलाएं — हर ग्रुप के लिए एक बार। वैकल्पिक रूप से, पहले सभी प्रोफाइल day-scholar ग्रुप के साथ बनाएं और फिर hostel students की प्रोफाइल एक-एक करके खोलकर How to assign a fee structure to a single student का अनुसरण करते हुए उनका प्लान override करें।
स्रोत व संदर्भ
- CBSE Affiliation Bye-Laws — Chapter VII (Fee Structure and Admissions) · देखा गया 19 May 2026
CBSE से संबद्ध स्कूल हर सत्र के लिए प्रकाशित वार्षिक फीस स्ट्रक्चर रखें और हर नए दाखिले को उसी स्ट्रक्चर से बांधें।
- Right of Children to Free and Compulsory Education Act, 2009 — Section 12 · देखा गया 19 May 2026
RTE Act की धारा 12 के तहत क्लास 1 (या entry-level) की कम से कम 25 प्रतिशत सीटें वंचित समूहों से भरी जाएं, जिनकी फीस प्रोफाइल राज्य reimbursement के लिए अलग टैग होनी चाहिए।
- Ministry of Education — UDISE+ Data Capture Format (Enrolment and School Finance sections) · देखा गया 19 May 2026
UDISE+ वार्षिक रिपोर्ट में स्कूल को क्लास-वार नया enrolment और प्रति-छात्र फीस head राशि दर्ज करनी होती है — Inkwelly का per-student profile model इसी रिपोर्टिंग ढांचे को mirror करता है।
Inkwelly आपके स्कूल पर — खुद देखें
30 मिनट का डेमो। आपके मौजूदा ERP को आपके साथ खोलकर, कॉल पर ही आपका डेटा Inkwelly में लोड करते हैं। कॉल ख़त्म होते-होते एक तय तारीख़ का गो-लाइव प्लान आपके हाथ में।