1000 students minutes mein onboard. Bas CSV upload kijiye.
चार CSV templates, एक drag-drop upload, हर row validate और seconds में imported। Profiles, addresses, parents और academics — Inkwelly में bulk-import, photos URLs से automatic download, dry-run validation, और per-row error reporting जो कभी silently fail नहीं होती।
ये क्यों ज़रूरी है — और ज़्यादातर ERPs ये क्यों ठीक से नहीं handle करते
March के बीच का समय। नया academic session 2 हफ्ते में open होने वाला है। Lucknow के एक CBSE day school के Principal ने admission round से 320 नए students को admit किया है। उनके names, dates of birth, parent mobiles, Aadhaar numbers, addresses, blood groups, और class assignments — सब office assistant की 6 हफ्ते से maintain की जा रही 3-tab Excel sheet में पड़े हैं। अब ये सब school ERP के अंदर जाना है — fee ledgers, attendance registers, class lists, parent app accounts, ID cards, transport stops — school year start होने से पहले।
Office के पास 14 दिन हैं। ज़्यादातर school ERPs में 'student creation' एक one-by-one form है: admission open करो, 18 fields type करो, click save, फिर repeat। 320 admissions × 4 minutes per admission = 21 hours pure typing के। फिर address forms जोड़ो। Parent forms जोड़ो। Roll-number assignment जोड़ो। Photo uploads जोड़ो। 14-दिन का buffer 6 हफ्ते की office churn में बदल जाता है — और school year shuru होता है आधा data अभी भी Excel में।
हमने Bulk Import Students इसी को weeks से minutes में compress करने के लिए बनाया है। चार CSV templates — Profile, Address, Parent, Academic — हर एक import page से downloadable। Excel या Google Sheets में अपने office के तरीके से fill कीजिए। CSV को Inkwelly में drag-drop कीजिए। System हर row को parse करता है, Indian school conventions के against validate करता है (12-digit Aadhaar, DD/MM/YYYY dates, valid CBSE class names), existing student list के साथ duplicates check करता है, आपके दिए profile photo URLs को download करता है, और database में student profiles create करता है — सब एक ही batch में। 320 admissions 4 minutes से कम में land हो जाते हैं।

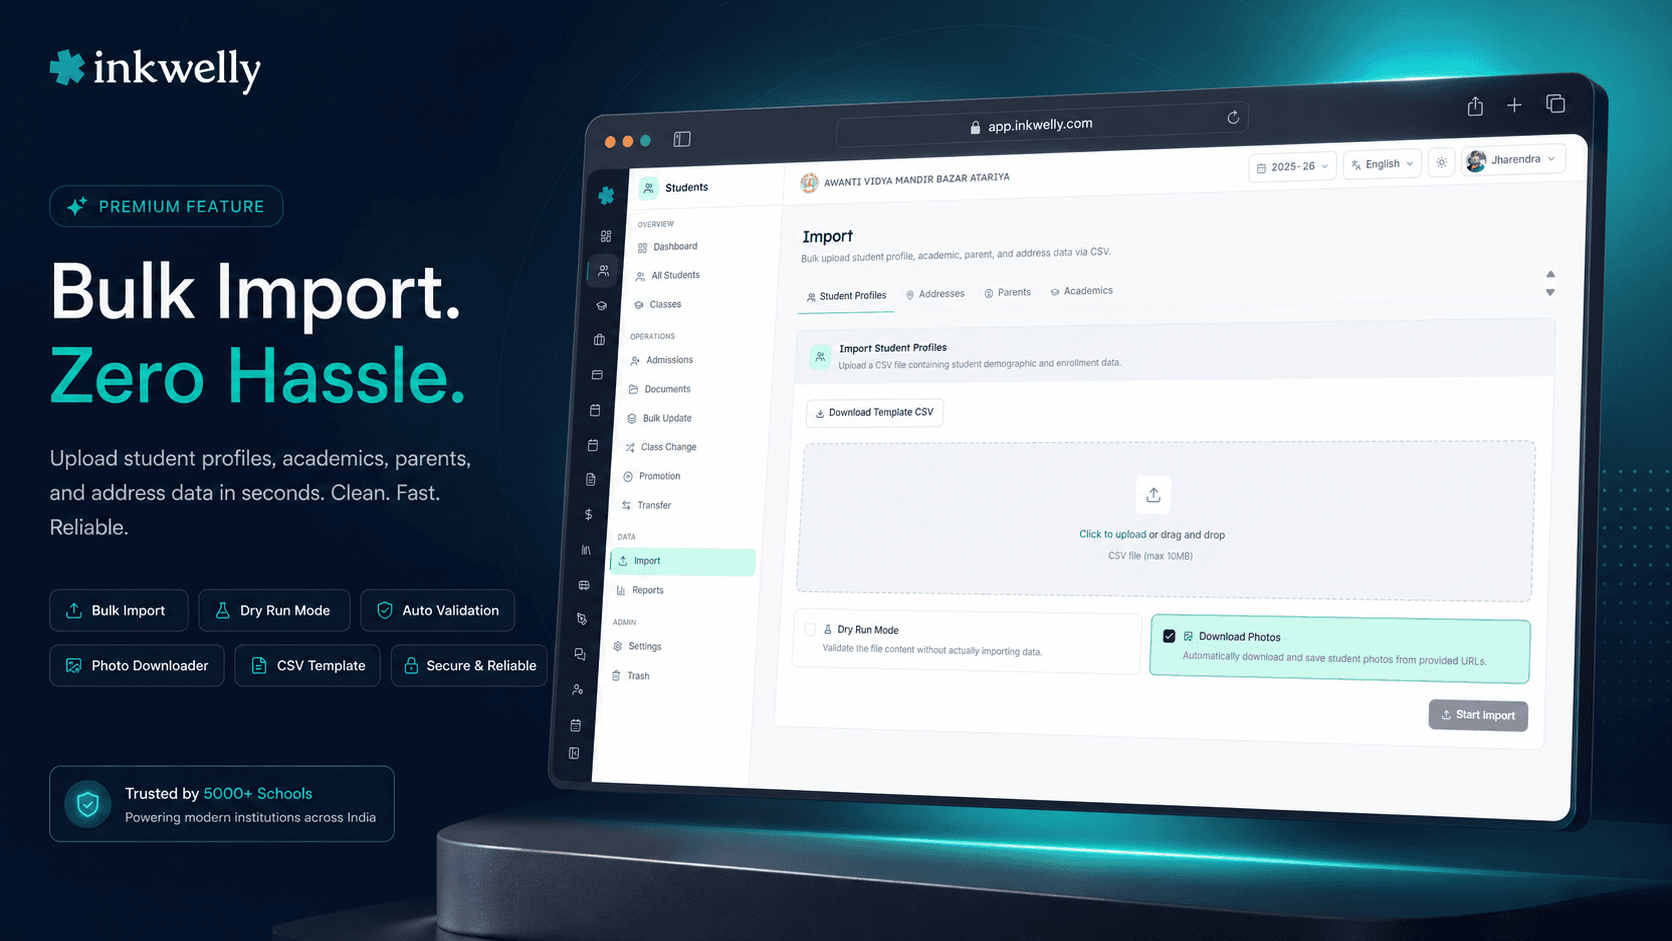
ये कैसे काम करता है — चार CSVs, एक upload page
Students → Import पर जाइए अपने school के session में। Page के top पर चार tabs हैं: Profiles, Addresses, Parents, Academics। हर tab का अपना CSV template है — क्योंकि student data की cardinality अलग है (1 student → 1 profile, लेकिन 1 student → multiple addresses, multiple parents/guardians, multiple academic year records)।
Step 1 — Template download कीजिए। हर tab का 'Download template' button एक CSV generate करता है — Inkwelly जिन exact column headers की expect करता है, वो उसमें होते हैं। Template में 5 से 8 example rows शामिल हैं ताकि office expected format देख सके — date formats, gender values, address types, relationship types। ये बहुत critical है: Excel से migrate कर रहे Indian schools में अक्सर inconsistent header names होते हैं ('Student Name' एक column में, 'Name of Student' किसी और column में)। Downloaded template उस problem को fix करता है — आपका office पहले दिन से ही सही columns में लिखता है।
Step 2 — CSV को Excel या Google Sheets में fill कीजिए। आपका office जो tools पहले से उपयोग करता है, वही use कीजिए। Names, dates of birth 15/03/2010 या 2010-03-15 format में, gender MALE / FEMALE / OTHER, blood group A_POSITIVE / B_POSITIVE / AB_NEGATIVE (standardised codes), Aadhaar 12 digits में, mobile country code के साथ, religion 7 enumerated values में से एक, caste category RTE 25% reservation tracking के लिए, और एक profilePhotoUrl column अगर आपके admission system ने photos URLs के रूप में collect किए हैं।
Step 3 — CSV को drag-drop कीजिए। Upload zone 10MB तक की files accept करता है (~25,000 rows एक typical profile import के लिए)। Click या drag — file एक green confirmation card में अपने name और size के साथ appear हो जाती है। Wrong format (xlsx, xls, कोई भी non-CSV) upload start होने से पहले reject हो जाती है। Wrong size (10MB से ऊपर) clear error के साथ reject होती है जो offending file size बताता है।
Step 4 — पहले validate करें, फिर import (optional लेकिन strongly recommended)। Dry Run checkbox toggle कीजिए। System हर row को real import की same validation और duplicate-check pipeline से run करता है — लेकिन एक भी row database में write नहीं होती। Results dialog open होता है: total rows parsed, valid count, invalid count per-row errors के साथ, और processing time। Invalid rows को CSV में fix कीजिए, Dry Run still on रखकर re-upload, repeat करें जब तक 0 invalid rows न हो जाएं। फिर Dry Run untick कीजिए और Start Import click — अब clean CSV real में import होती है।
Step 5 — Photos खुद-ब-खुद download होती हैं। Profile और Parent imports के लिए, Download Photos checkbox by default on है। अगर आपके CSV में profilePhotoUrl column है with HTTP/HTTPS URLs (max 5MB per photo), Inkwelly हर photo download करता है, आपके school की media library में upload करता है, और student की profile से link करता है — सब automatic। Office को 320 photos कभी एक-एक करके upload नहीं करनी पड़तीं।
चारों CSV tabs में क्या-क्या cover होता है
- Profiles tab — 24 fields per student: studentId (आपके school का internal ID), admissionNumber (registration number), firstName, middleName, lastName, dateOfBirth, gender, peNumber (PEN — Permanent Education Number, आपके state board से issue किया गया), abcId, apaarId (नया NEP 2020 identifier), bloodGroup, religion, nationality, motherTongue, aadhaarNumber, casteCategory, profilePhotoUrl, email, mobile, isRTEStudent। Required: studentId, admissionNumber, firstName, dateOfBirth, gender। बाकी सब optional लेकिन compliance के लिए strongly encouraged।
- Addresses tab — 8 fields per address row: studentId (address को student से link करता है), addressType (PERMANENT / CURRENT / CORRESPONDENCE / OFFICE), addressLine1, addressLine2, city, state, country, postalCode। एक student के multiple address rows supported — एक student का permanent address अपने home village में और current address school hostel के पास हो सकता है।
- Parents tab — 12 fields per parent row: studentId (student से link करता है), relationshipType (FATHER / MOTHER / GUARDIAN / OTHER), title, firstName, middleName, lastName, mobile, email, occupation, education, profilePhotoUrl। एक student के multiple parents supported — same studentId के लिए father और mother अलग-अलग rows के रूप में।
- Academics tab — current-year academic placement: studentId, classId (आपके school की class), section, rollNumber, registrationNumber, admissionDate। Downstream में class lists, attendance registers, fee ledgers, और report card generation को drive करता है।
- Required headers per tab। Profile imports में studentId, admissionNumber, firstName, dateOfBirth, gender होने चाहिए। Address imports में studentId, addressType, addressLine1, city, state, country, postalCode। Parent imports में studentId, relationshipType, firstName, lastName, mobile। Academic imports में studentId, classId, rollNumber। Missing required headers की वजह से import एक भी row process होने से पहले रुक जाता है — Results dialog में missing columns की clear list दिखती है।
- Header order से कोई फर्क नहीं पड़ता। Inkwelly CSV columns को header name से match करता है, position से नहीं। आप columns को अपने office की पसंद से कैसे भी rearrange कर सकते हैं — extra columns ignore होते हैं, missing optional columns empty treated होते हैं।
- Empty cells skip होती हैं — blanks से कभी overwrite नहीं। अगर एक row में
aadhaarNumbercell empty है, तो वो field student profile पर empty रहती है (या re-import के time अपनी current value पर रहती है)। System कभी silently existing data के ऊपर blanks नहीं लिखता।
Walkthrough — पाँच screens, end to end
Dry Run — कुछ written किए बिना validate कीजिए
Bulk import में सबसे expensive mistake यही है कि data bich में validation fail हो जाए और आधा committed हो। आप upload करते हैं, 180 rows succeed करती हैं, row 181 की Aadhaar 11 digits है, और अब आपके database में 180 students हैं जिनको आपने fully verify नहीं किया और 140 students हैं जो कभी make ही नहीं हुए।
Dry Run इसको prevent करता है। हर tab पर Dry Run checkbox toggle कीजिए, Validate Data click कीजिए, और Inkwelly पूरी import pipeline run करता है — CSV parsing, header validation, per-row field validation, duplicate detection — एक भी row persist किए बिना। Results dialog दिखाता है: 320 rows parsed, 312 valid, 8 invalid specific errors per row के साथ ('Aadhaar must be 12 digits', 'Date of birth in invalid format', 'Email format invalid', 'studentId already exists for another student')। 8 rows को CSV में fix कीजिए, re-validate, 0 invalid पर पहुँचिए, फिर Dry Run untick करके real में run कीजिए। Actual import एक formality बन जाता है — आपको पहले से पता है कि succeed होगा।
Indian date formats — DD/MM/YYYY और YYYY-MM-DD दोनों work करते हैं
आपके office की Excel sheet में date of birth 15/03/2010 (Indian convention) में है। Aadhaar PDF print में वो 15/03/2010 दिखता है। पिछले school का transfer certificate 15-03-2010 के रूप में है। State board portal export 2010-03-15 (ISO format) में है।
Inkwelly का bulk import out of the box DD/MM/YYYY और YYYY-MM-DD दोनों accept करता है। Validator हर format को parse करता है, internally ISO में normalise करता है, और database में store करता है — आपको upload से पहले dates transform नहीं करनी पड़तीं। US-style MM/DD/YYYY को intentionally reject किया गया है ताकि ambiguous parsing prevent हो (03/15/2010 row को या तो March 15 या किसी invalid 15th month का 3rd guess किया जा सकता है)। आपके office को कभी ये सोचना नहीं पड़ता कि उनकी पिछली Excel कौन सा format use कर रही थी — दोनों Indian conventions बस work करते हैं।
Aadhaar, mobile, और Indian identifiers — validate, सिर्फ store नहीं
Import database में सिर्फ rows dump नहीं करता। हर Indian identifier को उसके real format rule के against validate करता है। Aadhaar बिल्कुल 12 digits होना चाहिए — validator check करने से पहले spaces, dashes और dots strip करता है, इसलिए 1234 5678 9012 और 1234-5678-9012 दोनों pass होते हैं और 123456789012 के रूप में store होते हैं। Mobile में कम से कम 10 digits होने चाहिए — country code, dashes, parentheses और spaces allowed हैं और strip हो जाते हैं (+91 98765 43210, (+91)-98765-43210, 9876543210 सब pass)। Email एक basic email pattern से match होना चाहिए (save पर lower-cased)। PEN, ABC ID, APAAR ID जैसे supplied वैसे store — ये Indian state boards और NEP 2020 framework द्वारा tracked हैं, और आपके school से expected है कि central registry जो भी value assign करे उसे maintain करे।
Duplicates आपके existing student list के against check होते हैं — studentId, admissionNumber, और aadhaarNumber per organisation unique हैं। अगर CSV row एक existing student से match होती है, तो row एक clear duplicate error के साथ reject होती है जो बताती है कि कौन सी field collide हुई। Existing students कभी silently overwritten नहीं होते।
Photo auto-download — कभी 320 photos एक-एक करके upload मत कीजिए
ज़्यादातर Indian admission portals (state board portals, आपका existing admission CRM, Google Forms) photos URLs के रूप में collect करते हैं — parent एक photo upload करता है और system उसे point करने वाला public URL store कर लेता है। ज़्यादातर school ERPs इसको ignore करते हैं और आपको force करते हैं कि हर photo manually download करके फिर से upload करें।
Inkwelly photos automatic handle करता है। अपने Profile या Parent CSV में एक profilePhotoUrl column add कीजिए, हर row के लिए public photo URL के साथ। Download Photos tick कीजिए (by default on)। जब import run होता है, Inkwelly हर photo download करता है (max 5MB), school की media library में sensible filename के साथ upload करता है (student-photos/<studentId>-<name>.jpg), और resulting media ID को student की profile photo field से attach करता है। 320 admissions, 320 photos, zero clicks — वो instantly student list पर, ID cards पर, parent app profile screen पर appear हो जाती हैं। जो URLs download fail होते हैं (404, broken image, oversized) उन्हें per-row results में log किया जाता है — आप उन्हें fix करके सिर्फ उन्हीं rows को re-import कर सकते हैं।
Per-row results — partial success default है, exception नहीं
ज़्यादातर school ERPs में bulk operations का nightmare यही है: एक row का Aadhaar malformed है और पूरा import roll back हो जाता है, आपको force करता है कि एक-एक row को fix करके scratch से re-run करें। Inkwelly ऐसे काम नहीं करता।
हर row atomically process होती है — success या failure independently। Results dialog दिखाता है: 312 students successfully imported, 8 rows failed specific errors के साथ ('Aadhaar must be 12 digits' row 47 पर, 'studentId already exists for another student' row 113 पर, 'Email format invalid' row 281 पर)। 312 successful imports save हो जाते हैं। 8 failures आपकी CSV में fixing के लिए रहती हैं — सिर्फ corrected rows re-upload कीजिए या पूरी file fix करके re-upload (duplicates skip होते हैं, इसलिए re-running safe है)। एक downloadable Error Report CSV हर failed row को उसके original data और specific validation messages के साथ list करती है — आप उसे directly अपने office की working sheet में paste करके in-place fix कर सकते हैं। Audit log हर successful import को user, timestamp, IP address, और source ('Bulk Import Students') के साथ capture करता है।
“March admission ke baad humare paas 280 students ka data Excel mein tha। Pehle ek-ek karke daalte the — 4 din lagte the। Ab CSV se import kiya — Profile, Address, Parent, Academic, sab 4 minute mein ho gaya। Photos bhi automatic download ho gaye। 1 April ko session start kiya, sab kuch ready tha।”
पाँच real office routines जो ये 5-minute task बना देता है
पाँच routine school office operations जो traditionally days लेते हैं, एक single CSV upload में compress हो जाते हैं:
1. New session onboarding (March–April) — पूरे साल में admit किए गए 320 students, अभी भी आपके office की Excel sheet में बैठे हैं। Bulk import के बिना: profile typing के 21 hours, plus addresses के 12 hours, plus parents के 14 hours, plus academic placements के 6 hours — कुल 53 office-hours। Inkwelly bulk import के साथ: 4 templates download कीजिए, अपनी Excel data हर एक में paste कीजिए, drag-drop, dry-run, 8 invalid rows fix कीजिए, real में run। Total 90 minutes से कम।
2. Mid-year transfer-in admissions — 12 students mid-session में दूसरे schools से transfer हो रहे हैं। उनकी Transfer Certificates में सब data है (name, DOB, board, parents)। Office assistant 12 rows profile template में, 12 parent template में, 12 address template में paste करता है, तीनों imports एक साथ run करता है। 15 minutes में 12 mid-year admissions, parent app activation सहित।
3. Sister-school onboarding (multi-branch trusts) — आपका trust एक नई branch open करता है जिसमें 180 students मौजूदा school से transfer हो रहे हैं। पुराने school के Inkwelly tenant से students को export कीजिए (CSV), columns को नए school के class names से match करने के लिए tweak कीजिए, नए tenant में import कीजिए। पूरी branch onboarding आधे दिन में।
4. Aadhaar / APAAR / ABC ID backfill — NEP 2020 APAAR ID requirement mid-year में आ गया। आपका office ने जाकर 1,200 existing students के ABC IDs collect किए। Bulk import के बिना: हर profile खोलिए, ABC ID paste, save — 1,200 separate operations। Bulk import के साथ: एक academic-tab CSV studentId + abcId columns के साथ, dry-run, run। 20 minutes में 1,200 ID backfills।
5. RTE 25% admission compliance (May) — RTE के तहत admit किए गए 25 students जिनकी isRTEStudent flag को District Education Officer की EWS certificate verification के बाद true set करनी है। Profile import studentId + isRTEStudent: true के साथ 25 rows के लिए। पूरी RTE cohort 5 minutes से कम में।
Common bulk import scenarios — हर Indian school हर साल चलाता है
- New session onboarding (March–April) — पूरी admission round को एक batch में अपने office की मौजूदा Excel sheet से import कीजिए।
- Mid-year transfer-in admissions (कोई भी महीना) — दूसरे schools से transfer हो रहे students को उनकी Transfer Certificate data के साथ onboard कीजिए।
- Sister-school migration (multi-branch trusts) — student records एक Inkwelly tenant से दूसरे में export → CSV → import के via move कीजिए।
- Migration from competitor ERPs — Fedena, Entab, SchoolMint, campus-style ERPs, या custom in-house systems सब CSV में export करते हैं। Import उनको Inkwelly में photos और parent records के साथ ले आता है।
- Migration from Excel-only schools — ज़्यादातर Tier-2 / Tier-3 schools अभी भी Excel पर चलते हैं। Bulk import bridge है — आपके office की मौजूदा Excel एक upload में database बन जाती है।
- APAAR ID + ABC ID backfill (NEP 2020 compliance) — central-registry identifiers existing students के across backfill कीजिए जब आपका office उन्हें collect कर ले।
- Aadhaar cleanup audits — आपका compliance dashboard 47 students दिखाता है जिनके Aadhaar numbers missing या malformed हैं; parent campaign के via collect, CSV में fix, re-import।
- RTE 25% reservation tagging (May–June) — District Education Officer EWS verification के बाद 25% reserved-category students को flag कीजिए।
- Multi-address data ingestion — वो students जिनके families एक permanent address अपने home village में और एक current address school hostel के पास maintain करते हैं।
- Multi-parent data ingestion — दोनों father और mother, plus एक guardian uncle, plus एक paying-parent grandparent, सब same student से linked।
- Class-by-class onboarding for new branches — हर grade का class teacher अपनी CSV fill करता है; उनको tab by tab import कीजिए जैसे-जैसे हर cohort ready हो।
- Photo bulk-attachment — आपके school के photographer 800 ID-card photos public URLs वाले Google Drive folder के रूप में deliver करते हैं; CSV
studentId+profilePhotoUrlके साथ attachment एक go में run करता है। - Annual photo refresh — अगले academic year की photos hosting service पर upload और import के via bulk-attached।
Bulk CSV import live, अपने school की data पर 30 minutes में
अपने office से Excel sheet या CSV लाइए — messy भी चलेगी। Demo में हम आपका school setup करेंगे, real bulk import आपकी real data पर run करेंगे, और दिखाएंगे कि अगले साल की March onboarding कितने minutes में हो जाएगी।
Limits, safety, और छोटी-छोटी बातें
File size: 10MB max per CSV। एक upload में ~25,000 student profile rows के लिए sufficient — किसी भी Indian school के एक year में admit करने से कहीं ज़्यादा। अगर आपका import genuinely larger है (large multi-branch trust migration), दो CSVs में split कीजिए और sequentially run कीजिए। दोनों runs independent atomic batches हैं अपने अपने results के साथ।
Photo size: 5MB max per file। Photo download service content-type को image के रूप में validate करता है और oversized files को clear per-row error के साथ reject करता है। जो photos download fail होती हैं वो row को block नहीं करतीं — student profile अभी भी create होती है, बस photo के बिना। Failing rows को URL या photo size fix करके re-import कीजिए।
Required headers per tab। Profiles को studentId, admissionNumber, firstName, dateOfBirth, gender चाहिए। Addresses को studentId, addressType, addressLine1, city, state, country, postalCode। Parents को studentId, relationshipType, firstName, lastName, mobile। Academics को studentId, classId, rollNumber। Missing required headers की वजह से import रुक जाता है — Results dialog में missing columns की clear list दिखती है। Optional columns किसी भी order में add हो सकते हैं — Inkwelly header name से match करता है।
Per-row atomicity। हर row अपनी database transaction के रूप में process होती है। एक row पर validation failures कभी दूसरी rows को block नहीं करतीं। 312-of-320 success outcome norm है — partial-success rows हर successfully-applied field को preserve करती हैं; failed rows आपकी CSV में editable रहती हैं।
Duplicate detection। studentId, admissionNumber, और aadhaarNumber per organisation unique हैं। अगर एक CSV row इनमें से किसी पर भी existing student से match होती है, तो row एक duplicate error के साथ reject होती है जो colliding field को point करता है। Existing students कभी silently overwritten नहीं होते — existing students को update करने के लिए, Bulk Update Students use कीजिए, Bulk Import नहीं।
Auto-User creation। हर successfully-imported student profile automatically उसी database transaction में matching User और UserProfile rows create करती है। Student की parent app login पहले दिन से काम करती है — कोई separate user-provisioning step नहीं।
Audit log। हर successful import row school के audit log में user, timestamp, IP address, और source ('Bulk Import Students') के साथ लिखती है। Audit log school admin panel से exportable है। अगर गलती से एक wrong CSV upload हो जाए, audit log बताता है कि कौन सी rows landed और आप उन्हें soft-delete कर सकते हैं (Student Information में 90-day restore window)।
Multi-tenant isolation। हर CSV upload सिर्फ आपके school तक scoped है। Multi-branch trusts per-school bulk imports independently run करते हैं — कोई cross-tenant access नहीं, गलत school के records में import का कोई risk नहीं। School का session context हर imported row से auto-attached है।
Role-based access। Bulk import by default school admin और principal roles तक gated है। Class teachers और दूसरे staff को अपने navigation में import tab नहीं दिखता। Per-role permissions अपने school की IAM settings से configure कीजिए।
Excel format नहीं। Inkwelly सिर्फ CSV (.csv) accept करता है। Excel .xlsx और .xls files upload पर reject होती हैं — पहले CSV में convert कीजिए (Excel: File → Save As → CSV UTF-8)। ये intentional है — CSV plain-text है, deterministic है, और UTF-8 BOM के साथ save करने पर Indian regional script (Devanagari, Tamil, Telugu, Kannada) preserve करती है, जबकि Excel format silent encoding bugs introduce करती है जो non-Latin names को corrupt कर देती हैं।
किस मॉड्यूल का हिस्सा
1 moduleअक्सर पूछे गए सवाल
10 सवालInkwelly कौन सा CSV format चाहता है?
Plain CSV — `.csv` file with comma-separated values, UTF-8 encoded (UTF-8 BOM recommended अगर आपकी CSV में Devanagari, Tamil, Telugu, Kannada या कोई non-Latin script है)। Excel `.xlsx` और `.xls` files accept नहीं हैं — Excel silent encoding bugs introduce करता है जो non-English names को corrupt करते हैं। Convert करने के लिए: File → Save As → CSV UTF-8। Header row required है और column names downloaded template से match होने चाहिए (header order से कोई फर्क नहीं — Inkwelly name से match करता है)।
CSV कितनी बड़ी हो सकती है?
10MB max per file, जो लगभग 25,000 student profile rows fit करता है। Larger migrations (multi-branch trusts 50,000+ students) के लिए, multiple CSVs में split कीजिए और sequentially run — हर run अपना atomic batch है अपने per-row results के साथ। 10MB limit CSV file के लिए है; downloaded photos separately 5MB per photo पर capped हैं।
क्या मैं actually records create करने से पहले import dry-run कर सकता हूँ?
हाँ — Dry Run checkbox हर tab पर है। Tick कीजिए, 'Validate Data' click कीजिए, और Inkwelly पूरी pipeline (parsing, header check, per-row validation, duplicate detection) run करता है बिना एक row भी write किए। Results dialog दिखाता है valid count, invalid count specific per-row errors के साथ, और processing time। Invalid rows को CSV में fix कीजिए, re-validate, 0 invalid पर पहुँचने पर Dry Run untick करके real में run कीजिए। Actual import एक formality बन जाता है।
जब एक row validation में fail हो जाती है — क्या पूरा import roll back हो जाता है?
नहीं। हर row atomically process होती है — success और failure independent हैं। अगर 320 में से 312 valid हैं और 8 में errors हैं, 312 save हो जाती हैं और 8 specific error messages के साथ report होती हैं ('Aadhaar must be 12 digits', 'studentId already exists', 'Email format invalid')। एक downloadable Error Report CSV हर failed row को उसके original data और validation messages के साथ list करती है — अपने office की working sheet में fix कीजिए और सिर्फ corrected rows re-upload कीजिए। कोई all-or-nothing rollback नहीं, कोई churn नहीं।
क्या system CSV में दिए URLs से student photos download कर सकता है?
हाँ — Profile और Parent imports के लिए। एक `profilePhotoUrl` column add कीजिए public HTTP/HTTPS URLs के साथ (max 5MB per photo)। 'Download Photos' checkbox by default on है। Inkwelly हर photo download करता है, school की media library में sensible filename के साथ upload करता है, और student/parent profile से same import run में attach करता है। जो URLs fail होते हैं (404, broken image, oversized) वो per-row results में log होते हैं — fix करके सिर्फ उन rows को re-import कीजिए। Photos student lists पर, ID cards पर, और parent app पर तुरंत दिखती हैं।
अगर studentId, admissionNumber या Aadhaar पहले से database में exist करता है तो क्या होगा?
Row एक duplicate error के साथ reject होती है जो colliding field को point करता है — `studentId`, `admissionNumber`, और `aadhaarNumber` per organisation unique हैं। Existing students कभी silently bulk import से overwritten नहीं होते। Existing students update करने के लिए [Bulk Update Students](/hi/features/bulk-update-students) use कीजिए — वो feature existing records edit करने के लिए designed है और save से पहले previous values दिखाता है।
क्या import Indian date formats handle करता है?
DD/MM/YYYY (Indian convention — e.g., 15/03/2010) और YYYY-MM-DD (ISO format — e.g., 2010-03-15) दोनों out of the box work करते हैं। Validator हर format को parse करता है और internally ISO में normalise करता है। US-style MM/DD/YYYY को intentionally reject किया गया है ambiguous parsing prevent करने के लिए — Aadhaar PDFs, transfer certificates, और Indian state board exports सब DD/MM/YYYY या YYYY-MM-DD में हैं, इसलिए ये उससे match होता है जो आपके office के पास actually है।
क्या मैं addresses और parents को profiles के same upload में import कर सकता हूँ?
वो separate tabs हैं — Profiles, Addresses, Parents, Academics — क्योंकि student data की cardinality अलग है। एक student → एक profile, लेकिन एक student → multiple addresses (permanent + current + correspondence), multiple parents/guardians, और per-year academic placements। Imports order में run कीजिए: पहले Profiles (जो student records create करता है), फिर Addresses, Parents और Academics (जो existing students से `studentId` के via link होते हैं)। चारों single 10-minute session में हो सकते हैं।
क्या import के दौरान parent's data किसी third-party service को भेजी जाती है?
नहीं। CSV parsing पूरी तरह Inkwelly के Mumbai region servers पर run होती है — आपके students का Aadhaar, mobile और personal data कभी India से बाहर नहीं जाता। CSV files memory में parse होती हैं और import के बाद discard हो जाती हैं (हम सिर्फ structured database records रखते हैं, raw file कभी नहीं)। Photo downloads image content-type के रूप में validate होते हैं और 5MB पर capped हैं। DPDP Act 2023 के compliant।
अगर मैं same CSV को re-import करूँ तो existing students का क्या होगा?
Re-importing safe है — `studentId`, `admissionNumber`, और `aadhaarNumber` पर duplicate detection rows को reject करती है जो existing students से match होती हैं। Same CSV को re-uploading zero new records produce करती है और हर row पर 'duplicate' message आता है। Existing students को intentionally update करने के लिए, [Bulk Update Students](/hi/features/bulk-update-students) use कीजिए, जो editing के लिए designed है — Bulk Import सिर्फ creating के लिए है।
आपको ये भी पसंद आ सकता है
2 लेखInkwelly आपके स्कूल पर — खुद देखें
30 मिनट का डेमो। आपके मौजूदा ERP को आपके साथ खोलकर, कॉल पर ही आपका डेटा Inkwelly में लोड करते हैं। कॉल ख़त्म होते-होते एक तय तारीख़ का गो-लाइव प्लान आपके हाथ में।